Every system administrator has to deal with text files as part of his daily responsibilities, which include editing existing files (most likely configuration files), or creating new ones.
It has been said that if you want to start a holy war in the Linux world, you can ask sysadmins what their favorite text editor is and why.
We are not going to do that in this article but will present a few tips that will be helpful to use two of the most widely used text editors : nano (due to its simplicity and easiness of use, especially to new users), and vim/vi (due to the several features that convert it into more than a simple editor).
I am sure that you can find many more reasons to use one or the other, or perhaps some other text editors such as emacs or pico. It’s entirely up to you.
Editing Files with Nano Editor
To launch nano, you can either just type nano at the command prompt, optionally followed by a filename (in this case, if the file exists, it will be opened in edition mode).
If the file does not exist, or if we omit the filename, nano will also be opened in edition mode but will present a blank screen for us to start typing:
nano test

As you can see in the previous image, nano displays at the bottom of the screen several functions that are available via the indicated shortcuts (^, aka caret, indicates the Ctrl key).
To name a few of them:
Ctrl + G: brings up the help menu with a complete list of functions and descriptions.Ctrl + X: exits the current file. If changes have not been saved, they are discarded.Ctrl + R: lets you choose a file to insert its contents into the present file by specifying a full path.

Ctrl + O: saves changes made to a file. It will let you save the file with the same name or a different one. Then press Enter to confirm.

Ctrl + X: exits the current file. If changes have not been saved, they are discarded.Ctrl + R: lets you choose a file to insert its contents into the present file by specifying a full path.
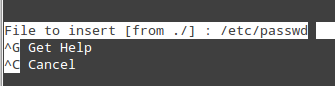
will insert the contents of /etc/passwd into the current file.
Ctrl + K: cuts the current line.Ctrl + U: paste.Ctrl + C: cancels the current operation and places you on the previous screen.
To easily navigate the opened file, nano provides the following features:
Ctrl + F and Ctrl + Bmove the cursor forward or backward, whereasCtrl + PandCtrl + Nmove it up or down one line at a time, respectively, just like the arrow keys.Ctrl + space and Alt + spacemove the cursor forward and backward one word at a time.
Finally,
Ctrl + _ (underscore)and then entering X,Y will take you precisely to Line X, column Y, if you want to place the cursor at a specific place in the document.

The example above will take you to line 15, column 14 in the current document.
If you can recall your early Linux days, especially if you came from Windows, you will probably agree that starting off with nano is the best way to go for a new user.
Editing Files with Vim Editor
Vim is an improved version of vi, a famous text editor in Linux that is available on all POSIX-compliant *nix systems, such as RHEL. If you have the chance and can install vim, go ahead; if not, most (if not all) of the tips given in this article should also work.
One of Vim’s distinguishing features is the different modes in which it operates:
Vi Command Mode
Command Mode will allow you to browse through the file and enter commands, which are brief and case-sensitive combinations of one or more letters.
If you need to repeat one of them a certain number of times, you can prefix it with a number (there are only a few exceptions to this rule).
For example, yy (or Y, short for yank) copies the entire current line, whereas 4yy (or 4Y) copies the entire current line along with the next three lines (4 lines in total).
Vi Ex Mode
In ex mode, you can manipulate files (including saving a current file and running outside programs or commands). To enter ex mode, we must type a colon (:) starting from command mode (or in other words, Esc + :), directly followed by the name of the ex-mode command that you want to use.
Vi Insert Mode
In insert mode, which is accessed by typing the letter i, we simply enter text. Most keystrokes result in text appearing on the screen.
We can always enter command mode (regardless of the mode we’re working on) by pressing the Esc key.
Let’s see how we can perform the same operations that we outlined for nano in the previous section, but now with vim. Don’t forget to hit the Enter key to confirm the vim command!
To access Vim’s full manual from the command line, type :help while in command mode and then press Enter:
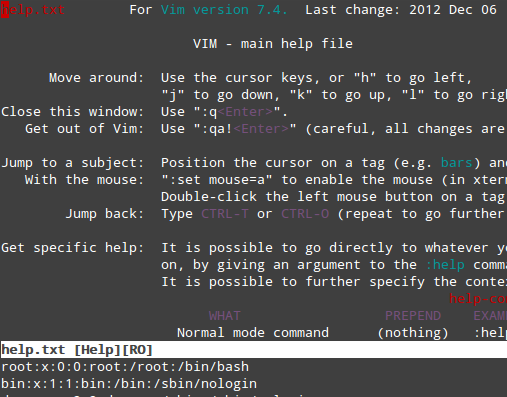
The upper section presents an index list of contents, with defined sections dedicated to specific topics about vim. To navigate to a section, place the cursor over it and press Ctrl + ] (closing square bracket). Note that the bottom section displays the current file.
1. To save changes made to a file, run any of the following commands from command mode and it will do the trick:
:wq!
:x!
ZZ (yes, double Z without the colon at the beginning)
2. To exit discarding changes, use :q!. This command will also allow you to exit the help menu described above, and return to the current file in command mode.
3. Cut N number of lines: type Ndd while in command mode.
4. Copy M number of lines: type Myy while in command mode.
5. Paste lines that were previously cut or copied: press the P key while in command mode.
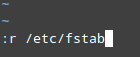
6. To insert the contents of another file into the current one:
:r filename
For example, to insert the contents of /etc/fstab, do:
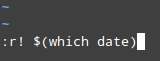
7. To insert the output of a command into the current document:
:r! command
For example, insert the date and time in the line below the current position of the cursor:
In another article that I wrote for, (Part 2 of the LFCS series), I explained in greater detail the keyboard shortcuts and functions available in vim. You may want to refer to that tutorial for further examples of how to use this powerful text editor.
Analyzing Text with Grep and Regular Expressions
By now you have learned how to create and edit files using nano or vim. Say you become a text editor ninja, so to speak – now what? Among other things, you will also need how to search for regular expressions inside text.
A regular expression (also known as “regex” or “regexp“) is a way of identifying a text string or pattern so that a program can compare the pattern against arbitrary text strings.
Although the use of regular expressions along with grep command would deserve an entire article on its own, let us review the basics here:
1. The simplest regular expression is an alphanumeric string (i.e., the word “svm”) or two (when two are present, you can use the | (OR) operator):
grep -Ei 'svm|vmx' /proc/cpuinfo
The presence of either of those two strings indicates that your processor supports virtualization:

2. A second kind of a regular expression is a range list, enclosed between square brackets.
For example, c[aeiou]t matches the strings cat, cet, cit, cot, and cut, whereas [a-z] and [0-9] match any lowercase letter or decimal digit, respectively.
If you want to repeat the regular expression X certain number of times, type {X} immediately following the regexp.
For example, let’s extract the UUIDs of storage devices from /etc/fstab:
grep -Ei '[0-9a-f]{8}-([0-9a-f]{4}-){3}[0-9a-f]{12}' -o /etc/fstab

The first expression in brackets [0-9a-f] is used to denote lowercase hexadecimal characters, and {8} is a quantifier that indicates the number of times that the preceding match should be repeated (the first sequence of characters in a UUID is an 8-character long hexadecimal string).
The parentheses, the {4} quantifier, and the hyphen indicate that the next sequence is a 4-character long hexadecimal string and the quantifier that follows ({3}) denote that the expression should be repeated 3 times.
Finally, the last sequence of 12-character long hexadecimal string in the UUID is retrieved with [0-9a-f]{12}, and the -o option prints only the matched (non-empty) parts of the matching line in /etc/fstab.
3. POSIX character classes.
| Character Class | Matches… |
| [[:alnum:]] | Any alphanumeric [a-zA-Z0-9] character |
| [[:alpha:]] | Any alphabetic [a-zA-Z] character |
| [[:blank:]] | Spaces or tabs |
| [[:cntrl:]] | Any control characters (ASCII 0 to 32) |
| [[:digit:]] | Any numeric digits [0-9] |
| [[:graph:]] | Any visible characters |
| [[:lower:]] | Any lowercase [a-z] character |
| [[:print:]] | Any non-control characters |
| [[:space:]] | Any whitespace |
| [[:punct:]] | Any punctuation marks |
| [[:upper:]] | Any uppercase [A-Z] character |
| [[:xdigit:]] | Any hex digits [0-9a-fA-F] |
| [:word:] | Any letters, numbers, and underscores [a-zA-Z0-9_] |
For example, we may be interested in finding out what the used UIDs and GIDs (refer to Part 3 of this series to refresh your memory) are for real users that have been added to our system. Thus, we will search for sequences of 4 digits in /etc/passwd:
grep -Ei [[:digit:]]{4} /etc/passwd

The above example may not be the best case for the use of regular expressions in the real world, but it clearly illustrates how to use POSIX character classes to analyze text along with grep.
Conclusion
In this article we have provided some tips to make the most of nano and vim, two text editors for the command-line users.
Both tools are supported by extensive documentation, which you can consult on their respective official websites and using the suggestions given in Part 2 of this series.
For comprehensive RHCSA exam preparation, we have created a comprehensive ebook titled ‘RHCSA Exam Study Guide‘, covering all the objectives with practical examples.


Thanks for contacting your team, I am the root user I set the file password via vim eg: 123, i forget the password i try to open the file it’s coming to encrypted method, at the time i just try to add the content it was attend, then save my file.
Again i try to open the file via the correct password it was open but it’s was coming to encrypted. My data was lose, How to recover my data via vim…!
Thanks for the Nice explanations.
For vim editor, here is the nice interactive tutorial http://www.openvim.com/tutorial.html