There are mainly two reasons for scanning a computer hard disk: one is to examine it for filesystem inconsistencies or errors that can result from persistent system crashes, improper closure of critical system software, and more significantly destructive programs (such as malware, viruses, etc.).
Another is to analyze its physical condition, where we can check a hard disk for bad sectors resulting from physical damage on the disk surface or a failed memory transistor.
In this article, we will review a mix of GUI and terminal-based disk scanning utilities for Linux.
In case you notice any unusual behavior from a computer hard disk or a particular partition, one of the first things you can always investigate is filesystem inconsistency or errors and there is no other better utility for performing this other than fsck.
1. fsck – Filesystem Consistency Check
Fsck is a system utility that checks and optionally repairs a Linux filesystem, serving as a front-end for various filesystem checkers.
Warning: Try out fsck commands on test Linux servers only, unless you know what you’re doing.
Always unmount a partition first before you can run fsck on it.
$ sudo unmount /dev/sdc1
$ sudo fsck -Vt vfat /dev/sdc1
In the command below, the switch:
-t– specifies the filesystem type.-V– enables verbose mode.
You can find detailed usage instructions in the fsck man page:
$ man fsck
Once you have performed filesystem inconsistency tests, you proceed to carry out physical condition assessments.
2. badblock
Badblocks scans for bad blocks or sectors on hard disks, and when detected, it can be used in conjunction with fsck or e2fsck to instruct the kernel to avoid these faulty areas.
To use badblocks, you will need to specify the device file for the hard drive that you want to scan.
# badblocks /dev/sda
badblocks will write a pattern to each block on the hard drive and then read it back to verify that the data is correct. If any errors are detected, the block will be marked as bad.
Once the scan is complete, you can use the -r option to read the results of the scan that contains a list of all the bad blocks that were found.
# badblocks -r badblocks.txt
3. S.M.A.R.T System Utilities
S.M.A.R.T (Self-Monitoring, Analysis and Reporting Technology) is a system built into nearly all modern ATA/SATA and SCSI/SAS hard disks as well as solid-state disks.
It collects in-depth information about a supported hard disk and you can get that data using the utilities below.
1. Smartctl
smartctl is one of the two utilities under the smartmontools package, which is a command line utility that controls and monitors the S.M.A.R.T system.
To install smartmontools package, run the applicable command below for your distro:
$ sudo apt-get install smartmontools   #Debian/Ubuntu systems
$ sudo yum install smartmontools       #RHEL/CentOS systems
The following is an example of a smartctl command for reporting hard disk partition health where the option -H helps to show the general partition health condition after a self-test:
$ sudo smartctl -H /dev/sda6
Look through the smartctl man page for more usage guidelines:
$ man smartctl
There is a GUI front-end for smartctl called gsmartcontrol which can be installed as follows:
$ sudo apt-get install gsmartcontrol  #Debian/Ubuntu systems
$ sudo yum install gsmartcontrol       #RHEL/CentOS systems
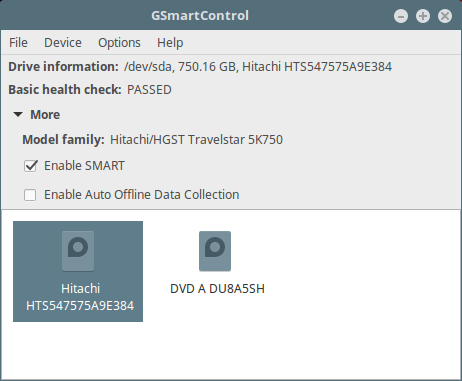
2. Gnome Disk Utility (or Disks)
Gnome Disk utility offers a GUI for doing all the partition management-related tasks such as creating, deleting, mounting partitions, and beyond. It comes pre-installed in the majority of mainstream Linux systems such as Ubuntu, Fedora, Linux Mint, and others.
To use it on Ubuntu, open the Dash and search for Disks, on Linux Mint, open Menu and search for Disks and on Fedora, click on Activities type Disks.
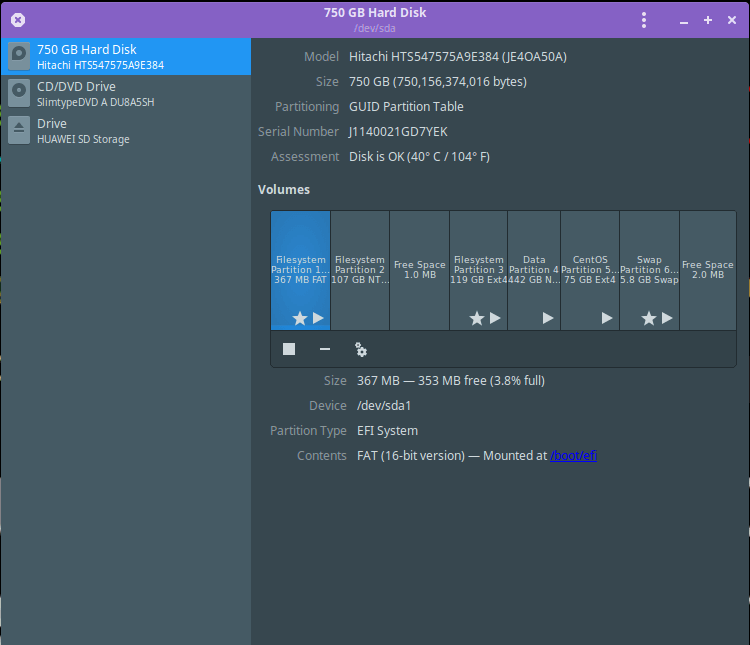
More importantly, it can also provide S.M.A.R.T data and effect self-tests as in the following interface.

That’s it! In this article, we reviewed hard disk scanning utilities for the Linux operating system. You can share with us any utilities/tools for the same purpose, that are not mentioned in the list above or ask any related questions in the comments.






Aaron, I now have peace of mind on my 4TB Seagate Disk, now I have GSmartControl Many Thanks + Total Respect to you, you are now DEFINITELY Bookmarked.
I recommend parted and its GUI brother gparted. if you have to get really desperate there is always fdisk…
This contributes even to updating knowledge about classical maintenance tools of Linux. Perhaps something about the maintenance of keymaps and keyboards. I think that many people use more than one language and this introduces difficulties with the output of some keys. Helps on these problems will be welcomed…
Hi,
Very Nice and Useful Material
@Jalal
Thanks for the kind words of appreciation and for always following us.