Canonical finally announced the availability of Ubuntu 20.04, the new release came with many updated packages and programs which is very good for people who are looking for the most updated packages.
In this article, we’re going to explain some of the key things you need to do after installing Ubuntu 20.04, to get you started with using Focal Fossa.
First, you may like to view our tutorial about upgrading or installing Ubuntu 20.04 on your machine.
- How To Install Ubuntu 20.04 Desktop
- How to Install Ubuntu 20.04 Server
- How to Upgrade to Ubuntu 20.04 from Ubuntu 18.04 & 19.10
Things to Do After Installing Ubuntu 20.04
Follow these quick tips to do after installing Ubuntu 20.04.
1. Check and Install Package Updates
The first step is to check and install updates to keep your computer’s software up to date. This is the single most important task you need to do to protect your system.
To install updates, open the Update Manager by pressing ‘Alt+F2’, then enter ‘update-manager’ and hit Enter.
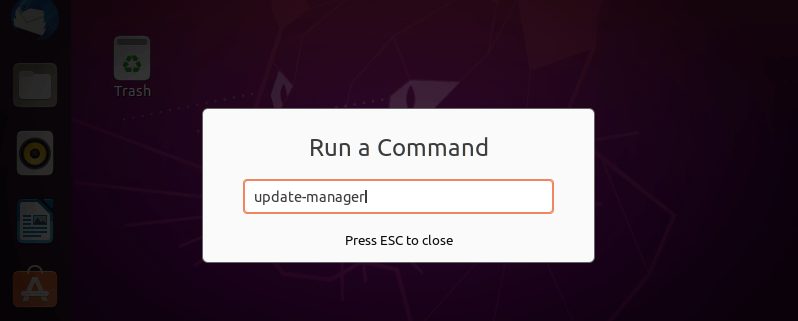
After the Update Manager opens up, if there are updates to be installed, you can review and select pending updates and also check for new updates. Click the ‘Install Updates’ button to upgrade the selected packages, you will be prompted to enter your password, provide it to proceed.

Alternatively, open a terminal window and simply run the following commands.
$ sudo apt-get update && sudo apt-get dist-upgrade
Note that Ubuntu will keep notifying you for security updates and non-security updates on a daily and weekly basis respectively. You can also configure your system to automatically install updates, under the Update Manager.
2. Set Up Livepatch
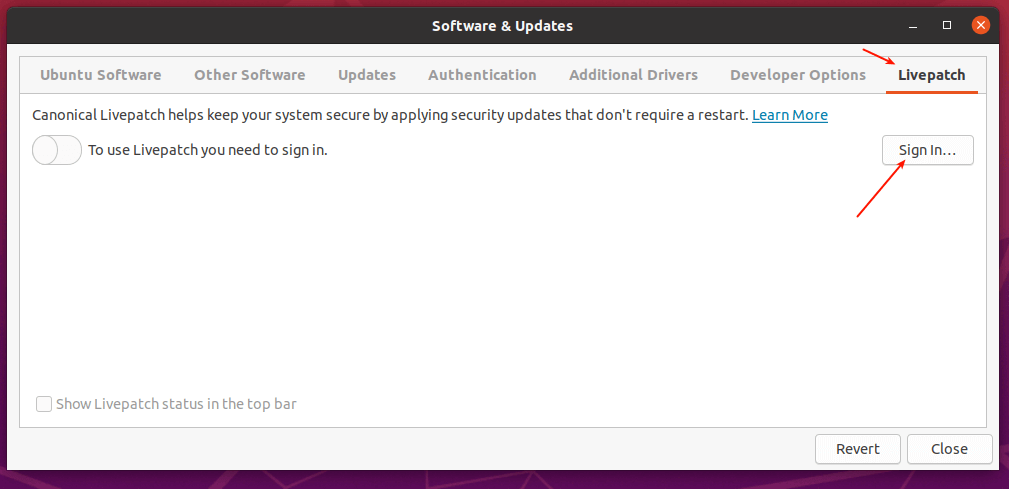
Livepatch (or Canonical Livepatch Service) enables Ubuntu users to apply critical kernel patches without rebooting. This also helps to keep your system secure by applying security updates without a system restart. It is free for personal use with up to 3 machines. To enable it, all you need is an Ubuntu One account.
Go to Activities, search for Livepatch and open it, or simply open Software & Updates and click on the Livepatch tab. If you have an Ubuntu One account, simply Sign in, otherwise create one.
3. Opt-in/Opt-out from Problem Reporting
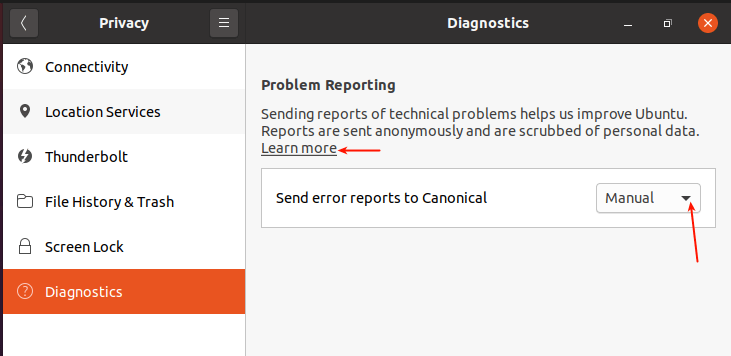
Canonical uses reports of technical problems to help improve Ubuntu. You can choose to send error reports to the Ubuntu developers or not. To edit the settings, click on Activities, search and open Settings, then go to Privacy, then Diagnostics.
By default, sending error reports is configured to be done Manually. You can also choose Never (not to send at all) or Automatic (so that the system keeps sending error reports automatically every time they happen).
To fully understand how the information you share is used, click on Learn more.
4. Sign in to Snap Store
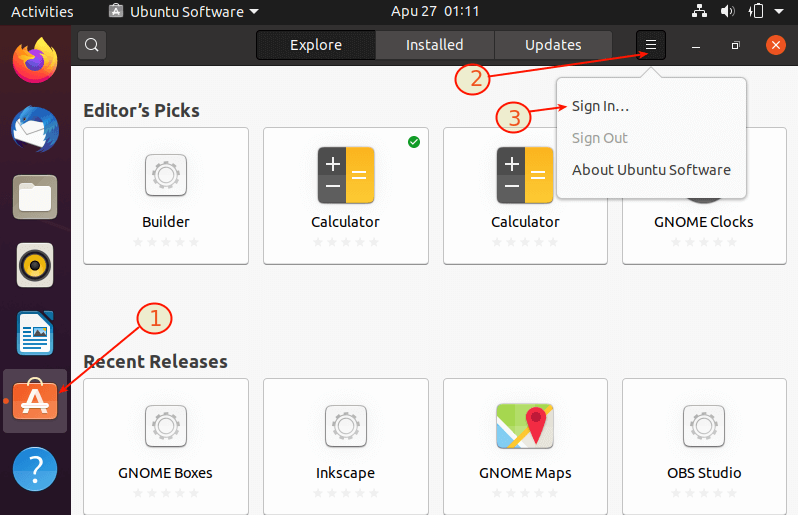
If you have a Snap Store account, you can get access to private snaps, from app developers. Alternatively, use your Ubuntu One account to sign in. But you do not need an account to install public snaps.
To sign into Snap Store, open Ubuntu Software, click on the menu option, then click on Sign in.
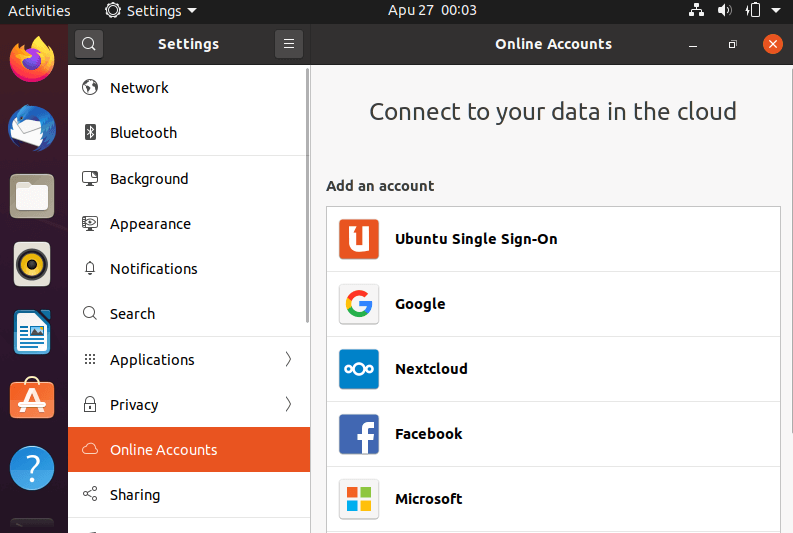
5. Connect to Online Accounts
Next, sign in to your online accounts to enable you to connect to your data in the cloud. Go to Activities, search and open Settings, then click on Online Accounts.
6. Set Up a Mail Client
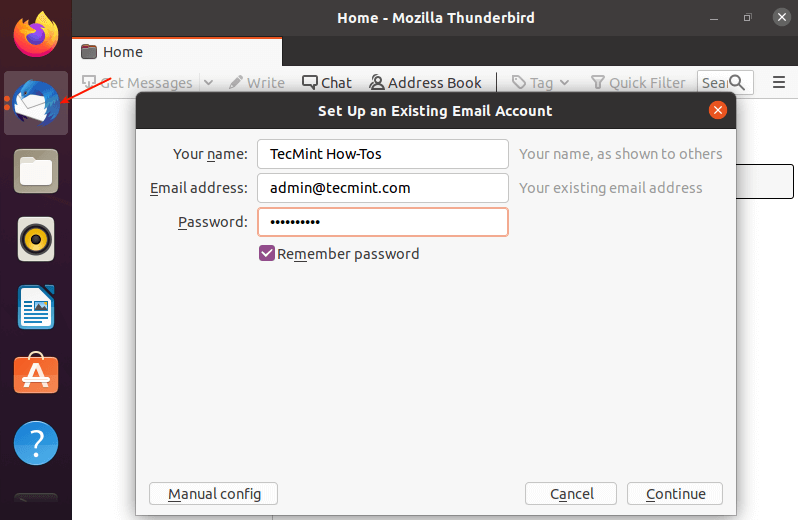
By default, Ubuntu ships with Thunderbird Mail application, which offers cutting edge features such as speed, privacy, and latest technologies.
To open it, click on the Thunderbird icon and set up an existing email account or do a manual configuration as highlighted in the following screenshot.
7. Install Your Favorite Browser
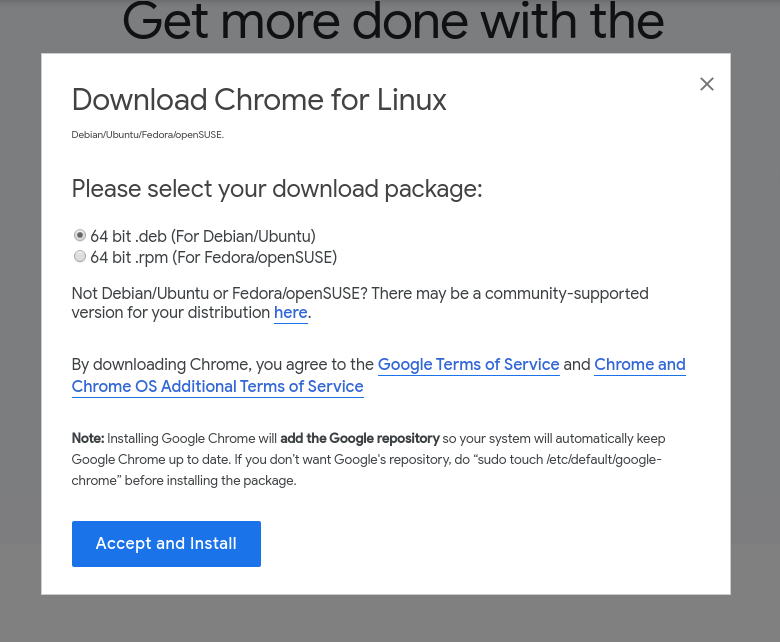
The primary means of surfing the internet is by using a browser. Mozilla Firefox (a lightweight and feature-rich browser) is the default web browser in Ubuntu. However, Ubuntu supports several other browsers including Chromium, Chrome, Opera, Konqueror, and many more.
To install your favorite browser, go to the official browser website, and download the .deb package and install it.
8. Install VLC Media Player
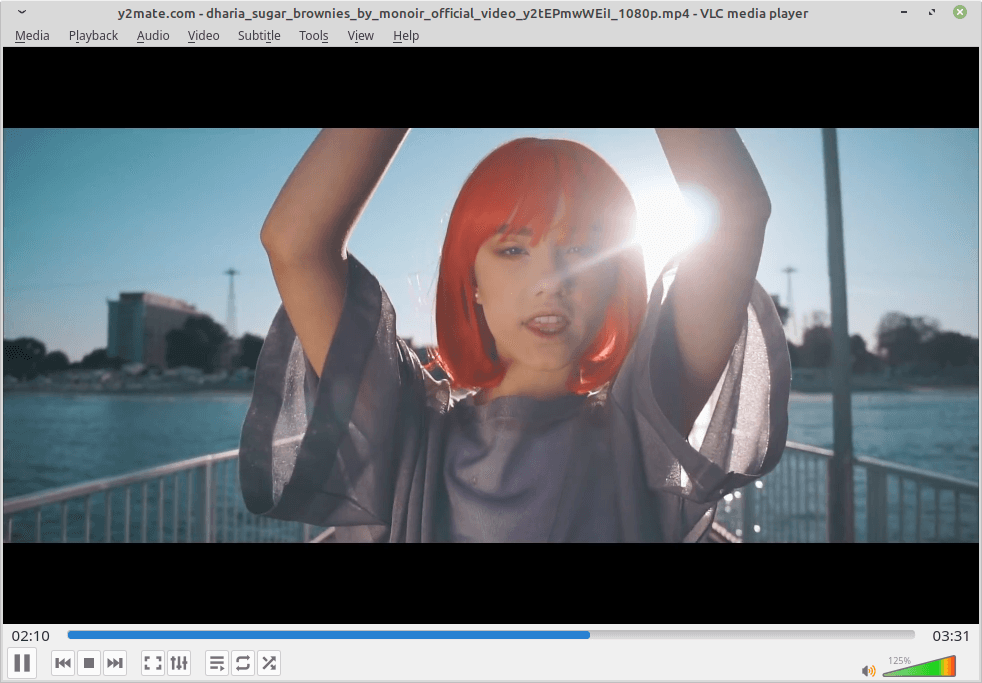
VLC is a simple yet powerful and widely-used multimedia player and framework that plays most if not all multimedia files. It also plays DVDs, Audio CDs, VCDs as well as numerous streaming protocols.
It is distributed as a snapcraft for Ubuntu and many other Linux distributions. To install it, open a terminal window and run the following command.
$ sudo snap install vlc
9. Install Media Codecs
The Ubuntu maintainers want to include only free and open-source software, closed-source packages such as media codecs for common audio and video files such as MP3, AVI, MPEG4, and so on, are not provided by default in a standard installation.
To install them, you need to install the ubuntu-restricted-extras meta-package by running the following command.
$ sudo apt install ubuntu-restricted-extras
10. Install GNOME Tweaks
GNOME Tweaks is a simple graphical interface for advanced GNOME 3 settings. It enables you to easily customize your desktop. Although it is designed for the GNOME Shell, you can use it in other desktops.
$ sudo apt install gnome-tweaks
11. Install Useful GNOME Extensions
The easiest way to add functionality to GNOME is by using extensions that are available on GNOME’s website. There you will find a multitude of extensions you can choose from. To make installing the extensions really easy, simply install the GNOME shell integration as a browser extension and native host connector.
For example, to install the GNOME host connector for Chrome or Firefox, run these commands.
$ sudo apt install chrome-gnome-shell
OR
$ sudo apt install firefox-gnome-shell
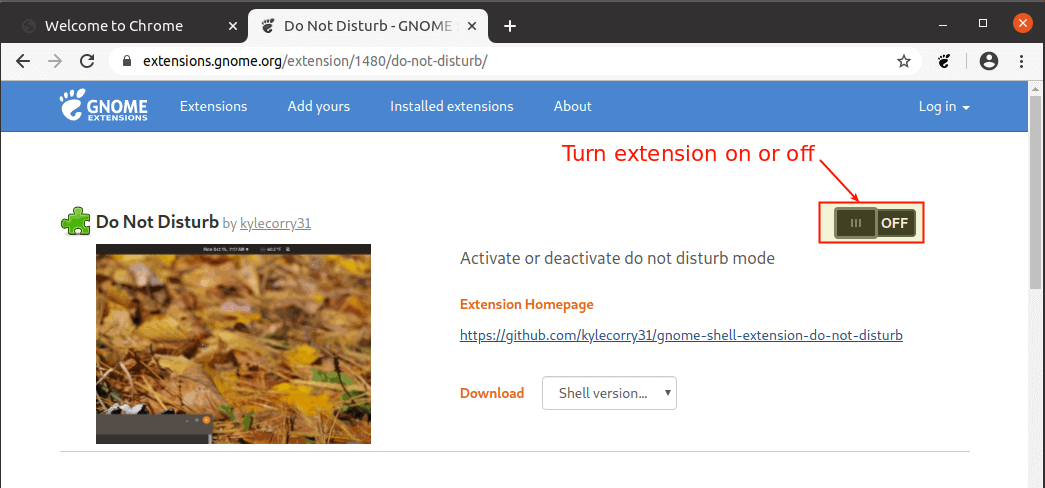
After installing the browser extension, simply open your browser to enable or disable extensions as shown in the following screenshot.
12. Install Additional Archive Utilities
Ubuntu ships with tar, zip and unzip archiving utilities by default. To support different archive files that you can use on Ubuntu, you need to install other additional archiving utilities such as rar, unrar, p7zip-full, and p7zip-rar as shown.
$ sudo apt install rar unrar p7zip-full p7zip-rar
13. Select Default Applications
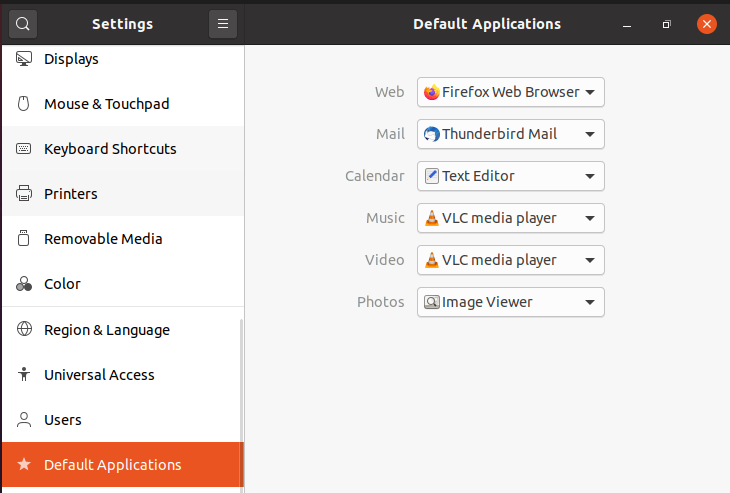
In any desktop operating system, once you double-click a file in the file manager, it will be opened with the default application for that file type. To configure the default applications to open a file type in Ubuntu 20.04, go to Settings, then click Default Applications, and select them from the drop-down menu for each category.
14. Configure Keyboard Shortcuts
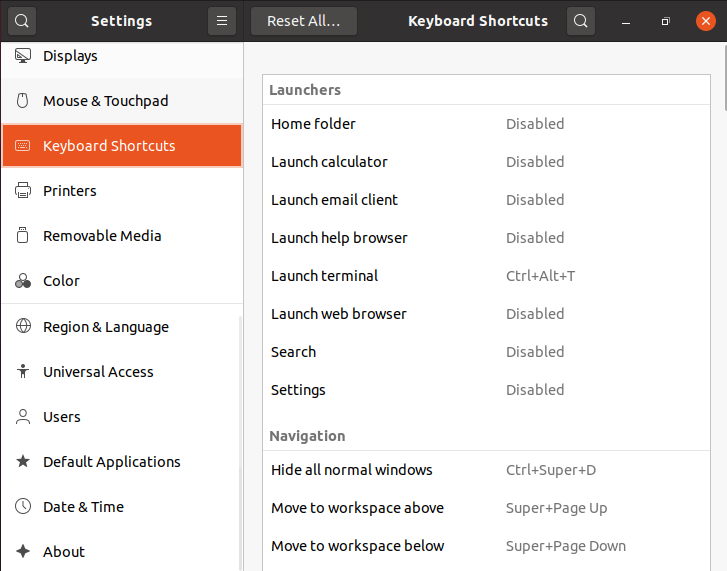
Using keyboard shortcuts can increase your productivity and save you lots of time when using a computer. To set your keyboard shortcuts, under Settings, simply click on Keyboard Shortcuts.
15. Enable GNOME Night Light Mode
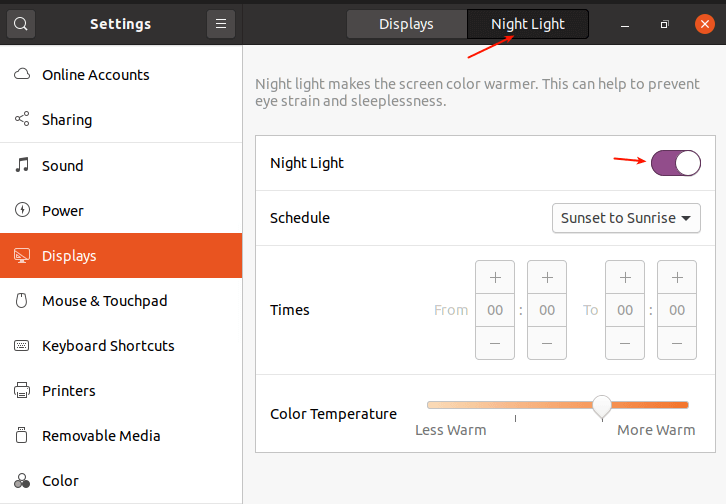
GNOME Night Light mode is a protective display mode that helps to protect your eyes from strain and sleeplessness, by making the screen color warmer. To enable it, go to Settings, then Displays and click on the Night Light tab. You can schedule when to apply it, time, and color temperature.
16. Enable the Canonical Partners Repository
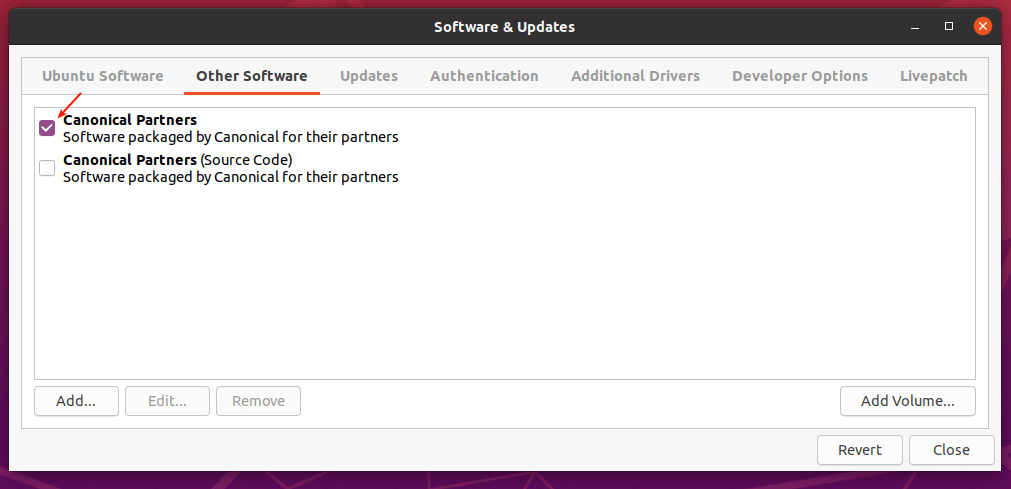
The Canonical Partner repository offers some proprietary applications such as Adobe Flash Plugin, that are closed-source but don’t cost any money to use. To enable it, open Software & Updates, once it launches, click on the Other Software tab.
Then check the first option as highlighted in the following screenshot. You will be prompted to enter your password for authentication, enter it to proceed.
17. Install Wine for Running Windows Apps
If you intend to run Windows applications in Ubuntu 20.04, then you need to install Wine – is an open-source implementation of the Windows API on top of X and POSIX-compliant operating systems, such as Linux, BSD, and macOS. It allows you to integrate and run Windows application cleanly, on Linux desktops by translating Windows API calls into POSIX calls on-the-fly.
To install Wine, run this command.
$ sudo apt install wine winetricks
18. Install Steam for Games
If you are a gamer, then you also need to install a Steam client for Linux. Steam is the leading video game distribution service that allows you to play and discuss games. Game developers and publishers can also create and distribute their games on Steam.
Run the following command to install the steam client on your Ubuntu 20.04 desktop.
$ sudo apt install steam
19. Install Additional Proprietary Graphics Drivers
For gamers, apart from installing steam (as shown above), you also need to install additional graphics drivers to improve your gaming experience on Ubuntu. Although Ubuntu provides open-source graphics drivers, proprietary graphics drivers perform orders of magnitude better than open-source graphics drivers.
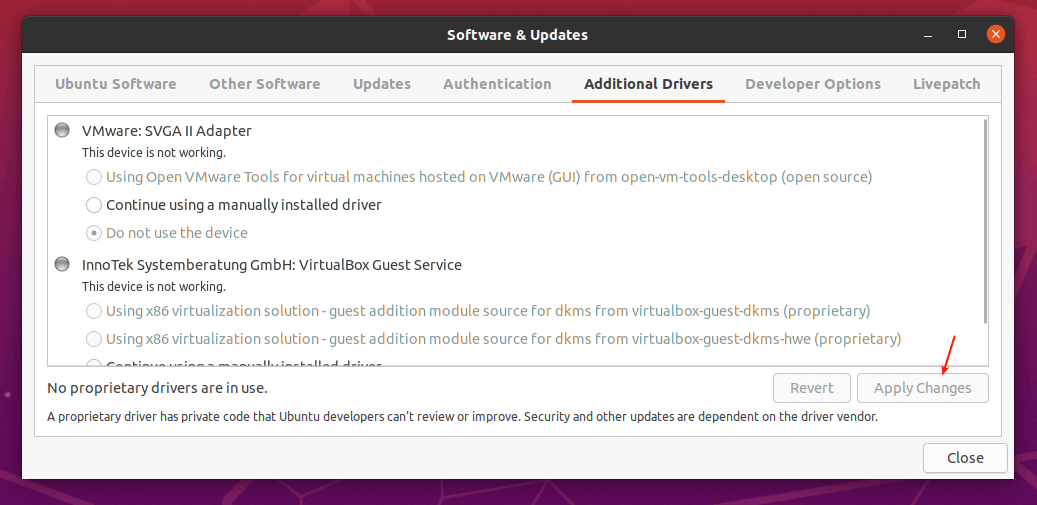
Unlike in earlier versions of Ubuntu, in Ubuntu 20.04, it is much easier to install proprietary graphics drivers without the need to enable third-party repositories or web downloads. Simply go to Software & Updates, then click on Additional Drivers.
First, the system will search for available drivers, when the search is complete, the list box will list each device for which proprietary drivers could be installed. After making your selections, click Apply Changes.
20. Add Your Favorite Apps to the Dock
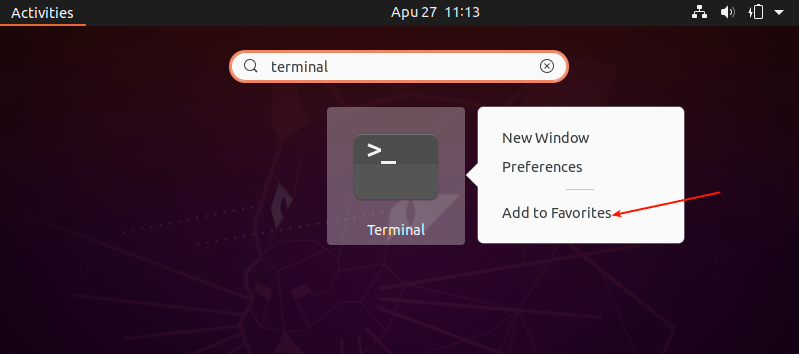
To add your favorite applications to the Ubuntu Dock (which is situated on the left side of your desktop by default), click on the Activities overview, search for the application you want e.g terminal, then right-click on it and select Add to Favorites.
21. Install Laptop Power Saving Tools
If you are using a laptop, then you might want to install Laptop Mode Tools, a simple and configurable laptop power-saving tool for Linux systems. It helps to extend your laptop’s battery life in so many ways. It also allows you to tweak some other power-related settings using a configuration file.
$ sudo apt install laptop-mode-tools
22. Install Apps from the Ubuntu Software and Third-party
Last but not least, go ahead and install more software that you intend to use. You can do this from the Ubuntu Software (or install apps from third-party repositories).
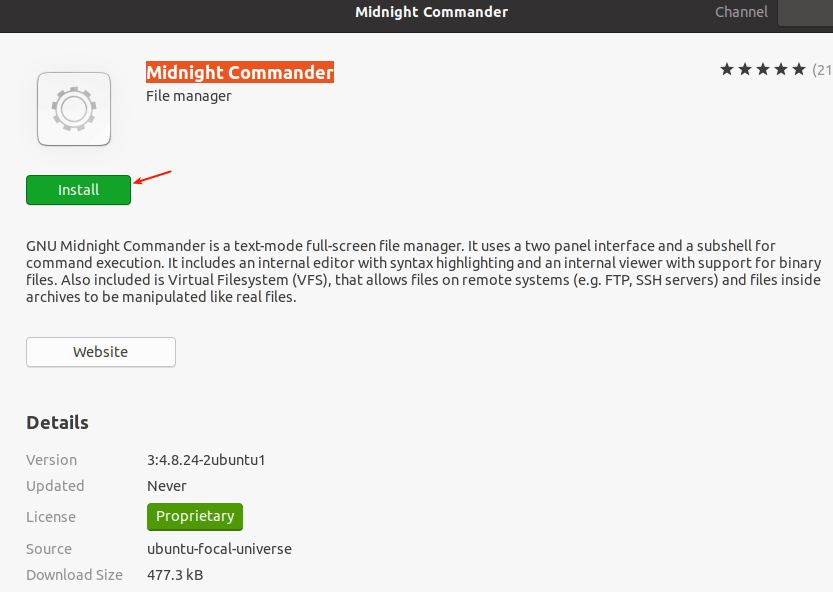
Simply open the Ubuntu Software and use the search feature to find the software you want. For example, to install midnight commander, click on the search icon, type its name, and click on it.
23. Install Timeshift
Timeshift is a useful backup utility that creates incremental snapshots of the file system at regular intervals. These snapshots can be used to restore your system to an earlier working state in case of disaster
$ sudo add-apt-repository -y ppa:teejee2008/ppa
$ sudo apt-get update
$ sudo apt-get install timeshift
24. Install JAVA
JAVA is the most popular programming language and many applications and websites will not work properly unless you have it installed on your system.
$ sudo apt-get install openjdk-11-jdk
25. Try Different Desktop Environments
Ubuntu distribution is not only restricted to Gnome, but it can also be used with different desktop environments such as cinnamon, mate, KDE and others.
To install cinnamon you can use the following command.
$ sudo apt-get install cinnamon-desktop-environment
To install MATE, use the following command.
$ sudo apt-get install ubuntu-mate-desktop
That’s all! If you have any additional ideas about things to do after installing Ubuntu 20.04, please share it with us via the feedback form below.


I’m pretty new to Ubuntu, however, learning how incredible to use Ubuntu feels great! Thanks for these amazing tool quick guides!
@deniz
Many thanks for the useful feedback.
Hi, I’ve installed Ubuntu 20.04 it works fine until I launch a web browser, Chromium, and Firefox. As soon as I start any of these web browsers the entire system freezes.
I’ve tried updating the graphic drives, reinstalling Ubuntu, using another browser (Brave), and even installing Lubuntu and the problem is the same.
Does anyone have this problem? any ideas about why this is happening?. I’m running Ubuntu on an older:
(24″ IMac 2010 )
12Gb Ram
250GB SSD hard drive.
and connected external hard drive.
Any help would be appreciated thank you.
And when you finish install that all shit You finally discover that you can’t DRAG AND DROP any files or folders on your desktop. JUST BRILLIANT!!
I know it’s ridiculous but if you install another file manager, I think I used Nemo, then you can drag and drop it onto the desktop.
As an old-timer, I added “xsnow“, “bsdgames“, and “fortune” as well, but I suppose they aren’t as popular. Xsnow is nice since Christmas is approaching.
Hi, I want to ask a newbie question. If I install a new desktop environment such as cinnamon-desktop-environment, and then I decide that I want to return to the default ubuntu, what can I do?
Hi! You can choose which desktop you want when you log in?
thanks!
Nice text but it is missing section about security. Such as setting passwords, checking firewall, etc.
Thanks a lot for the help…
Thank you very much for your help on how to configure some important tools/components after installing Ubuntu 20.04. I have a problem after installing my Ubuntu my setting tool is not properly showing the screen.
It shows in my toolbar opened but in reality it not visible like a new window. Kindly help me to enable my setting to show on my desktop to do major operations on my computer.
Thanks Aaron for your useful suggestions. I followed most of them. I will download Anaconda too.
@Filiberto
Thanks for the useful feedback.
Hey, I’m not able to connect to wifi networks and even mobile hotspot.
kindly help me, I am using ubuntu 20.04 lts.
Hi, when I tried the install commands shown above, I got these error messages on all of them: “Waiting for cache lock: Could not get lock /var/lib/dpkg/lock-frontend. It is held by process 10501 (apt)“.
Can anyone help me address this issue? Thank you in advance.
@Danny,
Use the following command to fix the error:
Hi, very helpful, thanks! Just one thing, couldn’t locate the package firefox-gnome-shell.
Your description for the installation of timeshift is flawed. OK for 18.04 but 20.04 has timeshift in the universe repository.
@Andy
Thanks for mentioning, we will cross-check this and update the article.
The best thing to do after Ubuntu installation is to download and install Deepin Linux instead of Ubuntu. Obviously ubuntu’s company boss or board management doesn’t get the lessons from the past as they insisting a new snappish era that users don’t like. Imho ubuntu will lose its userbase to other distros possibly Fedora, Mint, and Deepin.
Why waste the time to download and install Ubuntu in the first place? Download and install Deepin instead. However, what’s the point? When you run Mint, Deepin, elementary, Zorin, etc you are basically running Ubuntu with some cosmetic changes. If you want to be different than the Ubuntu crowd, use Fedora, Slackware, arch or Gentoo, not Deepin.
@rightous_linux_bros
Deepin is a beautiful, easy to use, safe, and reliable Linux distribution. Based on your recommendation, I believe many readers will try it out, especially those who recently shifted from Windows. Thanks for sharing your thoughts with us.
I have installed Ubuntu 20.04 and also installed some windows applications like photoshop cs6, IDM, etc through Playonlinux. I found them in virtual drive_c but I can’t open the exe files. They didn’t appear in App Launcher also.
please help me…
How can I change my external screen As a default monitor?
@Mehmet
Go to Settings, then Display. Select the display you want to make default and apply the changes.
I have updated to Ubuntu 20.04 LTS and also so far did the 10 things post-install. It was fun. How to install work spaces in this Ubuntu version?
@Mohommad
See this official guide: https://help.ubuntu.com/stable/ubuntu-help/shell-workspaces-switch.html.en
Only about 10 of the 25 things mentioned HAVE to be done. The rest are per user need basis. One can use Ubuntu quite well without doing them.
I would add the install of Synaptic Package Manager to replace the dysfunctional Software Center.
Another thing that I would like to do but can’t because of the way Ubuntu is structured is to uninstall the hundreds of Language Packs, hardware drivers, and applications that I do not need and will never use. All that extra software can amount to close to 1 GB of wasted space.
@dragonmouth
About the Ubuntu Software(which in actual sense is the snap store), it’s truly dysfunctional from my own experience. So installing Synaptic Package Manager will be a good idea. Thanks for the feedback.
Hello Hanny.
Thank you for the tutorial
I have a problem with the installation of ubuntu 14.10. The touchpad doesnt function. I have to work allways with the mouse. Do you know how fix it? I can give you more information about the notebook if it is required
Thanks
@Federico,
Search for Mouse & Touch pad setting and enable touch pad and scrolling to make it work..
Hello Federico,
After installing the operating system I recommend you to make the updates. In order to install the latest version of VirtualBox on Ubuntu/Linux Mint repository or from Oracle website.
Thanks!
Liviu Balan
did 6 and had to reload ubuntu
Thanks for the tutorial.
;)
Never mind; please disregard my previous email regarding not being able to “see” the Mate DE. I didnt know I had to log out of Unity and log into Mate ;)
But as to the problem with Numix theme; it still persists.
Thanks
Hello JG.
You have to change the icon theme that you’re using, after you installed Numix icon theme, you have to use the “Unity Tweak Tool” or “Gnome Tweak Tool” in order to change the default icon theme for the system..
Thanks.
Hi, I’m running Ubuntu 14.10 64bit and I can not run Mate. I have copied and pasted all the commands and a bunch of things happen in the terminal but end result is that I’m still only seeing Unity! I’ve rebooted a couple of times but it stays in Unity.
Same happens with Numix Theme. Namely, I copied and pasted all the commands, the terminal window displays all these messages and then…. nothing.
Could you please help me?
Thanks
Hi Hanny,
How can I tell if my pc has the Nvidia Optimus tech?
Thanks,
JDL
Hello.
You can use this command:
$ sudo lshw
I tried to install many thing like MATE But it shows an error
Errors were encountered while processing:
brltty
E: Sub-process /usr/bin/dpkg returned an error code (1)
Help me
Please take a look here:
http://ubuntuforums.org/showthread.php?t=1642173
Why do you recommend the proprietary solution VirtualBox instead of just using the built-in KVM virtualization layer thus supporting FOSS?
You should be all set with
sudo apt-get install virt-manager libvirt-bin
Virtualbox is in the repositories is FOSS, the extensions are not.
We’re just explaining how to install the most common & useful programs, if you noticed, things like Flash and Java are closed-source, but they are very important for any Linux user.
hi
there is an error in the mate section, the command for installing mate & the addons is the same:
sudo apt-get install mate-desktop-environment-core
please correct
Bye
Thank you, that error will be fixed.
The second command is:
sudo apt-get install mate-desktop-environment-extra
@Hanny,
Corrected in the writeup..
Dear Sir,
Please help me i am unable to find driver for my ubuntu 12.10
Ubuntu 12.10 is outdated, you can’t use it anymore.
You have a typo for the PPA for Flash in Item #7.
Instead of
sudo add-apt-repository ppa:nilarimograd/webupd8
it should be
sudo add-apt-repository ppa:nilarimogard/webupd8
@John,
Thanks for updating about that typo, we’ve corrected the command..
To add something:
I am running the MATE-Desktop, as this is the most stable one for me.
Greetings
Andrea
Hello Andrea.
Sorry i don’t know exactly where the problem is, meanwhile you can add the command “sudo service network-manager start” to the startup commands in order to run it automatically if you want, you can ask for help at: http://ask.ubuntu.com
MATE isn’t very stable yet, there are many common problems that’ll face you while using it, It’s better to wait until MATE 1.10.
Thanks.
hi Hanny Helal,
I have a serious problem since days. For me, after one of the updates, network-manager dropped from the panel and also network-manager does not even start up at boot. I always get the message:
wait for network-manager configuration
Then follows:
wait up 60 seconds more for network-configuration
followed by:
not able to boot with network-configuration booting system without full network-configuration
Then the system boots and I have to start network-manager via Terminal-command:
sudo service network-manager start
Then network connects normally…For me, this again seems like a race-bug or something like that….
Can you help with this please??
Do NOT install fglrx. It made my system unusuable. It froze at the ubuntu logo at startup.
fglrx is the official driver from ATi/AMD, there’s a guide about it here:
https://help.ubuntu.com/community/BinaryDriverHowto/AMD
#12. sudo add-apt-repository ppa:numix/ppa should be sudo apt-add-repository ppa:numix/ppa
@Ethan,
Thanks bringing to our notice, we’ve corrected the command.
Hello Ethan.
It’s is not a typo, because both commands will work, you can try it yourself:
sudo add-apt-repository ppa:numix/ppa
sudo apt-add-repository ppa:numix/ppa
And both commands will work just fine.
I’m assuming you copy and pasted those commands above and included the “$” from the command line. Causes an error for anyone copy and pasting from this page.
Hello.
The ‘$’ mark is just for styling the commands, of course it shouldn’t be copied from / to the terminal :)
Thanks.
If you really want to show the “$”, you might want to make it a table with no borders — that way when someone triple-clicks on the command, they’ll be able to paste it without the leading “$” and space.
Thanks!!! I was upset about the system error report message. Where is ‘Apport’ located?
Hello woody.
Can you explain a little bit more about what you mean by “where Apport is located”? you just have to remove the package from the package manager.
After installing nvidia drivers system crash. purge nvidia* helps.
It depends on the type of your graphics card, the drivers are official drivers from Nvidia.