In web hosting, virtual hosts allow a single server to host multiple domains. Apache, one of the most widely used web servers, provides robust virtual hosting capabilities.
On RHEL 9 and RHEL-based distributions such as Fedora, Rocky Linux and AlmaLinux, setting up and managing virtual hosts is straightforward, especially with the enable/disable options that make it easy to control which sites are active.
This guide will cover how to:
- Install and configure Apache on RHEL 9.
- Create virtual hosts for
example1.comandexample2.com. - Enable or disable the virtual hosts as needed.
Step 1: Install Apache Web Server
If Apache is not installed on your server, install it using:
sudo dnf install httpd -y
After installation, start and enable Apache to run on system boot:
sudo systemctl start httpd
sudo systemctl enable httpd
Step 2: Configure Apache Virtual Hosts
To keep things organized, create directories to store website files for each domain. Apache usually uses /var/www/ as the default location for website files.
sudo mkdir -p /var/www/example1.com/public_html
sudo mkdir -p /var/www/example2.com/public_html
Set the correct ownership and permissions for these directories:
sudo chown -R $USER:$USER /var/www/example1.com/public_html
sudo chown -R $USER:$USER /var/www/example2.com/public_html
sudo chmod -R 755 /var/www
Create a simple HTML file for each domain to verify that the setup is working:
echo "<html><h1>Welcome to Example1.com</h1></html>" | sudo tee /var/www/example1.com/public_html/index.html
echo "<html><h1>Welcome to Example2.com</h1></html>" | sudo tee /var/www/example2.com/public_html/index.html
Step 3: Create Virtual Host Configuration Files
Apache looks for virtual host configurations in /etc/httpd/conf.d/ by default and each domain will need its own configuration file.
Create a Virtual Host File for example1.com:
sudo nano /etc/httpd/conf.d/example1.com.conf
Add the following configuration:
<VirtualHost *:80>
    ServerAdmin admin@example1.com
    ServerName example1.com
    ServerAlias www.example1.com
    DocumentRoot /var/www/example1.com/public_html
    ErrorLog /var/www/example1.com/error.log
    CustomLog /var/www/example1.com/access.log combined
</VirtualHost>
Create a Virtual Host File for example2.com:
sudo nano /etc/httpd/conf.d/example2.com.conf
Add the following configuration:
<VirtualHost *:80>
    ServerAdmin admin@example2.com
    ServerName example2.com
    ServerAlias www.example2.com
    DocumentRoot /var/www/example2.com/public_html
    ErrorLog /var/www/example2.com/error.log
    CustomLog /var/www/example2.com/access.log combined
</VirtualHost>
If you have a firewall enabled, make sure to allow HTTP traffic:
sudo firewall-cmd --permanent --add-service=http
sudo firewall-cmd --reload
Step 4: Enable and Disable Virtual Hosts
On RHEL, you can manage virtual hosts by enabling or disabling the configuration files.
To Enable a Virtual Host
Simply ensure that the configuration file is in /etc/httpd/conf.d/ and restart Apache:
sudo systemctl restart httpd
Both example1.com and example2.com will now be active.
To Disable a Virtual Host
If you want to temporarily disable a virtual host, you can rename the configuration file or move it out of /etc/httpd/conf.d/.
For example, to disable example2.com:
sudo mv /etc/httpd/conf.d/example2.com.conf /etc/httpd/conf.d/disabled_example2.com.conf
Restart Apache to apply changes:
sudo systemctl restart httpd
To re-enable it, move it back to the original location:
sudo mv /etc/httpd/conf.d/disabled_example2.com.conf /etc/httpd/conf.d/example2.com.conf
sudo systemctl restart httpd
Step 5: Test Apache Virtual Hosts
If testing locally, add the following entries to your /etc/hosts file:
127.0.0.1 example1.com
127.0.0.1 example2.com
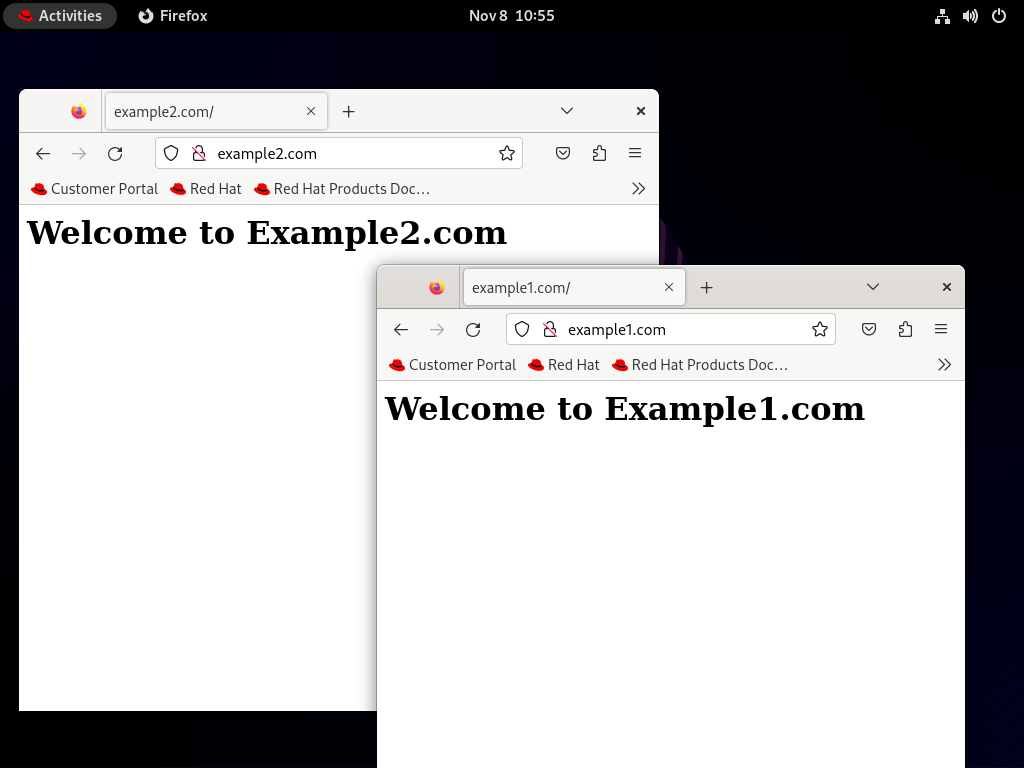
Open a web browser and go to http://example1.com and http://example2.com. You should see the corresponding welcome messages.

Conclusion
You have successfully created Apache Virtual Hosts on RHEL 9 for two domains, example1.com and example2.com, with the option to enable or disable each host as needed.
This setup allows your server to manage multiple websites independently and gives you control over which domains are active.


httpd: Syntax error on line 356 of /etc/httpd/conf/httpd.conf: Syntax error on line 13 of /etc/httpd/sites-enabled/test1.conf: Expected but saw
Error i see when i try to start apache.
There is an error in your helpful article. You create “ad2dissite”, but later on you call it with “ad2disite” .. with one “s”
@Daniel,
Thanks for pointing you that error, corrected in the article.
Hi, the httpd services not restart using systemctl restart httpd command.
Verify Apache synatx with apachectl command to identify the problem.
Getting this when I run a2ensite
-bash: a2ensite: command not found
Follwed everything above. Am on RHEL 7
I don’t think you followed each step! make sure the scripts have executable bit set.
I know it’s an old post but just chiming in for anybody who might be searching for an answer to this: I had the same issue. The problem was that only root had permissions to run the script but the directory /usr/local/bin isn’t in root’s $PATH environment variable.
You probably need to put /usr/local/bin in root’s $PATH variable or give your standard user permissions on the script.
Hello good afternoon!
I wonder would with the file /etc/hosts file to allow access to the virtual host across network lan ?
Thank you!
Yes it would! But you must manually edit every hosts file from each workstation in your LAN or WAN and add the proper DNS record in order to access apache virtual hosts across your network. For just a few number of machines the hosts file method can be appropriate but for a large number of machines he simplest solution would be to setup a DNS server on your premises.
Here is my vhostdel script all I did was allow the script to restart apache after it removes the conf file from sites-enabled.
#!/bin/bash
avail=/etc/httpd/sites-enabled/$1.conf
enabled=/etc/httpd/sites-enabled
site=`ls /etc/httpd/sites-enabled/`
if [ “$#” != “1” ]; then
echo “Use script: vhostdel virtual_site”
echo -e “\nAvailable virtual hosts: \n$site”
exit 0
else
if test -e $avail; then
sudo rm $avail
else
echo -e “$avail virtual host does not exist! Exiting!”
exit 0
fi
if test -e $enabled/$1.conf; then
echo “Error!! Could not remove $avail virtual host!”
else
echo -e “Success! $avail has been removed!\nNow restarting Apache….”
sudo systemctl restart httpd
echo -e “All done!”
exit 0
fi
fi
Great article no problems. I did make some modifications to your add vhost script. I also renamed them to something that makes a little more sense IMHO (vhostadd and vhostdel). I use the following script on my development server. The script does the same as yours plus the following:
When you run the command “vhostadd test1.example.com” the script will check the vhost directory to see if “/var/www/vhosts/test1.example.com” directory exists if it doesn’t it creates it for you. Then it will copy all the files in the “/var/www/vhosts/_vhost_skel” directory and places them in the “/var/www/vhosts/test1.example.com” directory for you! The vhost skeleton directory is helpful for doing redundant folder and file creation such as public_html, index.php, logs. To test to make sure the vhost is setup right I personally add a index.php file to the public_html directory with the following which will echo out the current working directory. So with the example command above your should be able to visit test1.example.com and it should display the directory that the index.php is located in which would look something like this on my setup: /var/www/vhosts/test1.example.com/public_html. Once the vhost skeleton files have been moved the script will know chown the directory recursively and chmod the directory recursively. Then the system will restart apache for you. All of the directories, chown user and group, and chmod permissions are all vars at the top of the script, modify them as you see fit.
#!/bin/bash
avail=/etc/httpd/sites-available/$1.conf
enabled=/etc/httpd/sites-enabled/
site=`ls /etc/httpd/sites-available/`
vhostdir=/var/www/vhosts
sitevhostdir=$vhostdir/$1
sitevhostskel=$vhostdir/_vhost_skel
chownusergroup=opterons:dev
chmodperms=2755
if test -d /etc/httpd/sites-available && test -d /etc/httpd/sites-enabled ; then
echo “———————————————–”
else
mkdir /etc/httpd/sites-available
mkdir /etc/httpd/sites-enabled
fi
if [ “$#” != “1” ]; then
echo “Use script: vhostadd virtual_site”
echo -e “\nAvailable virtual hosts:\n$site”
exit 0
else
if test -e $avail; then
if [ ! -d “$sitevhostdir” ]; then
echo -e “VHost directory: $sitevhostdir does not exist, no worries.\nCreating directory: $sitevhostdir now….”
mkdir -p “$sitevhostdir”
cp -rf “$sitevhostskel”/* “$sitevhostdir”
chown -R “$chownusergroup” “$sitevhostdir”
chmod -R “$chmodperms” “$sitevhostdir”
fi
sudo ln -s $avail $enabled
else
echo -e “$avail virtual host does not exist! Please create one!\n$site”
exit 0
fi
if test -e $enabled/$1.conf; then
echo “Success!! Now restarting the Apache server…”
sudo systemctl restart httpd
echo “All done!”
else
echo -e “Virtual host $avail does not exist!\nPlease see available virtual hosts:\n$site”
exit 0
fi
fi
I went step by step on this, configured DNS and even gave the whole directory more permissions. When I go to the VirtualHost site I get only the default Apache page.
Did I miss a step?
Hi,
I get the same error as alam above:
when i adding IncludeOptional sites-enabled/*.conf line in httpd.conf then in restart i got error Invalid command ‘IncludeOptional’, perhaps misspelled or defined by a module not included in the server configuration
Has anyone been able to resolve this?
Hi, I am getting the error:
sudo apachectl restart
apachectl: Configuration syntax error, will not run “restart”:
Syntax error on line 410 of /usr/local/apache/conf/httpd.conf:
Invalid command ‘IncludeOptional’, perhaps misspelled or defined by a module not included in the server configuration
Any help you can provide how to overcome this? I searched the net and have seen others get this error as well but did not find any solution.
when i adding IncludeOptional sites-enabled/*.conf line in httpd.conf then in restart i got error Invalid command ‘IncludeOptional’, perhaps misspelled or defined by a module not included in the server configuration
Hi did you get an answer to this one? I have the same issue.
Works as described! Perfect. Thanks!
hello, thank u for the tutorial. can u put a tutorial about run vhost with separate uid ( i tried httpd-itk, suPHP but nothing works with me )
Hello, I have followed all steps, but my issue is that my second website uses my first websites directory!
Interesting approach however I usually don’t turn sites on and off so it is actually easier for me to include the virtualhost right in the httpd.conf, but just wanted to let you know there is a typo in the instructions
/usr/local/bin/a2dissite
Two “ss” later when you execute the script you only have one “s”
This is great, thank you very much!
I’m trying to simplify Vhost management process ;)
you are trying to replicate the debian apache management tool :(