Single User Mode (sometimes known as Maintenance Mode) is a mode in Unix-like operating systems such as Linux operate, where a handful of services are started at system boot for basic functionality to enable a single superuser perform certain critical tasks.
It is runlevel 1 under system SysV init, and runlevel1.target or rescue.target in systemd. Importantly, the services, if any, started at this runlevel/target varies by distribution. It’s generally useful for maintenance or emergency repairs (since it doesn’t offer any network services at all), when a computer is not capable of normal operations.
Some of the low-level repairs include running such as fsck of damaged disk partitions, reset root password if you have lost it, fix “failed to mount /etc/fstab” error – just to mention the most critical of them. And also when the system fails to boot normally.
In this tutorial, we will describe how to boot into single user mode on CentOS 7. Note that practically this will help you enter the emergency mode and access an emergency shell.
How to Boot into Single User Mode
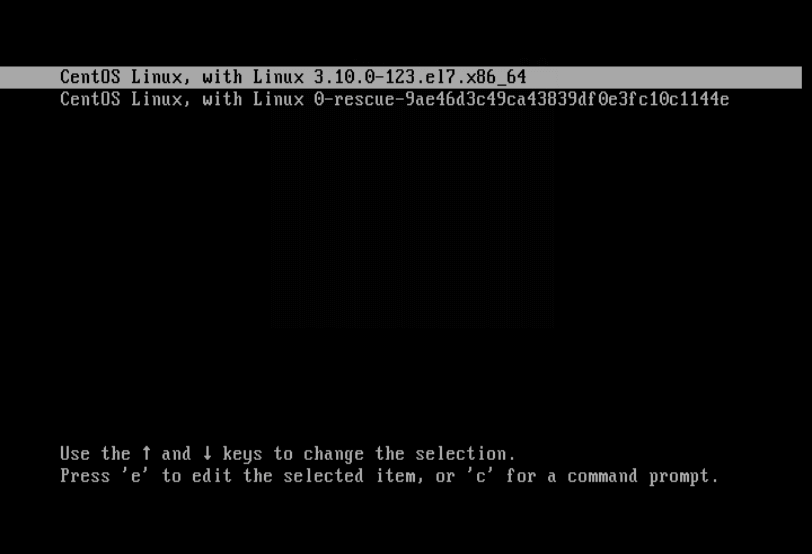
1. First restart your CentOS 7 machine, once boot process starts, wait for the GRUB boot menu to appear as shown in the screen shot below.

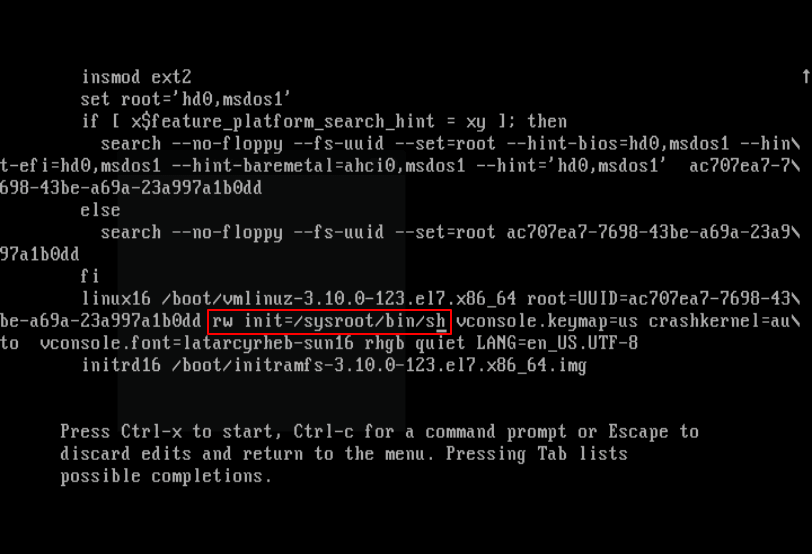
2. Next, select your Kernel version from the grub menu item and press e key to edit the first boot option. Now use the Down arrow key to find the kernel line (starts with “linux16“), then change the argument ro to rw init=/sysroot/bin/sh as shown in the screen shot below.

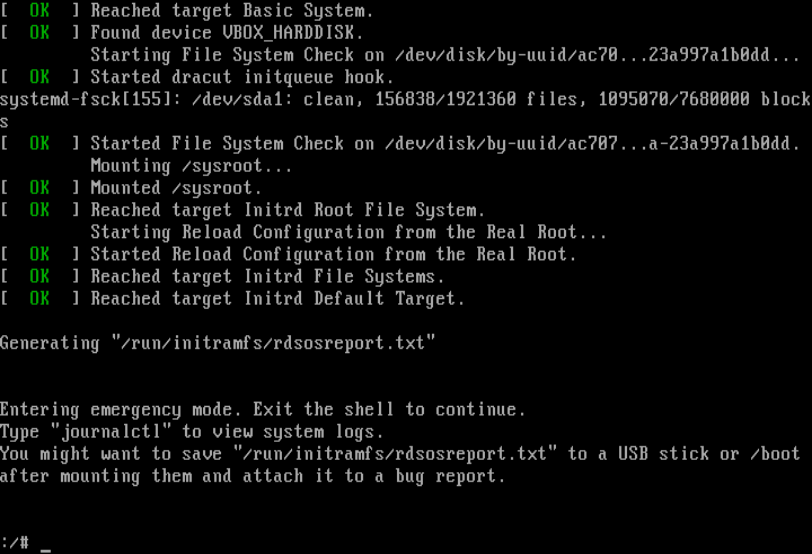
3. Once you have finished the task in the previous step, press Ctrl-X or F10 to boot into single user mode (access an emergency shell).

4. Now mount root (/) filesystem using the following command.
# chroot /sysroot/
At this point, you can perform all the necessary low-level system maintenance tasks. Once you are done, reboot the system using this command.
# reboot -f
You may also liked to read following articles.
- How to Hack Your Own Linux System
- Linux Directory Structure and Important Files Paths Explained
- How to Create and Run New Service Units in Systemd Using Shell Script
- How to Manage ‘Systemd’ Services and Units Using ‘Systemctl’ in Linux
Lastly, the single user mode or maintenance mode is not password-protected by default, so any one with malicious intend and physical access to your computer can enter the emergency mode and “destroy” your system.
Next, we will show you how to password-protect single user mode on CentOS 7. Until then, stay connected to Tecmint.com.


Thank you very much, it helped me a lot.
Thanks this article is technically accurate and easy to execute, it saved my Budd!!
@Daniel
Many thanks for the useful feedback.
I can’t run any commands when in single-user mode – My server just dropped to maintenance mode after the backup drive needed an fsck – but after it dropped to shell – any command I type such as fsck results in “no such file or directory”. Help! I need to either mount the filesystem to edit /etc/fstab and remove the second drive – or run fsck on it – but neither command is found!
Is it possible to edit /etc/sudoers in single user mode ? I need to edit the “PermitRootLogin” section.
@Irsyad
It should be possible, simply run this command to open the file:
Very helpful article, enabled me to fix my login service
@PM
That’s great, thanks for the useful feedback.
touch /.autorelabel
reboot
is needed
@gzcwnk
Okay, many thanks for mentioning this.
This article helped in solving my issue today
Thank you
Works perfect, thanks I could recover my sudo access .. !!
@Rodolfo
We are glad that this worked for you, thanks for the feedback.
How to start the networking in RHEL 7 on single user mode?
@Raj,
In single user mode on RHEL 7 or CentOS 7, the networking not enabled at startup. To get networking, you need get into runlevel 2 (local multi-user with networking) by running following command.
that’s not correct its runlevel 3 that has networking not 2
Nice! Could you show us how to password-protect single user mode on CentOS 7?
@João
Sure, we will prepare an article about how to password-protect single user mode on CentOS 7. Thanks for the feedback.
Great, it’s very useful .Thanks for the work
@Jean-Pierre
Welcome, thanks for the kind words of appreciation, and for always following us.