Step 3: Configure Collectd Clients
6. The activation of client instances for Collectd daemon resembles with the server configuration, meaning the same Network plugin must be loaded, the only difference here being the fact that you should instruct the Network client where to send the data.
So, repeat the same steps as for the server setup, and, when you reach the Network plugin block, uncomment the below statements and replace the Server IP Address according to your Collectd server IP.
# nano /etc/collectd/collectd.conf
OR
# nano /etc/collectd.conf
Client file excerpt:
<Plugin network>
# client setup:
      <Server "192.168.1.211" "25826">
       </Server>
...
</Plugin>

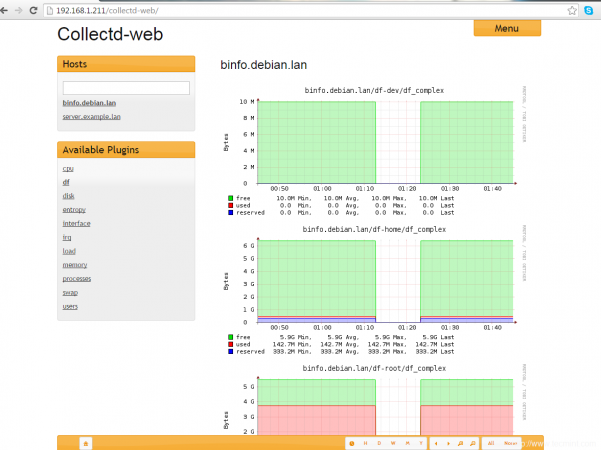
7. Finally, restart the collectd daemon to apply changes and visit your Collectd server IP Address in order to visualize the collected data so far as illustrated on the below screenshot.
# service collectd restart
or
# systemctl restart collectd   [For systemd init services]

Repeat the client configuration steps on all your collectd systems that you want to monitor and they should appear on your central Collectd server.
Step 4: Encrypt Collectd Client-Server Traffic
8. So far, all of the client transmitted data is done in clear text make it easy for unauthorized users to intercept and read data.
In order to cryptographically sign and encrypt the traffic using a mechanism similar to Apache .htacces authentication, you need to create an htpasswd file on the server and instruct all the clients to sign and encrypt data with the htpasswd credentials.
On the first step go to the Collectd server machine and create a passwd file by issuing the below command (install apache-utils or httpd-tools package if htpasswd command is not present on your server).
# htpasswd -c /etc/collectd/passwd your_username

9. After the credentials are created, use the cat command to view passwd file content and copy the password string to a safe location – you will need it later for client setup.
# cat /etc/collectd/passwd

10. Next, on the server side, open the main collectd configuration file for editing, navigate to Network plugin block, uncomment following statements (replace AuthFile statement according to your local passwd file path):
# nano /etc/collectd/collectd.conf
OR
# nano /etc/collectd.conf
Server File excerpt:
<Plugin network>
...
# server setup:
      <Listen "0.0.0.0" "25826">
	   SecurityLevel Sign
                  AuthFile "/etc/collectd/passwd"
       </Listen>
...
</Plugin>
11. Once you’re done, restart Collectd server to apply the changes and move to client side.
# service collectd restart
or
# systemctl restart collectd   [For systemd init services]
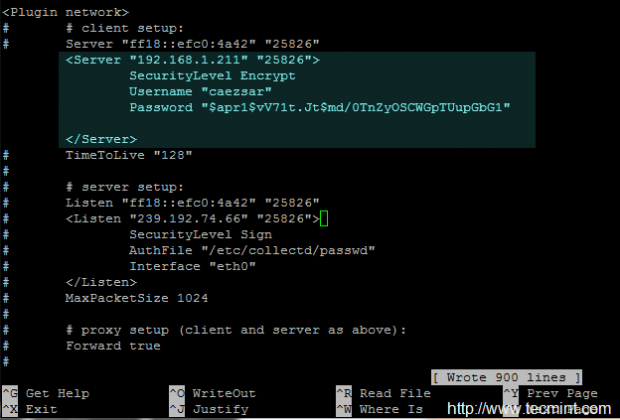
12. On the client side, repeat the same steps and uncomment the client statements from the Network plugin block, replacing the Username and Password statements according to your server passwd file.
# nano /etc/collectd/collectd.conf
OR
# nano /etc/collectd.conf
Client file excerpt:
<Plugin network>
# client setup:
      <Server "192.168.1.211" "25826">
SecurityLevel Encrypt
              	Username "your_server_passwd_username"
             	Password "your_server_passwd_hash_password"
       </Server>
...
</Plugin>

That’s it! restart Collectd daemon and repeat this step on all your Collectd client instances in order to communicate with the central node over a secure channel.


Thresholds must be configured on client side, because the data can differ from one client to another. Consult collectd docs for more. https://collectd.org/documentation/manpages/collectd-threshold.5.shtml
Thresholds must be configured on client side, because the data can differ from one to another. Consult collectd docs for more. https://collectd.org/documentation/manpages/collectd-threshold.5.shtml
Hi,
Just had a small query since i am setting up a client server architecture for collectd, is it possible that for all the clients my thresholds are set on the server side?