In the previous article of this series we explained how to set up and manage the mail server database securely using phpMyAdmin.
Requirement:

Now it’s time to configure the internal programs that will make sending and receiving emails a reality: Postfix and Dovecot (to handle outgoing and incoming emails, respectively).
Configuring Postfix Mail Server
Before you begin configuring Postfix, it would be worth and well to take a look at its man pages here, putting special emphasis on the section titled “Information for new Postfix users“. If you do, you will find it easier to follow along with this tutorial.
In few words, you should know that there are two configuration files for Postfix:
- /etc/postfix/main.cf (Postfix configuration parameters, refer to man 5 postconf for more details).
- /etc/postfix/master.cf (Postfix master daemon configuraton, see man 5 master for further details).
In /etc/postfix/main.cf, locate (or add, if necessary) the following lines and make sure they match the values indicated below:
append_dot_mydomain = no
biff = no
config_directory = /etc/postfix
dovecot_destination_recipient_limit = 1
message_size_limit = 4194304
readme_directory = no
smtp_tls_session_cache_database = btree:${data_directory}/smtp_scache
smtpd_banner = $myhostname ESMTP $mail_name (CentOS)
smtpd_tls_cert_file = /etc/pki/dovecot/certs/dovecot.pem
smtpd_tls_key_file = /etc/pki/dovecot/private/dovecot.pem
smtpd_tls_session_cache_database = btree:${data_directory}/smtpd_scache
smtpd_use_tls = yes
virtual_transport = dovecot
smtpd_sasl_type = dovecot
smtpd_sasl_path = private/auth
The next three settings are of special importance. In the files indicated in yellow we will configure Postfix’s access to the Domains_tbl, Users_tbl, and Alias_tbl tables:
virtual_mailbox_domains = mysql:/etc/postfix/mariadb-vdomains.cf
virtual_mailbox_maps = mysql:/etc/postfix/mariadb-vusers.cf
virtual_alias_maps = mysql:/etc/postfix/mariadb-valias.cf
Note that you can choose different file names above, as long as you make sure to create them and insert the following contents in them. In each case, replace YourPassword with the password you chose for the dba user in Part 1, or you can also use the MariaDB root credentials for user and password below.
Also, make sure you use the exact same names of the email server database and tables created in Part 1.
In /etc/postfix/mariadb-vdomains.cf:
user = dba
password = YourPassword
hosts = 127.0.0.1
dbname = EmailServer_db
query = SELECT 1 FROM Domains_tbl WHERE DomainName='%s'
In /etc/postfix/mariadb-vusers.cf:
user = dba
password = YourPassword
hosts = 127.0.0.1
dbname = EmailServer_db
query = SELECT 1 FROM Users_tbl WHERE Email='%s'
In /etc/postfix/mariadb-valias.cf:
user = dba
password = YourPassword
hosts = 127.0.0.1
dbname = EmailServer_db
query = SELECT Destination FROM Alias_tbl WHERE Source='%s'
Finally, don’t forget to change the permissions to these files to 640:
# chmod 640 /etc/postfix/mariadb-vdomains.cf
# chmod 640 /etc/postfix/mariadb-vusers.cf
# chmod 640 /etc/postfix/mariadb-valias.cf
And the ownership to user root and group postfix:
# chown root:postfix /etc/postfix/mariadb-vdomains.cf
# chown root:postfix /etc/postfix/mariadb-vusers.cf
# chown root:postfix /etc/postfix/mariadb-valias.cf
Next, to enable secure connections we need to make sure the following settings are uncommented (or added, if necessary) in /etc/postfix/master.cf:
submission inet n       -       n       -       -       smtpd
  -o syslog_name=postfix/submission
  -o smtpd_tls_security_level=encrypt
  -o smtpd_sasl_auth_enable=yes
  -o smtpd_reject_unlisted_recipient=no
  -o smtpd_recipient_restrictions=permit_sasl_authenticated,reject
  -o milter_macro_daemon_name=ORIGINATING
pickup    unix  n       -       n       60      1       pickup
cleanup   unix  n       -       n       -       0       cleanup
qmgr      unix  n       -       n       300     1       qmgr
tlsmgr    unix  -       -       n       1000?   1       tlsmgr
rewrite   unix  -       -       n       -       -       trivial-rewrite
bounce    unix  -       -       n       -       0       bounce
defer     unix  -       -       n       -       0       bounce
trace     unix  -       -       n       -       0       bounce
verify    unix  -       -       n       -       1       verify
flush     unix  n       -       n       1000?   0       flush
proxymap  unix  -       -       n       -       -       proxymap
proxywrite unix -       -       n       -       1       proxymap
smtp      unix  -       -       n       -       -       smtp
relay     unix  -       -       n       -       -       smtp

showq     unix  n       -       n       -       -       showq
error     unix  -       -       n       -       -       error
retry     unix  -       -       n       -       -       error
discard   unix  -       -       n       -       -       discard
local     unix  -       n       n       -       -       local
#virtual   unix  -       n       n       -       -       virtual
lmtp      unix  -       -       n       -       -       lmtp
anvil     unix  -       -       n       -       1       anvil
scache    unix  -       -       n       -       1       scache
Note: The indentation in the lines beginning with the -o option is critical; otherwise postfix check will return an error:

Before you save changes, add the following lines at the bottom of the file:
dovecot   unix  -       n       n       -       -       pipe
    flags=DRhu user=vmail:vmail argv=/usr/libexec/dovecot/deliver -f ${sender} -d ${recipient}
At this point it is essential to check whether Postfix has access to the database tables and the domains, accounts, and alias that we created in Part 1.
To do so, we will use the postmap command, an utility to test communication with the tables Postfix will look up during operation, but first and foremost we’ll need to restart postfix:
# systemctl postfix restart
# postmap -q linuxnewz.com mysql:/etc/postfix/mariadb-vdomains.cf
# postmap -q someotherdomain.com mysql:/etc/postfix/mariadb-vdomains.cf
# postmap -q [email protected] mysql:/etc/postfix/mariadb-vusers.cf
# postmap -q [email protected] mysql:/etc/postfix/mariadb-vusers.cf
# postmap -q [email protected] mysql:/etc/postfix/mariadb-vusers.cf
# postmap -q [email protected] mysql:/etc/postfix/mariadb-valias.cf
In the image below we can see that for existing records in the database, a 1 is returned. Otherwise, nothing is displayed back to the screen. In the case of the alias check, note that the actual email account the alias is mapped to is returned:

Note that we are NOT authenticating against the credentials set for each email account, we are only testing the ability of Postfix to detect those records in the database.
Thus, if you get a different output than above, make sure you are using a valid user / password pair in mariadb-vdomains.cf, mariadb-vusers.cf, and mariadb-valias.cf (or whatever you chose to call those files).
Configuring Dovecot
As an IMAP / POP3 server, Dovecot provides a way for users through a Mail User Agent (MUA, or also known as client), such as Thunderbird or Outlook, to name a few examples to access their mail.
To begin, let’s create a user and a group to handle emails (we will need this as our email accounts are not associated with a system user). You can use another UID and GID (other than 5000 as we do below) as long as it’s not in use and is a high number:
# groupadd -g 5000 vmail
# useradd -g vmail -u 5000 vmail -d /home/vmail -m
The settings for Dovecot are split across several configuration files (make sure the following lines are uncommented and / or edit them to match the settings indicated below).
In /etc/dovecot/dovecot.conf:
!include_try /usr/share/dovecot/protocols.d/*.protocol
protocols = imap pop3 lmtp
!include conf.d/*.conf
!include_try local.conf
In /etc/dovecot/conf.d/10-auth.conf (only enable authentication through SQL and leave other authentication methods commented out):
disable_plaintext_auth = yes
auth_mechanisms = plain login
!include auth-sql.conf.ext
In /etc/dovecot/conf.d/auth-sql.conf.ext (note that we will store emails within a directory named yourdomain.com inside /home/vmail, which you need to create if it doesn’t exist. In our case we did mkdir /home/vmail/linuxnewz.com to manage emails for that domain):
passdb {
  driver = sql
  args = /etc/dovecot/dovecot-sql.conf.ext
}
userdb {
  driver = static
  args = uid=vmail gid=vmail home=/home/vmail/%d/%n/Maildir
}
Individual inboxes for user accounts will be created when emails for such accounts are first received.
In /etc/dovecot/conf.d/10-mail.conf:
mail_location = maildir:/home/vmail/%d/%n/Maildir
namespace inbox {
  inbox = yes
}
mail_privileged_group = mail
mbox_write_locks = fcntl
In /etc/dovecot/conf.d/10-master.conf:
service imap-login {
  inet_listener imap {
    port = 143
  }
  inet_listener imaps {
  }
}
service pop3-login {
  inet_listener pop3 {
    port = 110
  }
  inet_listener pop3s {
  }
}
service lmtp {
  unix_listener /var/spool/postfix/private/dovecot-lmtp {
   mode = 0600
   user = postfix
   group = postfix
  }
}
service auth {
  unix_listener /var/spool/postfix/private/auth {
    mode = 0666
    user = postfix
    group = postfix
  }
  unix_listener auth-userdb {
   mode = 0600
   user = vmail
  }
  user = dovecot
}
service auth-worker {
  user = vmail
}
service dict {
  unix_listener dict {
  }
}
In /etc/dovecot/conf.d/10-ssl.conf (replace the certificate and key paths if you are planning on using a certificate signed by a CA):
ssl = required
ssl_cert = </etc/pki/dovecot/certs/dovecot.pem
ssl_key = </etc/pki/dovecot/private/dovecot.pem
In /etc/dovecot/dovecot-sql.conf.ext enter your database information and the credentials of the administrative user created in Part 1.
Important: if your password contains an asterisk (#), you will need to enclose the connect string as indicated in the example below:
driver = mysql
connect = "host=127.0.0.1 dbname=EmailServer_db user=dba password=PassWith#Here"
default_pass_scheme = SHA512-CRYPT
password_query = SELECT Email as User, password FROM Users_tbl WHERE Email='%u';
Additionally, you can configure logging for Dovecot to be separate from Postfix in /etc/dovecot/conf.d/10-logging.conf:
log_path = /var/log/dovecot.log
Finally, make sure the Dovecot log is accessible for user dovecot:
# chown vmail:dovecot /var/log/dovecot.log
# chmod 660 /var/log/dovecot.log
Verify and Fix Postifix Configuration and Enable SMTP, POP3, and IMAP in Firewall
If you happen to run into any issues while configuring Postfix and / or Dovecot, instead of submitting all of the configuration files to ask for help, you can get a configuration summary (uncommented lines only) with:
# postconf –n # Summary for /etc/postfix/main.cf
# postconf –M # Summary for /etc/postfix/master.cf
# doveconf –n # Summary of all configuration files for Dovecot
In addition, make sure that the email inboxes are readable by vmail only:
# chown –R vmail:vmail /home/vmail
Configuration files should also be readable by vmail and dovecot users:
# chown -R vmail:dovecot /etc/dovecot
# chmod -R o-rwx /etc/dovecot
Finally, make sure you enable SMTP, POP3, and IMAP through the firewall:
# firewall-cmd --add-port=143/tcp
# firewall-cmd --add-port=143/tcp --permanent
# firewall-cmd --add-port=110/tcp
# firewall-cmd --add-port=110/tcp --permanent
# firewall-cmd --add-port=587/tcp
# firewall-cmd --add-port=587/tcp --permanent
Configure Thunderbird as an Email Client for Postfix
Having secured access through the firewall for the ports used in email communications, it’s time to configure an email client. Using [email protected] and its corresponding password, along with mail.linuxnewz.com as IMAP (or POP3) and SMTP server we are ready to start sending and receiving emails to and from such account:
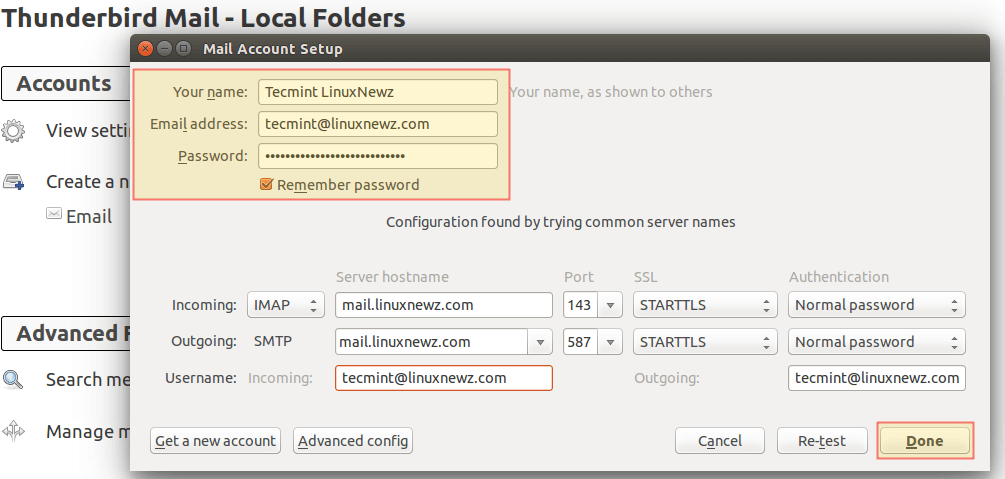
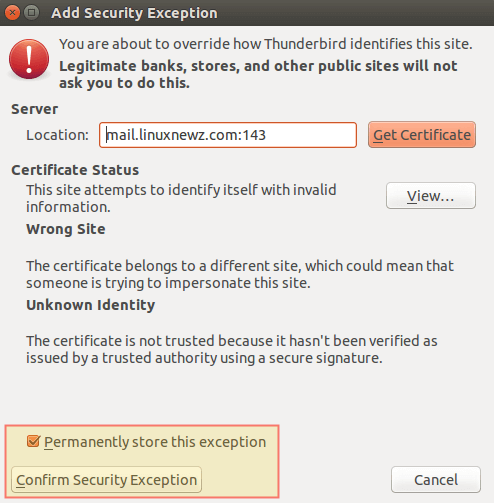
You can safely disregard the warning message that is shown because you are using a certificate that is not signed by a trusted 3rd-party CA:
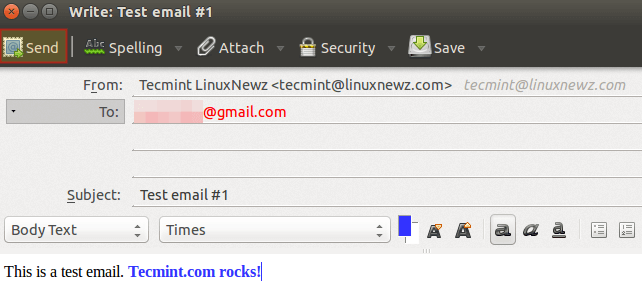
Let’s compose a brief test email and click Send:
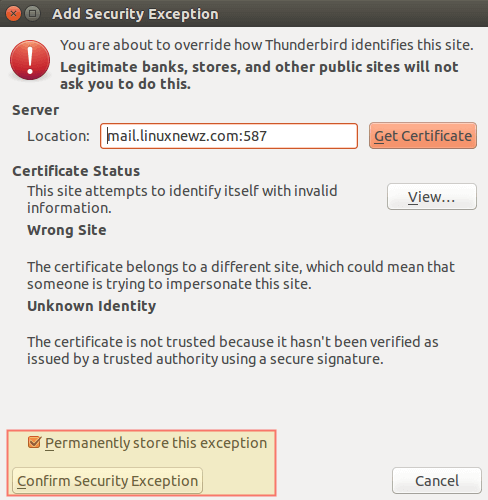
When prompted to accept the self-signed certificate for the outgoing server, confirm it previously as before:
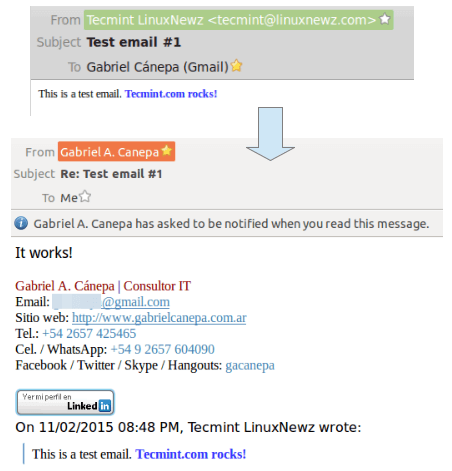
Finally, go to the destination email to see if you received the email that was just sent. If so, reply to it and see if it is delivered back to the source email inbox (otherwise, refer to the Postfix log at /var/log/maillog or the Dovecot log at /var/log/dovecot.log for troubleshooting information):
You now have a working Postfix and Dovecot email server and can start sending and receiving emails.
Summary
In this article we have explained how to configure Postfix and Dovecot to handle email traffic in your Linux server. If something does not work as indicated in this article, make sure you take time to check the Postfix and Dovecot documentation.
Please note that although setting up a Postfix mail server is not an easy task, it is a rewarding experience for every system administrator.
If after going through the docs you find yourself still struggling with Postfix and / or Dovecot, feel free to drop us a note using the comment form below and we will be glad to help you (don’t forget to upload to an online storage service the Postfix and Dovecot configuration as retrieved using postconf and doveconf as outlined in this article).


