PostgreSQL database supports several replication solutions to build high-availability, scalable, fault-tolerant applications, one of which is Write-Ahead Log (WAL) Shipping. This solution allows for a standby server to be implemented using file-based log shipping or streaming replication, or where possible, a combination of both approaches.
With streaming replication, a standby (replication slave) database server is configured to connect to the master/primary server, which streams WAL records to the standby as they are generated, without waiting for the WAL file to be filled.
By default, streaming replication is asynchronous where data is written to the standby server(s) after a transaction has been committed on the primary server. This means that there is a small delay between committing a transaction in the master server and the changes becoming visible in the standby server. One downside of this approach is that in case the master server crashes, any uncommitted transactions may not be replicated and this can cause data loss.
This guide shows how to set up a Postgresql 12 master-standby streaming replication on CentOS 8. We will use “replication slots” for the standby as a solution to avoid the master server from recycling old WAL segments before the standby has received them.
Note that compared to other methods, replication slots retain only the number of segments known to be needed.
Testing Environment:
This guide assumes you connected to your master and standby database servers as the root via SSH (use Sudo command where necessary if you are connected as a normal user with administrative rights):
Postgresql master database server: 		10.20.20.9
Postgresql standby database server:		10.20.20.8
Both database servers must have Postgresql 12 installed, otherwise, see: How to Install PostgreSQL and pgAdmin in CentOS 8.
Note: PostgreSQL 12 comes with major changes to replication implementation and configuration such as replacement of recovery.conf and the conversion of recovery.conf parameters to normal PostgreSQL configuration parameters, making it much easier to configure cluster replication.
Step 1: Configuring the PostgreSQL Master/Primary Database Server
1. On the master server, switch to the postgres system account and configure the IP address(es) on which the master server will listen to for connections from clients.
In this case, we will use * meaning all.
# su - postgres
$ psql -c "ALTER SYSTEM SET listen_addresses TO '*';"
The ALTER SYSTEM SET SQL command is a powerful feature to change a server’s configuration parameters, directly with a SQL query. The configurations are saved in the postgresql.conf.auto file located at the root of data folder (e.g /var/lib/pgsql/12/data/) and read addition to those stored in postgresql.conf. But configurations in the former take precedence over those in the later and other related files.

2. Then create a replication role that will be used for connections from the standby server to the master server, using the createuser program. In the following command, the -P flag prompts for a password for the new role and -e echoes the commands that createuser generates and sends to the database server.
# su – postgres
$ createuser --replication -P -e replicator
$ exit

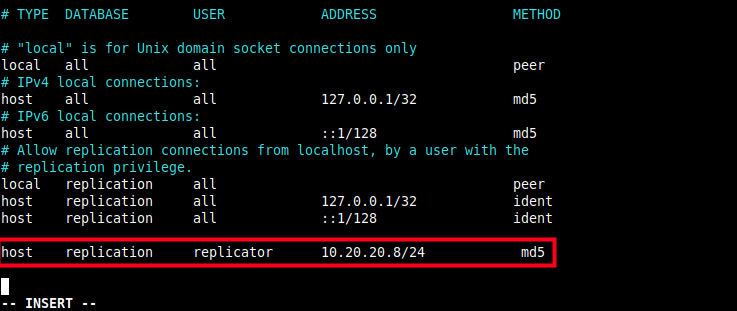
3. Then enter the following entry at the end of the /var/lib/pgsql/12/data/pg_hba.conf client authentication configuration file with the database field set to replication as shown in the screenshot.
host replication replicator 10.20.20.8/24 md5
4. Now restart the Postgres12 service using the following systemctl command to apply the changes.
# systemctl restart postgresql-12.service
5. Next, if you have the firewalld service running, you need to add the Postgresql service in the firewalld configuration to allow requests from the standby server to the master.
# firewall-cmd --add-service=postgresql --permanent
# firewall-cmd --reload
Step 2: Making a Base Backup to Bootstrap the Standby Server
6. Next, you need to make a base backup of the master server from the standby server; this helps to bootstrap the standby server. You need to stop the postgresql 12 service on the standby server, switch to the postgres user account, backup the data directory (/var/lib/pgsql/12/data/), then delete everything under it as shown, before taking the base backup.
# systemctl stop postgresql-12.service
# su - postgres
$ cp -R /var/lib/pgsql/12/data /var/lib/pgsql/12/data_orig
$ rm -rf /var/lib/pgsql/12/data/*
7. Then use the pg_basebackup tool to take the base backup with the right ownership (the database system user i.e Postgres, within the Postgres user account) and with the right permissions.
In the following command, the option:
-h– specifies the host which is the master server.-D– specifies the data directory.-U– specifies the connection user.-P– enables progress reporting.-v– enables verbose mode.-R– enables the creation of recovery configuration: Creates a standby.signal file and append connection settings to postgresql.auto.conf under the data directory.-X– used to include the required write-ahead log files (WAL files) in the backup. A value of stream means to stream the WAL while the backup is created.-C– enables the creation of a replication slot named by the -S option before starting the backup.-S– specifies the replication slot name.
$ pg_basebackup -h 10.20.20.9 -D /var/lib/pgsql/12/data -U replicator -P -v  -R -X stream -C -S pgstandby1
$ exit

8. When the backup process is done, the new data directory on the standby server should look like that in the screenshot. A standby.signal is created and the connection settings are appended to postgresql.auto.conf. You can list its contents using the ls command.
# ls -l /var/lib/pgsql/12/data/
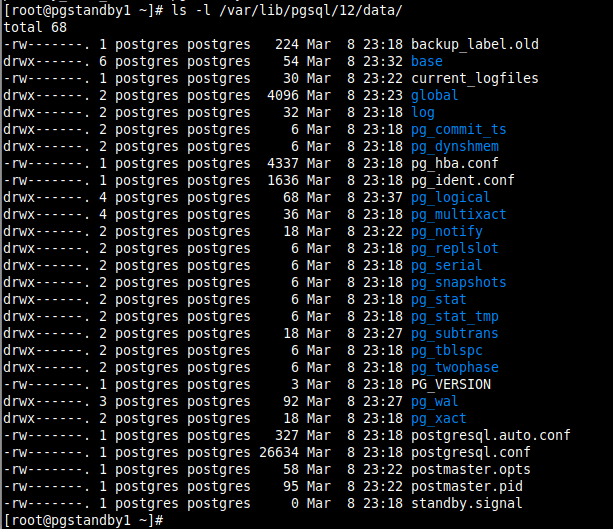
A replication slave will run in “Hot Standby” mode if the hot_standby parameter is set to on (the default value) in postgresql.conf and there is a standby.signal file present in the data directory.
9. Now back on the master server, you should be able to see the replication slot called pgstandby1 when you open the pg_replication_slots view as follows.
# su - postgres
$ psql -c "SELECT * FROM pg_replication_slots;"
$ exit

10. To view the connection settings appended in the postgresql.auto.conf file, use the cat command.
# cat /var/lib/pgsql/12/data/postgresql.auto.conf

11. Now commence normal database operations on the standby server by starting the PostgreSQL service as follows.
# systemctl start postgresql-12
Step 3: Testing PostgreSQL Streaming Replication
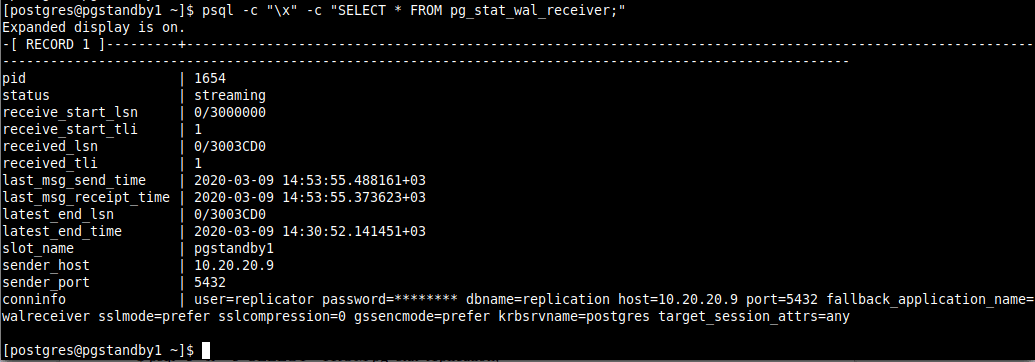
12. Once a connection is established successfully between the master and the standby, you will see a WAL receiver process in the standby server with a status of streaming, you can check this using the pg_stat_wal_receiver view.
$ psql -c "\x" -c "SELECT * FROM pg_stat_wal_receiver;"
and a corresponding WAL sender process in the master/primary server with a state of streaming and a sync_state of async, you can check this pg_stat_replication pg_stat_replication view.
$ psql -c "\x" -c "SELECT * FROM pg_stat_replication;"
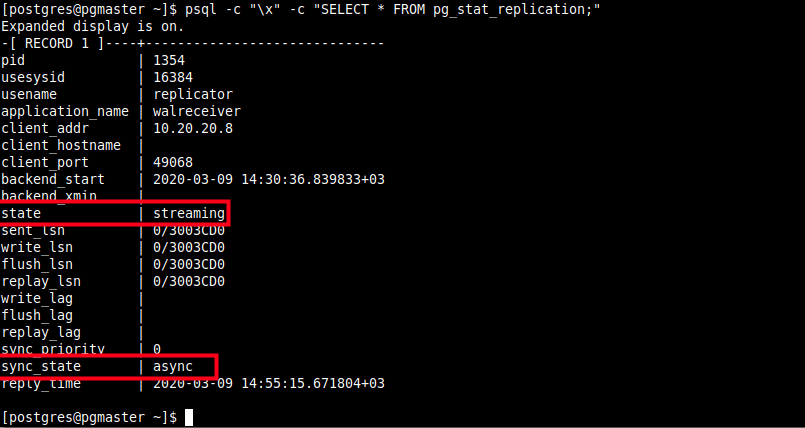
From the screenshot above, the streaming replication is asynchronous. In the next section, we will demonstrate how to optionally enable synchronous replication.
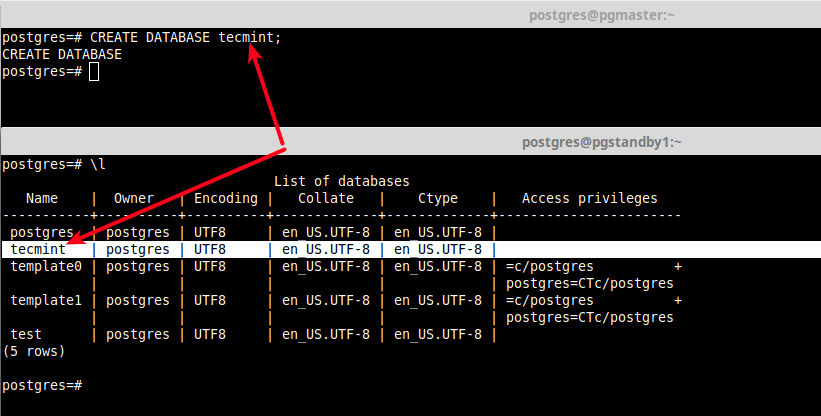
13. Now test if the replication is working fine by creating a test database in the master server and check if it exists in the standby server.
[master]postgres=# CREATE DATABASE tecmint;
[standby]postgres=# \l
Optional: Enabling Synchronous Replication
14. Synchronous replication offers the ability to commit a transaction (or write data) to the primary database and the standby/replica simultaneously. It only confirms that a transaction is successful when all changes made by the transaction have been transferred to one or more synchronous standby servers.
To enable synchronous replication, the synchronous_commit must also be set to on (which is the default value, thus no need for any change) and you also need to set the synchronous_standby_names parameter to a non-empty value. For this guide, we will set it to all.
$ psql -c "ALTER SYSTEM SET synchronous_standby_names TO '*';"

15. Then reload the PostgreSQL 12 service to apply the new changes.
# systemctl reload postgresql-12.service
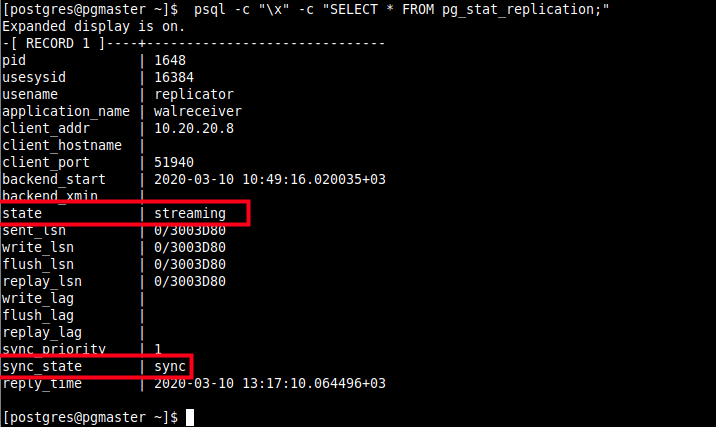
16. Now when you query the WAL sender process on the primary server once more, it should show a state of streaming and a sync_state of sync.
$ psql -c "\x" -c "SELECT * FROM pg_stat_replication;"
We have come to the end of this guide. We have shown how to set up PostgreSQL 12 master-standby database streaming replication in CentOS 8. We also covered how to enable synchronous replication in a PostgreSQL database cluster.
There are many uses of replication and you can always pick a solution that meets your IT environment and/or application-specific requirements. For more detail, go to Log-Shipping Standby Servers in the PostgreSQL 12 documentation.


Thanks for the information, it’s an excellent blog!
Hi,
I had a case when the stanby server was done and then the master server (sync) timeout/long time execute a query for update/delete.
How to stop replication on master server ?
Very good blog, thank you so much for your effort in writing the posts.
Thanks, Mruthyunjaya, it a very good article, Can you please share how to do Postgresql failover and failback based on the replication slots?
Hi team
Thanks for the steps for configuring the failover method in detail.
Need more details like:
The steps for replication of Postgres v12 are explained in simple terms.
Have set up replication referencing steps above
Do you have any references on how to setup DRBD or SRDF for disk mirroring
Thank you, very great article. I was able to get replication up and running thanks to your guide.
one typo on step 2 you have a typo on Primary IP:
@pg-rook,
Thanks, corrected the command in the article…