A Linux Foundation Certified Engineer is a skilled professional who has the expertise to install, manage, and troubleshoot network services in Linux systems, and is in charge of the design, implementation and ongoing maintenance of the system-wide architecture.

Introducing The Linux Foundation Certification Program.
In Part 1 of this series, we showed how to install squid, a proxy caching server for web clients. Please refer to that post (link given below) before proceeding if you haven’t installed squid on your system yet.
In this article, we will show you how to configure the Squid proxy server in order to grant or restrict Internet access, and how to configure an http client, or web browser, to use that proxy server.
My Testing Environment Setup
Squid Server
Operating System :	Debian Wheezy 7.5
IP Address 	 :	192.168.0.15
Hostname	 :	dev2.gabrielcanepa.com.ar
Client Machine 1
Operating System :	Ubuntu 12.04
IP Address 	 :	192.168.0.104
Hostname	 :	ubuntuOS.gabrielcanepa.com.ar
Client Machine 2
Operating System :	CentOS-7.0-1406
IP Address 	 :	192.168.0.17
Hostname	 :	dev1.gabrielcanepa.com.ar
Let us remember that, in simple terms, a web proxy server is an intermediary between one (or more) client computers and a certain network resource, the most common being access to the Internet. In other words, the proxy server is connected on one side directly to the Internet (or to a router that is connected to the Internet) and on the other side to a network of client computers that will access the World Wide Web through it.
You may be wondering, why would I want to add yet another piece of software to my network infrastructure?
Here are the top 3 reasons:
1. Squid stores files from previous requests to speed up future transfers. For example, suppose client1 downloads CentOS-7.0-1406-x86_64-DVD.iso from the Internet. When client2 requests access to the same file, squid can transfer the file from its cache instead of downloading it again from the Internet. As you can guess, you can use this feature to speed up data transfers in a network of computers that require frequent updates of some kind.
2. ACLs (Access Control Lists) allow us to restrict the access to websites, and / or monitor the access on a per user basis. You can restrict access based on day of week or time of day, or domain, for example.
3. Bypassing web filters is made possible through the use of a web proxy to which requests are made and which returns requested content to a client, instead of having the client request it directly to the Internet.
For example, suppose you are logged on in client1 and want to access www.facebook.com through your company’s router. Since the site may be blocked by your company’s policies, you can instead connect to a web proxy server and have it request access to www.facebook.com. Remote content is then returned to you through the web proxy server again, bypassing your company’s router’s blocking policies.
Configuring Squid – The Basics
The access control scheme of the Squid web proxy server consists of two different components:
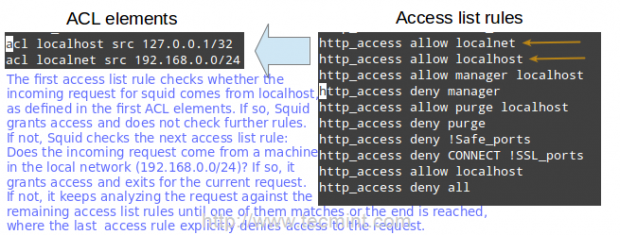
- The ACL elements are directive lines that begin with the word “acl” and represent types of tests that are performed against any request transaction.
- The access list rules consist of an allow or deny action followed by a number of ACL elements, and are used to indicate what action or limitation has to be enforced for a given request. They are checked in order, and list searching terminates as soon as one of the rules is a match. If a rule has multiple ACL elements, it is implemented as a boolean AND operation (all ACL elements of the rule must be a match in order for the rule to be a match).
Squid’s main configuration file is /etc/squid/squid.conf, which is ~5000 lines long since it includes both configuration directives and documentation. For that reason, we will create a new squid.conf file with only the lines that include configuration directives for our convenience, leaving out empty or commented lines. To do so, we will use the following commands.
# mv /etc/squid/squid.conf /etc/squid/squid.conf.bkp
And then,
# grep -Eiv '(^#|^$)' /etc/squid/squid.conf.bkp

OR

# grep -ve ^# -ve ^$ /etc/squid/squid.conf.bkp > /etc/squid/squid.conf

Now, open the newly created squid.conf file, and look for (or add) the following ACL elements and access lists.
acl localhost src 127.0.0.1/32
acl localnet src 192.168.0.0/24
The two lines above represent a basic example of the usage of ACL elements.
- The first word, acl, indicates that this is a ACL element directive line.
- The second word, localhost or localnet, specify a name for the directive.
- The third word, src in this case, is an ACL element type that is used to represent a client IP address or range of addresses, respectively. You can specify a single host by IP (or hostname, if you have some sort of DNS resolution implemented) or by network address.
- The fourth parameter is a filtering argument that is “fed” to the directive.
The two lines below are access list rules and represent an explicit implementation of the ACL directives mentioned earlier. In few words, they indicate that http access should be granted if the request comes from the local network (localnet), or from localhost. Specifically what is the allowed local network or local host addresses? The answer is: those specified in the localhost and localnet directives.
http_access allow localnet
http_access allow localhost
At this point you can restart Squid in order to apply any pending changes.
# service squid restart 		[Upstart / sysvinit-based distributions]
# systemctl restart squid.service 	[systemd-based distributions]
and then configure a client browser in the local network (192.168.0.104 in our case) to access the Internet through your proxy as follows.
In Firefox
1. Go to the Edit menu and choose the Preferences option.
2. Click on Advanced, then on the Network tab, and finally on Settings…
3. Check Manual proxy configuration and enter the IP address of the proxy server and the port where it is listening for connections.
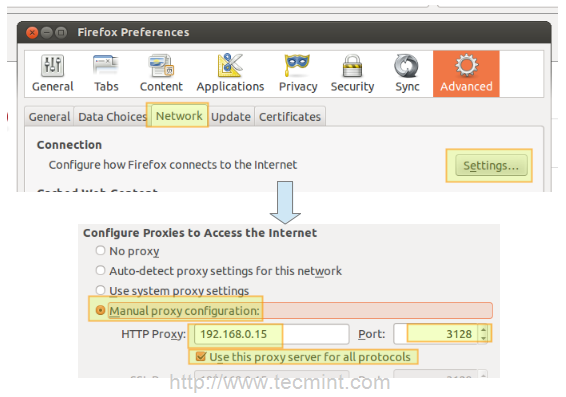
Note That by default, Squid listens on port 3128, but you can override this behaviour by editing the access list rule that begins with http_port (by default it reads http_port 3128).
4. Click OK to apply the changes and you’re good to go.
Verifying that a Client is Accessing the Internet
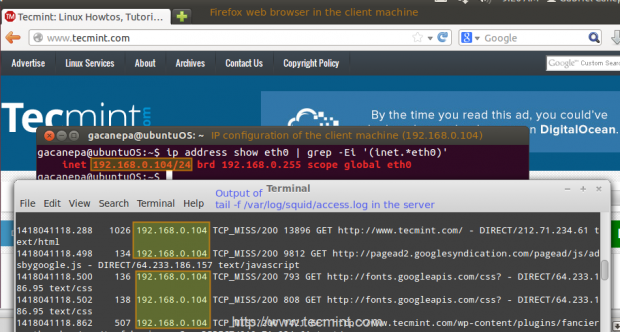
You can now verify that your local network client is accessing the Internet through your proxy as follows.
1. In your client, open up a terminal and type,
# ip address show eth0 | grep -Ei '(inet.*eth0)'
That command will display the current IP address of your client (192.168.0.104 in the following image).
2. In your client, use a web browser to open any given web site (www.tecmint.com in this case).
3. In the server, run.
# tail -f /var/log/squid/access.log
and you’ll get a live view of requests being served through Squid.
Restricting Access By Client
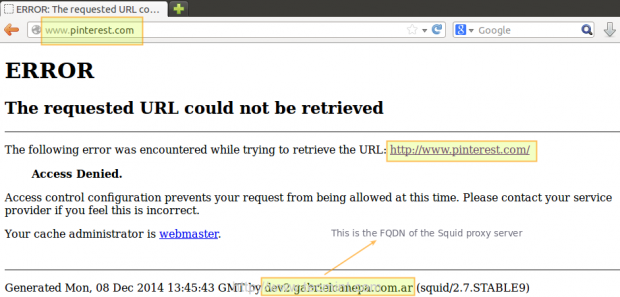
Now suppose you want to explicitly deny access to that particular client IP address, while yet maintaining access for the rest of the local network.
1. Define a new ACL directive as follows (I’ve named it ubuntuOS but you can name it whatever you want).
acl ubuntuOS src 192.168.0.104
2. Add the ACL directive to the localnet access list that is already in place, but prefacing it with an exclamation sign. This means, “Allow Internet access to clients matching the localnet ACL directive except to the one that matches the ubuntuOS directive”.
http_access allow localnet !ubuntuOS
3. Now we need to restart Squid in order to apply changes. Then if we try to browse to any site we will find that access is denied now.
Configuring Squid – Fine Tuning
Restricting access by domain and / or by time of day / day of week
To restrict access to Squid by domain we will use the dstdomain keyword in a ACL directive, as follows.
acl forbidden dstdomain "/etc/squid/forbidden_domains"
Where forbidden_domains is a plain text file that contains the domains that we desire to deny access to.

Finally, we must grant access to Squid for requests not matching the directive above.
http_access allow localnet !forbidden
Or maybe we will only want to allow access to those sites during a certain time of the day (10:00 until 11:00 am) only on Monday (M), Wednesday (W), and Friday (F).
acl someDays time MWF 10:00-11:00
http_access allow forbidden someDays
http_access deny forbidden
Otherwise, access to those domains will be blocked.
Restricting access by user authentication
Squid support several authentication mechanisms (Basic, NTLM, Digest, SPNEGO, and Oauth) and helpers (SQL database, LDAP, NIS, NCSA, to name a few). In this tutorial we will use Basic authentication with NCSA.
Add the following lines to your /etc/squid/squid.conf file.
auth_param basic program /usr/lib/squid/ncsa_auth /etc/squid/passwd
auth_param basic credentialsttl 30 minutes
auth_param basic casesensitive on
auth_param basic realm Squid proxy-caching web server for Tecmint's LFCE series
acl ncsa proxy_auth REQUIRED
http_access allow ncsa
Note: In CentOS 7, the NCSA plugin for squid can be found in /usr/lib64/squid/basic_nsca_auth, so change accordingly in above line.

A few clarifications:
- We need to tell Squid which authentication helper program to use with the auth_param directive by specifying the name of the program (most likely, /usr/lib/squid/ncsa_auth or /usr/lib64/squid/basic_nsca_auth), plus any command line options (/etc/squid/passwd in this case) if necessary.
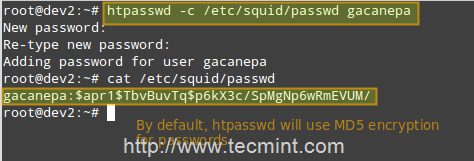
- The /etc/squid/passwd file is created through htpasswd, a tool to manage basic authentication through files. It will allow us to add a list of usernames (and their corresponding passwords) that will be allowed to use Squid.
- credentialsttl 30 minutes will require entering your username and password every 30 minutes (you can specify this time interval with hours as well).
- casesensitive on indicates that usernames and passwords are case sensitive.
- realm represents the text of the authentication dialog that will be used to authenticate to squid.
- Finally, access is granted only when proxy authentication (proxy_auth REQUIRED) succeeds.
Run the following command to create the file and to add credentials for user gacanepa (omit the -c flag if the file already exists).
# htpasswd -c /etc/squid/passwd gacanepa
Open a web browser in the client machine and try to browse to any given site.
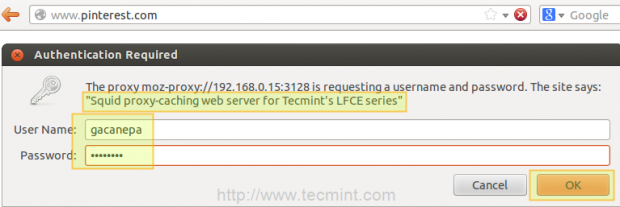
If authentication succeeds, access is granted to the requested resource. Otherwise, access will be denied.
Using Cache to Sped Up Data Transfer
One of Squid’s distinguishing features is the possibility of caching resources requested from the web to disk in order to speed up future requests of those objects either by the same client or others.
Add the following directives in your squid.conf file.
cache_dir ufs /var/cache/squid 1000 16 256
maximum_object_size 100 MB
refresh_pattern .*\.(mp4|iso) 2880
A few clarifications of the above directives.
- ufs is the Squid storage format.
- /var/cache/squid is a top-level directory where cache files will be stored. This directory must exist and be writeable by Squid (Squid will NOT create this directory for you).
- 1000 is the amount (in MB) to use under this directory.
- 16 is the number of 1st-level subdirectories, whereas 256 is the number of 2nd-level subdirectories within /var/spool/squid.
- The maximum_object_size directive specifies the maximum size of allowed objects in the cache.
- refresh_pattern tells Squid how to deal with specific file types (.mp4 and .iso in this case) and for how long it should store the requested objects in cache (2880 minutes = 2 days).
The first and second 2880 are lower and upper limits, respectively, on how long objects without an explicit expiry time will be considered recent, and thus will be served by the cache, whereas 0% is the percentage of the objects’ age (time since last modification) that each object without explicit expiry time will be considered recent.
Case study: downloading a .mp4 file from 2 different clients and testing the cache
First client (IP 192.168.0.104) downloads a 71 MB .mp4 file in 2 minutes and 52 seconds.

Second client (IP 192.168.0.17) downloads the same file in 1.4 seconds!

That is because the file was served from the Squid cache (indicated by TCP_HIT/200) in the second case, as opposed to the first instance, when it was downloaded directly from the Internet (represented by TCP_MISS/200).
The HIT and MISS keywords, along with the 200 http response code, indicate that the file was served successfully both times, but the cache was HIT and Missed respectively. When a request cannot be served by the cache for some reason, then Squid attempts to serve it from the Internet.

Conclusion
In this article we have discussed how to set up a Squid web caching proxy. You can use the proxy server to filter contents using a chosen criteria, and also to reduce latency (since identical incoming requests are served from the cache, which is closer to the client than the web server that is actually serving the content, resulting in faster data transfers) and network traffic as well (reducing the amount of used bandwidth, which saves you money if you’re paying for traffic).
You may want to refer to the Squid web site for further documentation (make sure to also check the wiki), but do not hesitate to contact us if you have any questions or comments. We will be more than glad to hear from you!


