In this guide we will learn how to create images and launch an instance of an image (virtual machine) in OpenStack and how to gain control over an instance via SSH.
Requirements
Step 1: Allocate Floating IP to OpenStack
1. Before you deploy an OpenStack image, first you need to assure that all pieces are in place and we’ll start by allocating floating IP.
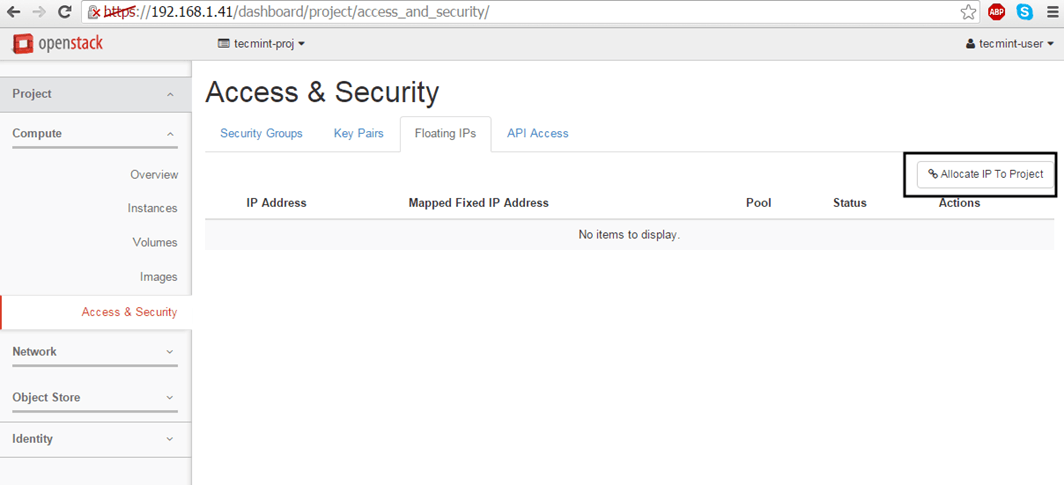
Floating IP allows external access from outside networks or internet to an Openstack virtual machine. In order to create floating IPs for your project, login with your user credentials and go to Project -> Compute -> Access & Security -> Floating IPs tab and click on Allocate IP to The Project.
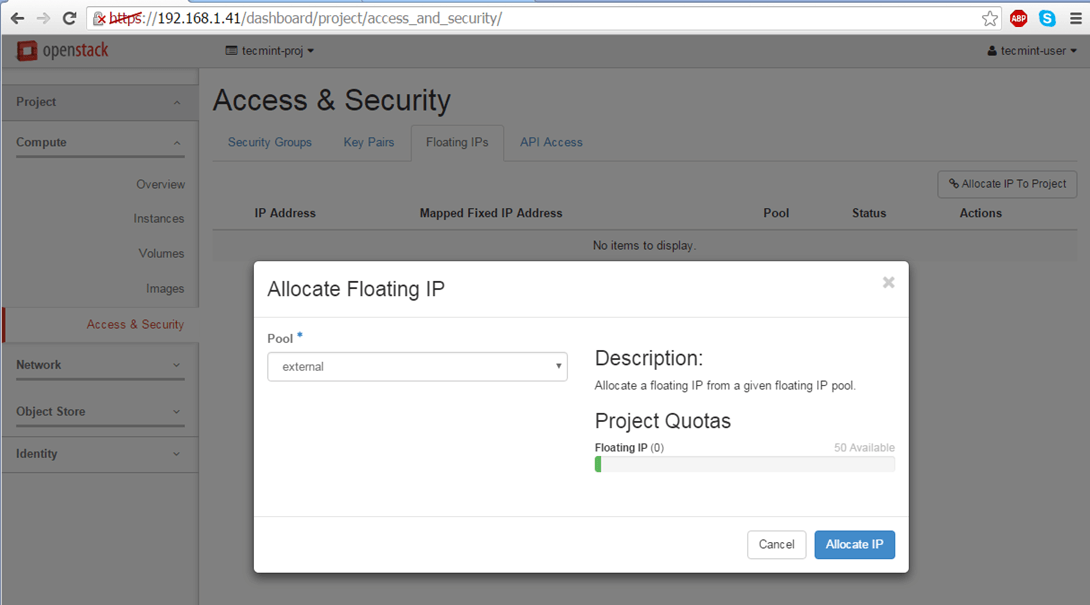
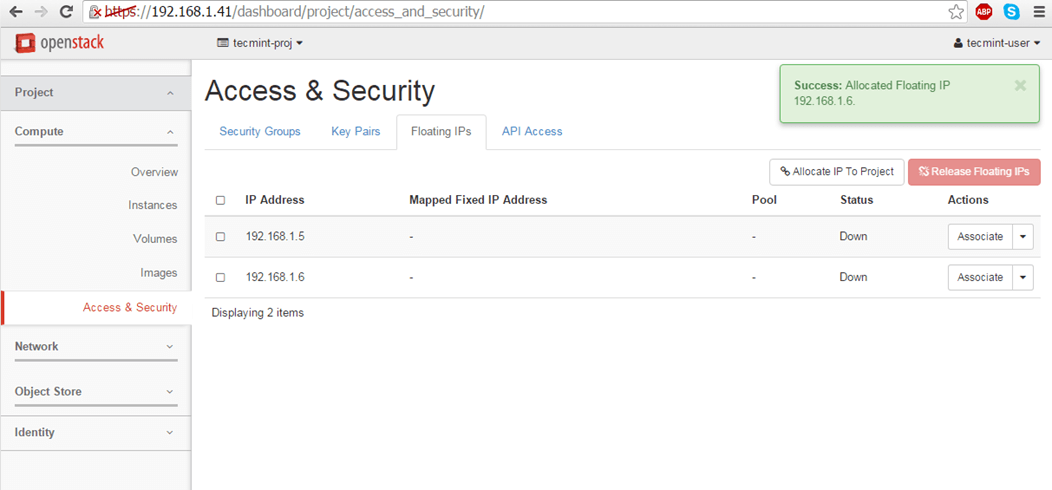
Choose external Pool and hit on Allocate IP button and the IP address should appear in dashboard. It’s a good idea to allocate a Floating IP for each instance you run.
Step 2: Create an OpenStack Image
2. OpenStack images are just virtual machines already created by third-parties. You can create your own customized images on your machine by installing an Linux OS in a virtual machine using a virtualization tool, such as KVM, VirtualBox, VMware or Hyper-V.
Once you have installed the OS, just convert the file to raw and upload it to your OpenStack cloud infrastructure.
To deploy official images provided by major Linux distributions use the following links to download the latest packaged images:
- CentOS 7 – http://cloud.centos.org/centos/7/images/
- CentOS 6 – http://cloud.centos.org/centos/6/images/
- Fedora 23 – https://download.fedoraproject.org/pub/fedora/linux/releases/23/Cloud/
- Ubuntu – http://cloud-images.ubuntu.com/
- Debian – http://cdimage.debian.org/cdimage/openstack/current/
- Windows Server 2012 R2 – https://cloudbase.it/windows-cloud-images/#download
Official images additionally contain the cloud-init package which is responsible with SSH key pair and user data injection.
On this guide we’ll deploy a test image, for demonstration purposes, based on a lightweight Cirros cloud image which can be obtained by visiting the following link http://download.cirros-cloud.net/0.3.4/.
The image file can be used directly from the HTTP link or downloaded locally on your machine and uploaded to OpenStack cloud.
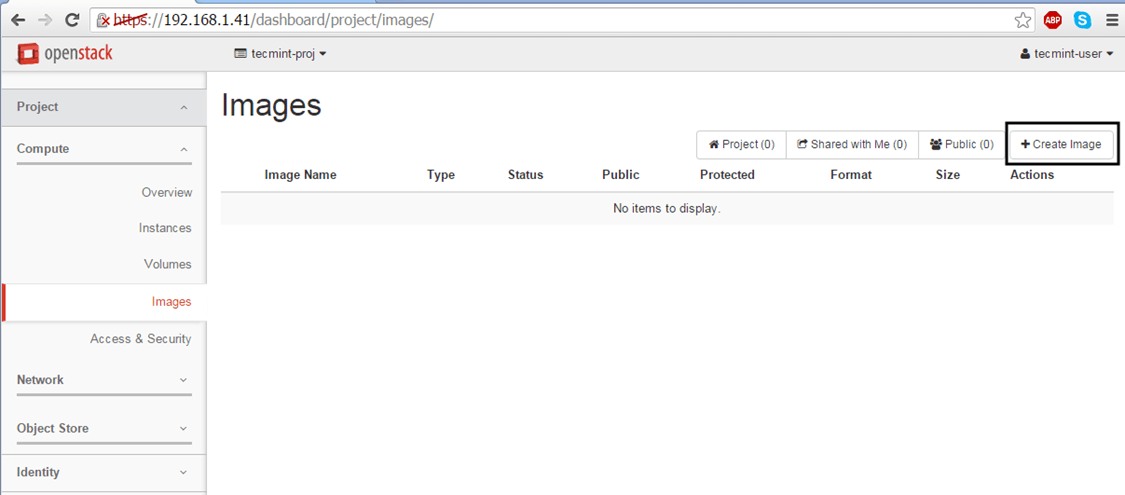
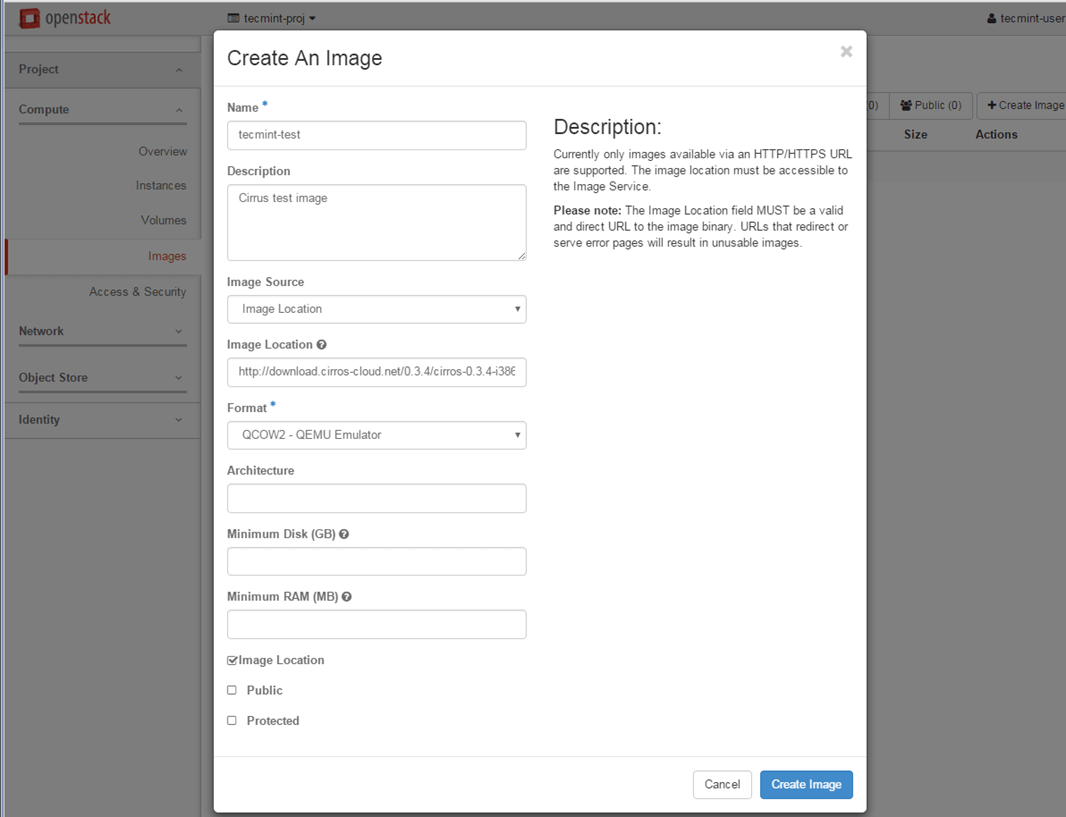
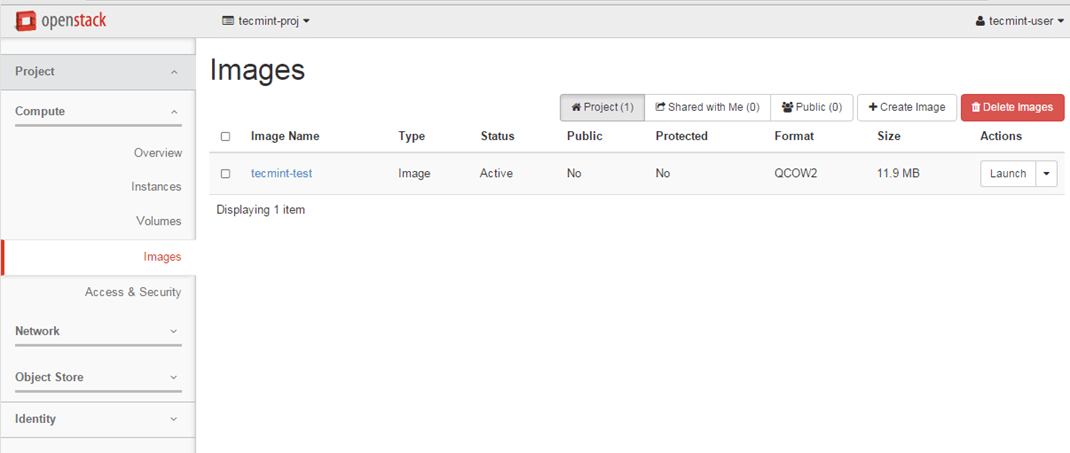
To create an image, go OpenStack web panel and navigate to Project -> Compute -> Images and hit on Create Image button. On the image prompt use the following settings and hit on Create Image when done.
Name: tecmint-test
Description: Cirros test image
Image Source: Image Location  #Use Image File if you’ve downloaded the file locally on your hard disk
Image Location: http://download.cirros-cloud.net/0.3.4/cirros-0.3.4-i386-disk.img
Format: QCOWW2 – QEMU Emulator
Architecture: leave blank
Minimum Disk: leave blank
Minimum RAM: leave blank
Image Location: checked
Public: unchecked
Protected: unchecked
Step 3: Launch an Image Instance in OpenStack
3. Once you’ve created an image you’re good to go. Now you can run the virtual machine based on the image created earlier in your cloud environment.
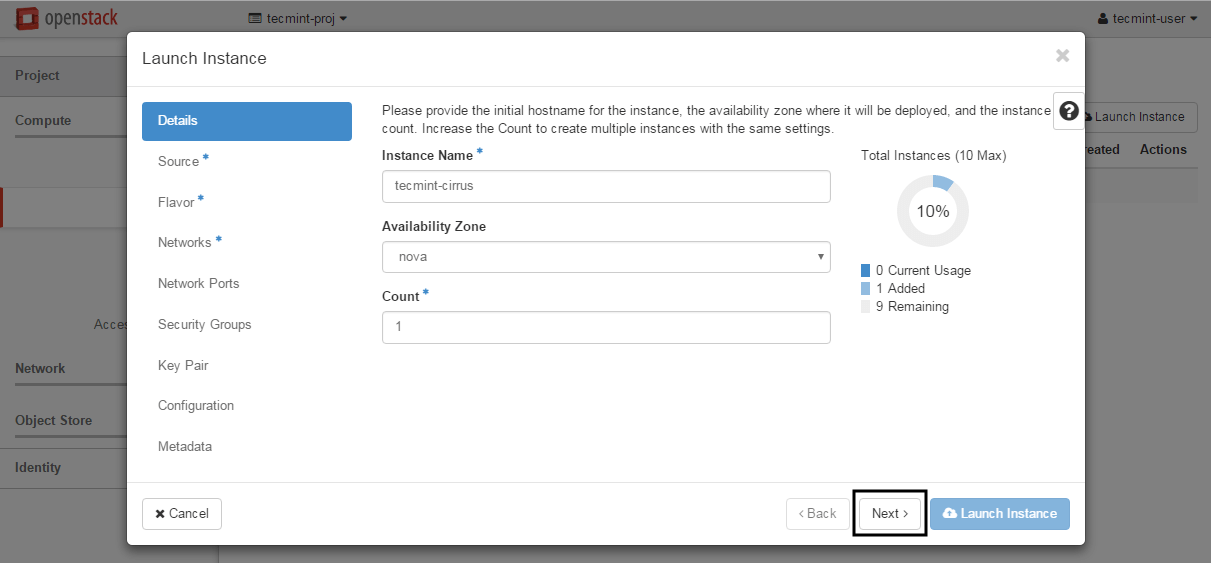
Move to Project -> Instances and hit on Launch Instance button and a new window will appear.

4. On the first screen add a name for your instance, leave the Availability Zone to nova, use one instance count and hit on Next button to continue.
Choose a descriptive Instance Name for your instance because this name will be used to form the virtual machine hostname.
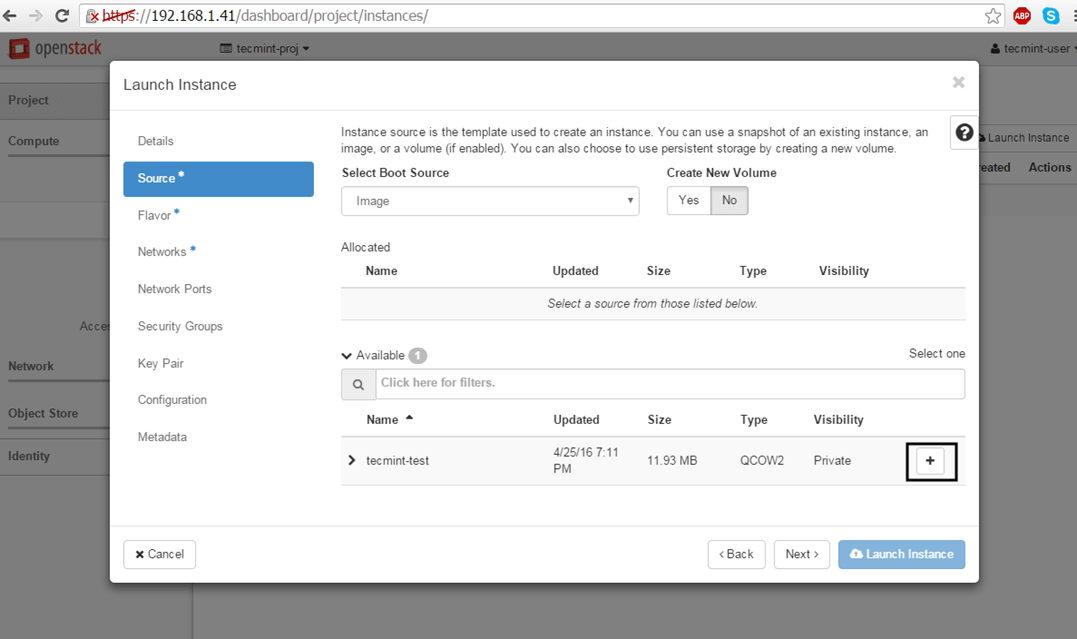
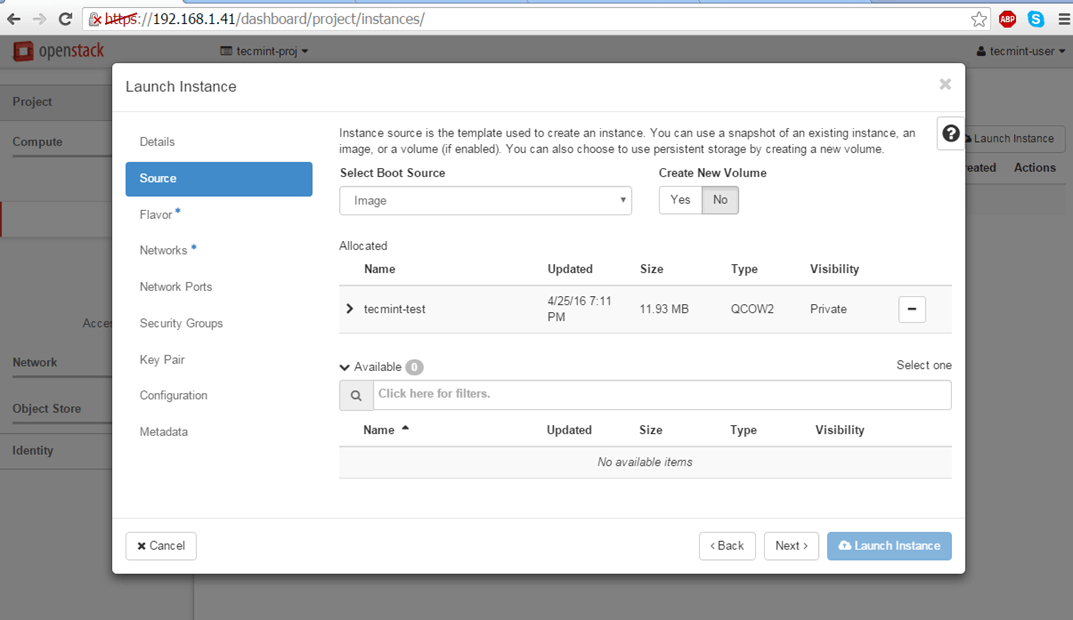
5. Next, select Image as a Boot Source, add the Cirros test image created earlier by hitting the + button and hit Next to proceed further.
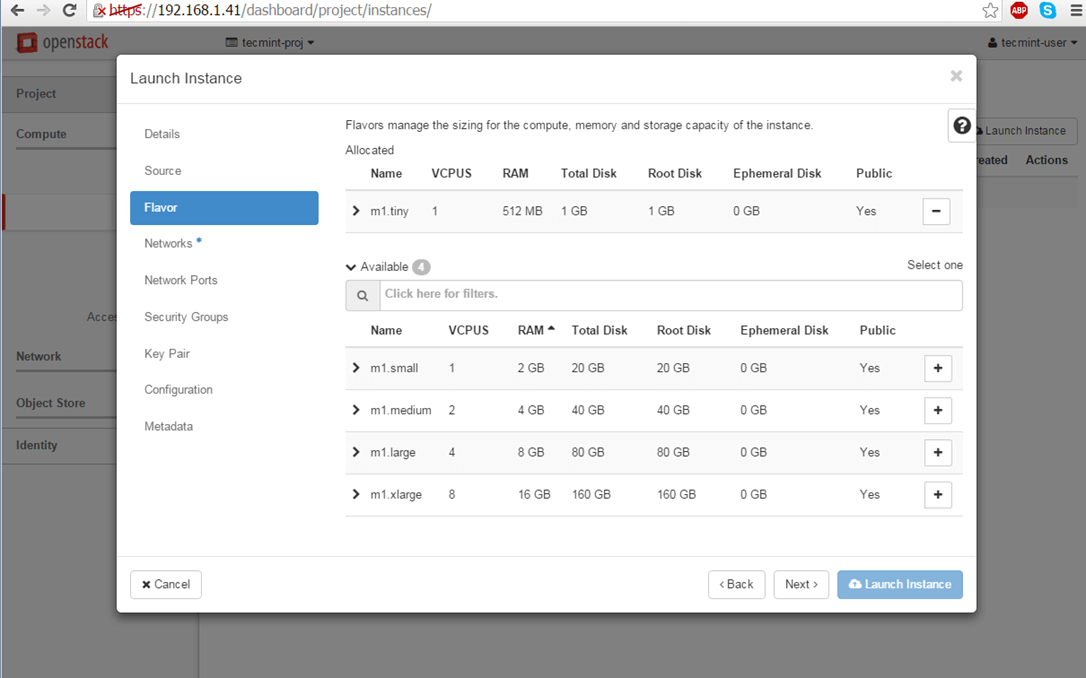
6. Allocate the virtual machine resources by adding a flavor best suited for your needs and click on Next to move on.
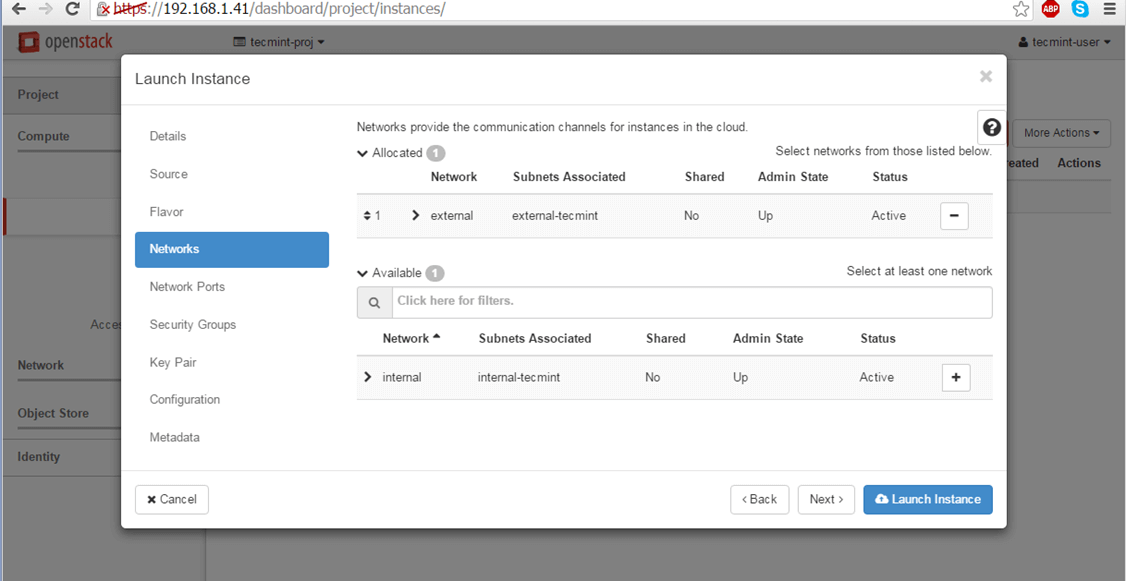
7. Finally, add one of the OpenStack available networks to your instance using the + button and hit on Launch Instance to start the virtual machine.
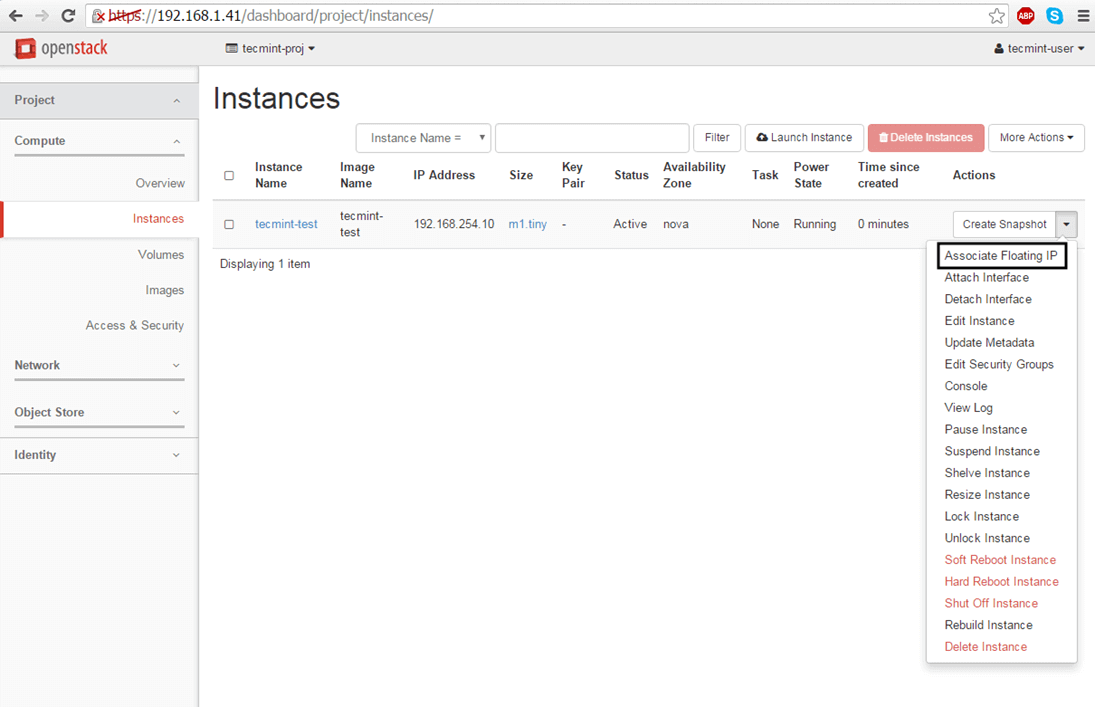
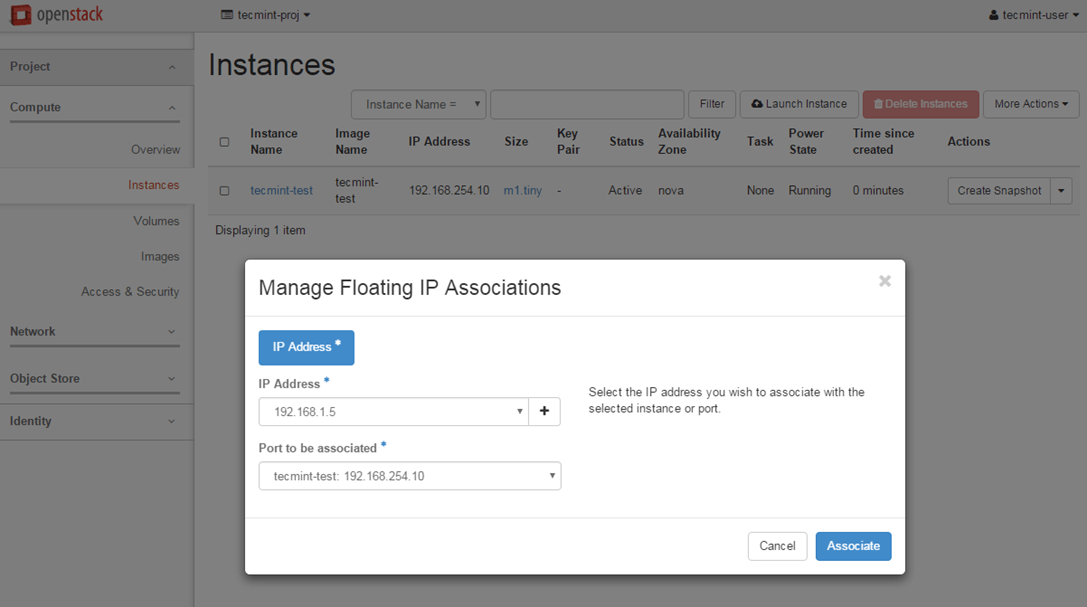
8. Once the instance has been started, hit on the right arrow from Create Snapshot menu button and choose Associate Floating IP.
Select one of the floating IP created earlier and hit on Associate button in order to make the instance reachable from your internal LAN.
9. To test the network connectivity for your active virtual machine issue a ping command against the instance floating IP address from a remote computer in your LAN.
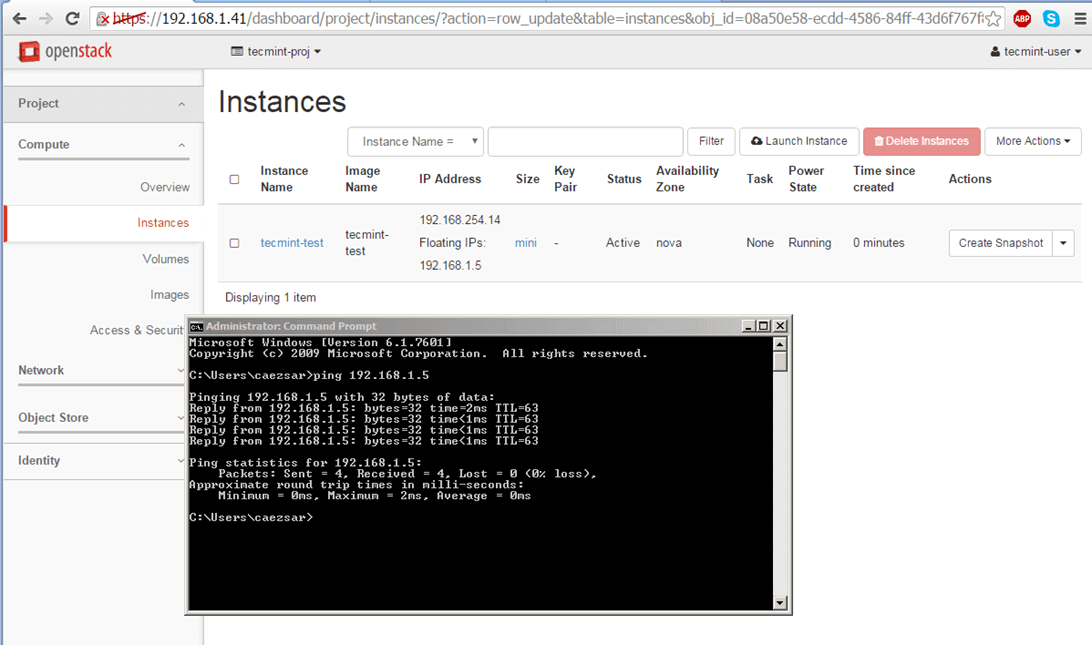
10. In case there’s no issue with your instance and the ping command succeeds you can remotely login via SSH on your instance.
Use the instance View Log utility to obtain Cirros default credentials as illustrated on the below screenshots.
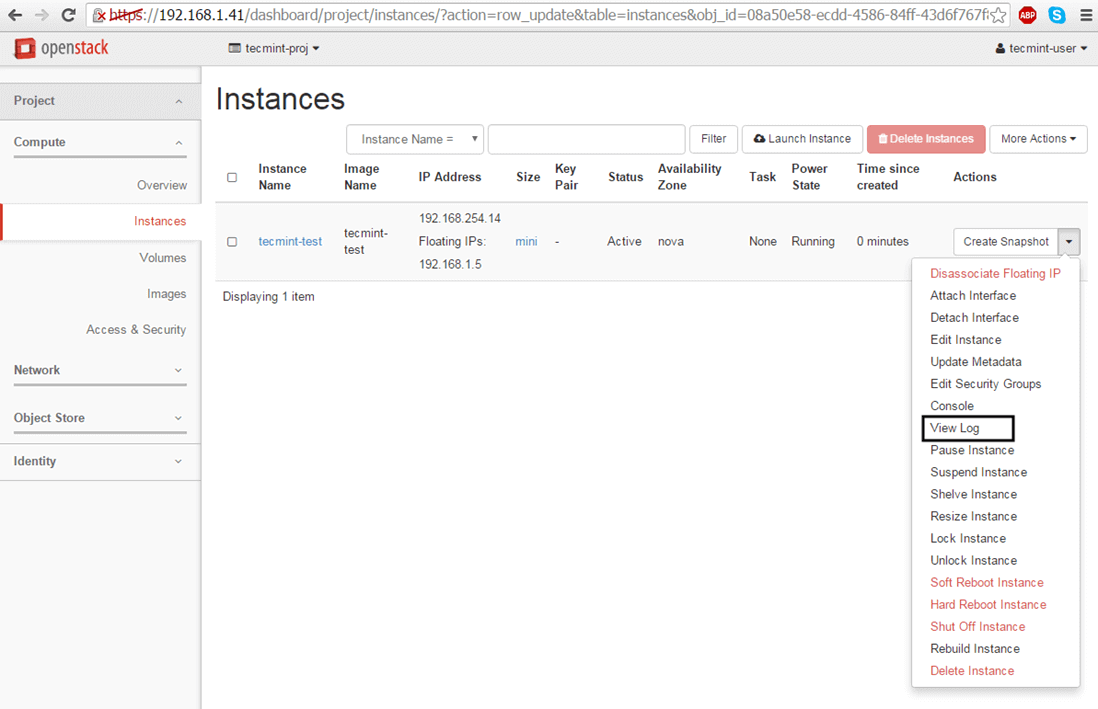
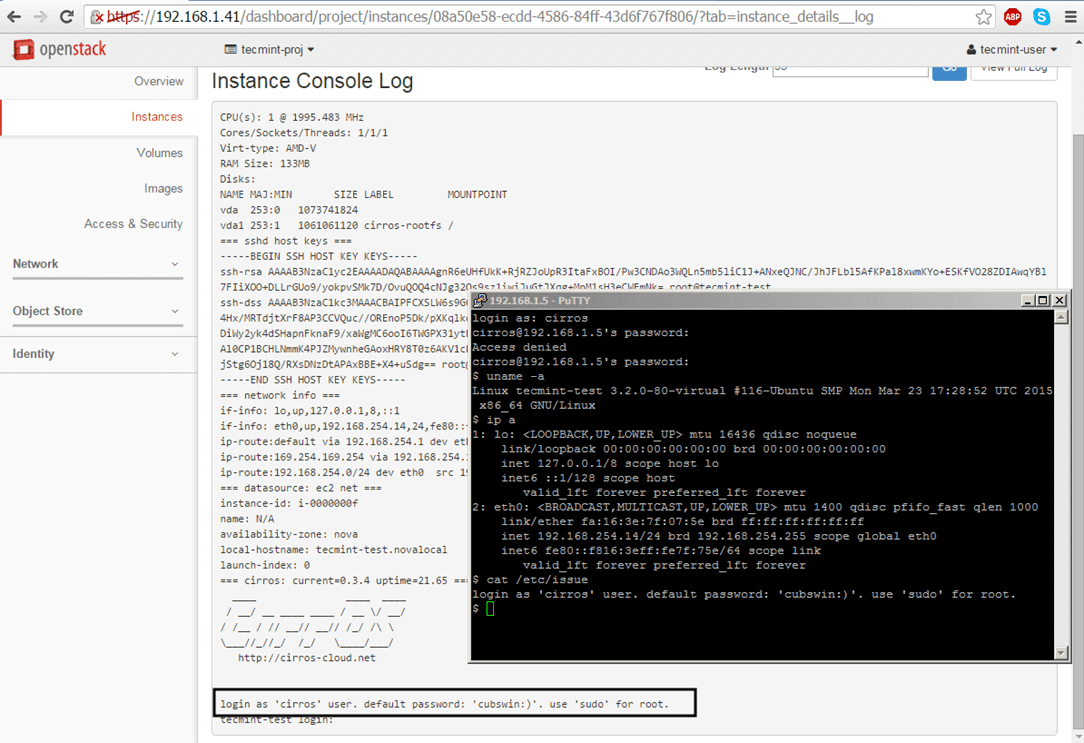
11. By default, no DNS name servers will be allocated from the internal network DHCP server for your virtual machine. This problem leads to domain connectivity issues from instance counterpart.
To solve this issue, first stop the instance and go to Project -> Network -> Networks and edit the proper subnet by hitting the Subnet Details button.
Add the required DNS name servers, save the configuration, start and connect to the instance console to test if the new configuration has been applied by pinging a domain name. Use the following screenshots as a guide.
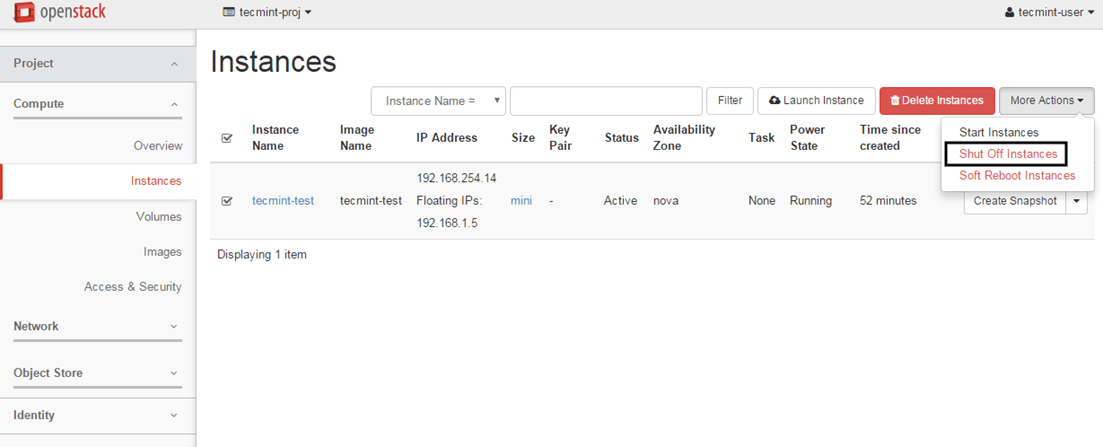
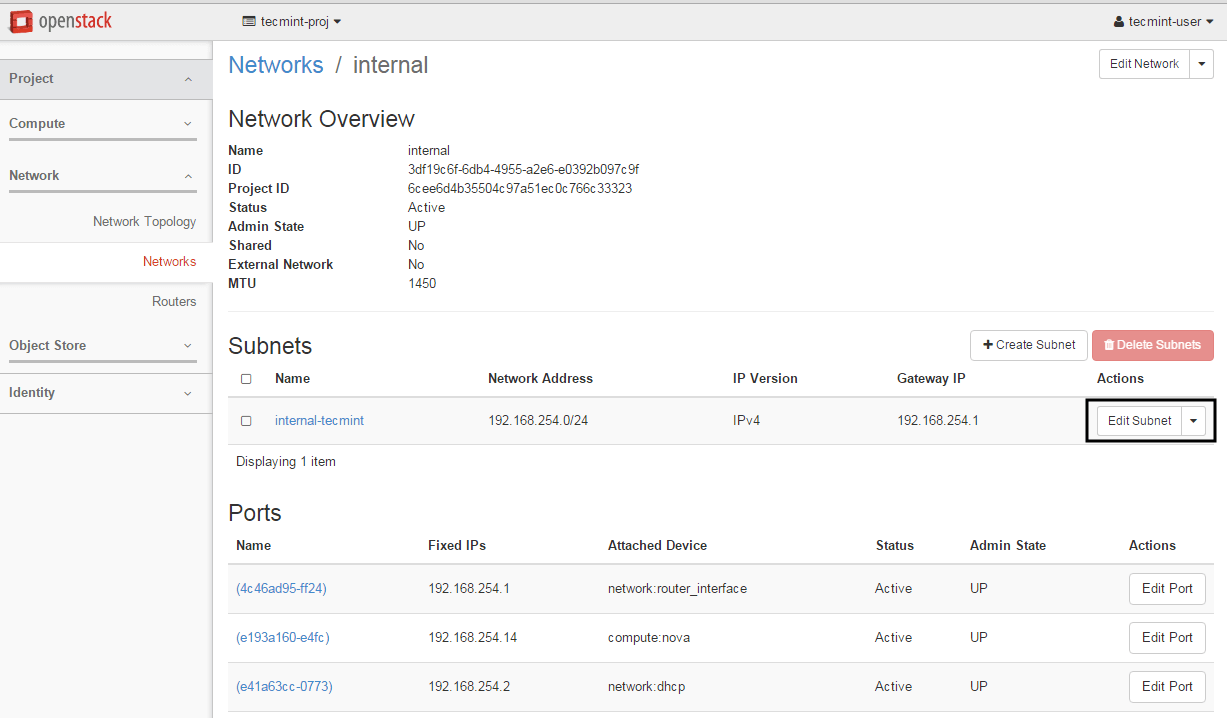
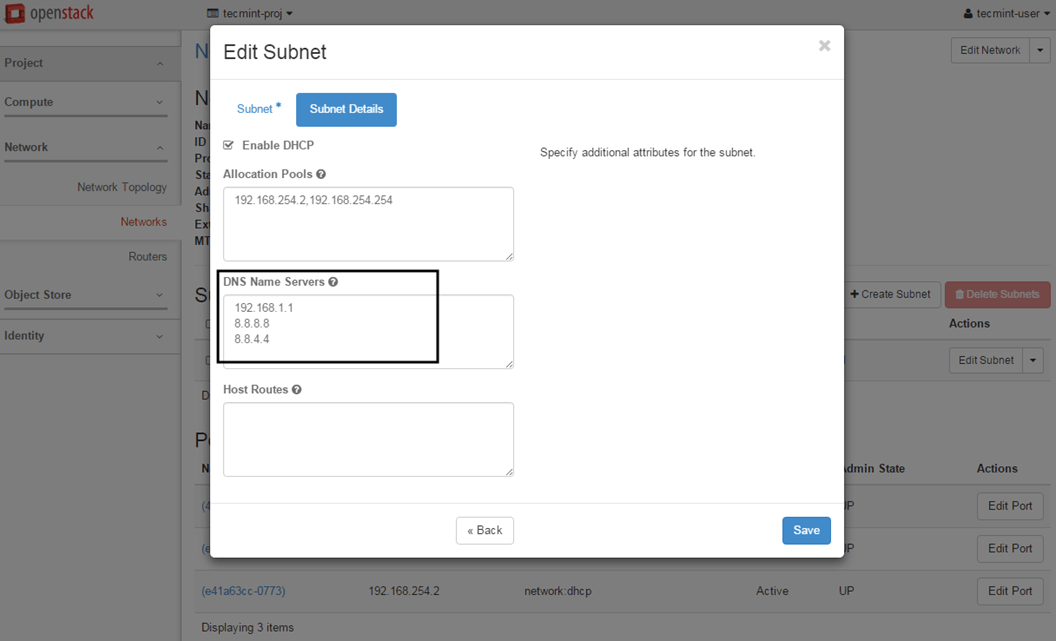
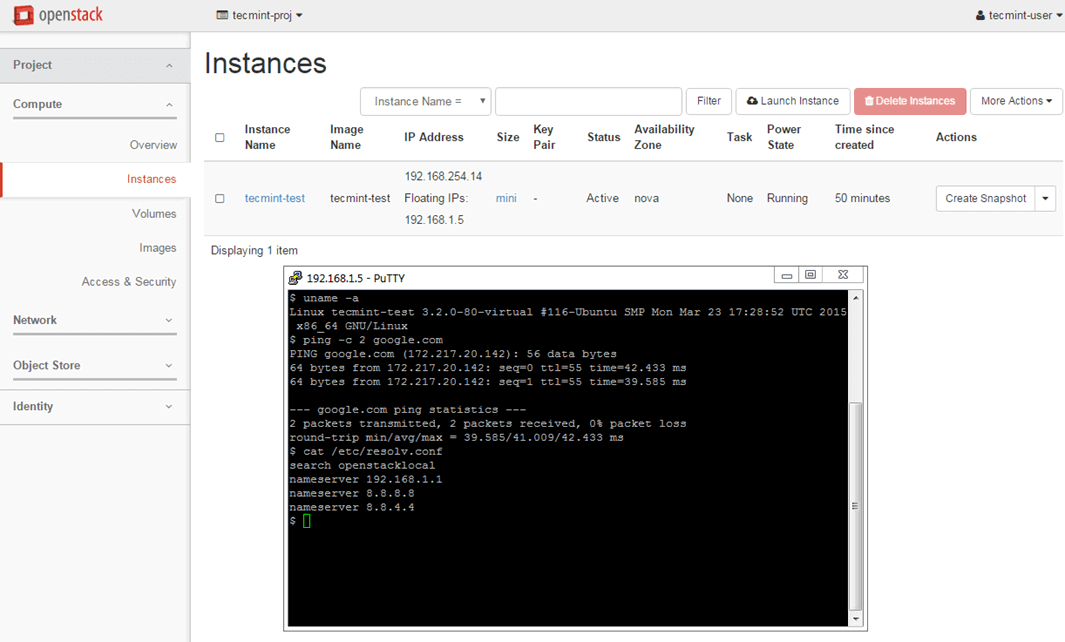
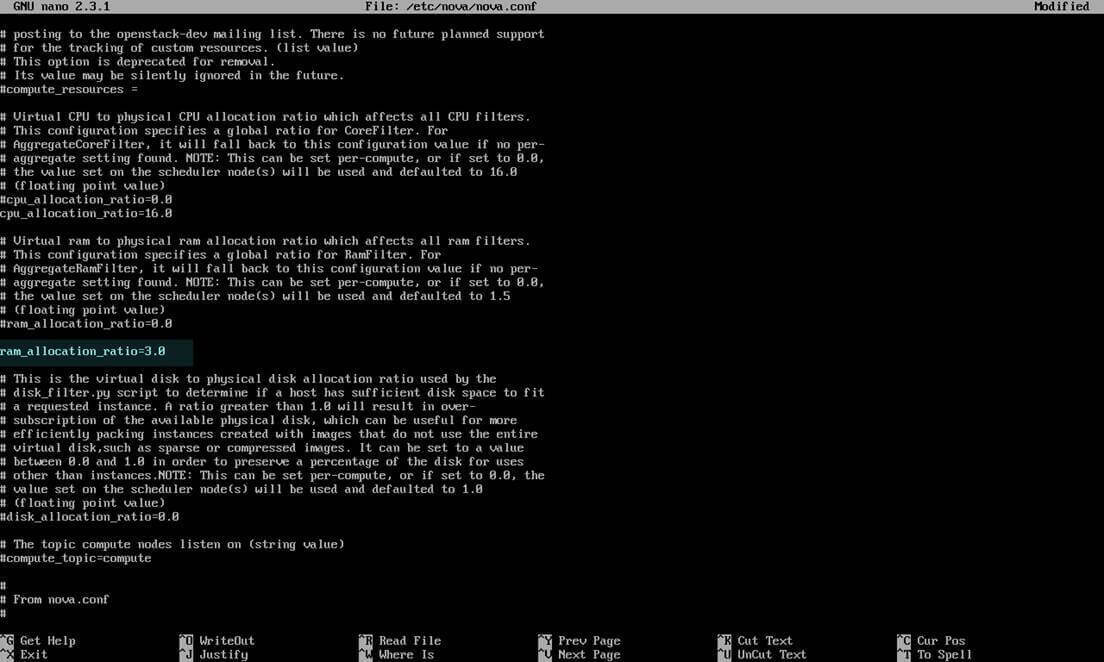
In case you have limited physical resources in your infrastructure and some of your instances refuse to start, edit the following line from nova configuration file and restart the machine in order to apply changes.
# vi /etc/nova/nova.conf
Change the following line to look like this:
ram_allocation_ratio=3.0
That’s all! Although this series of guides just scratched the surface of OpenStack mammoth, now you have the basic knowledge to start create new tenants and use real Linux OS images in order to deploy virtual machines in your own OpenStack cloud infrastructure.

Hello,
Followed your guide but:
Error: External network 7ecdd64f-2e91-41d1-b177-46fa7940ea87 is not reachable from subnet f8258c5d-32a3-441d-9e73-a13cd0ab9d81. Therefore, cannot associate Port 3daa43d5-47e0-40e5-bcdd-33f220b39580 with a Floating IP. Neutron server returns request_ids: [‘req-b322718e-56be-4d38-bbe2-bd98d74db8b6’]
Error: Unable to associate IP address 192.168.176.8.
Any ideas?
Can not create image under test user but only using root. Server error – OpenStack Dashboard
Something went wrong! An unexpected error has occurred. Try refreshing the page. If that doesn’t help, contact your local administrator.
Found Workaround: add user in /etc/sudoers
Reboot
Works for me.
Where should i get windows 10 qcow2 image??? with drivers ?
There’s no official Windows 10 image for Openstack. But you can create your own image using this guide: http://docs.openstack.org/image-guide/windows-image.html
I followed your tutorial to get set up openstack mitaka.
I create a vm but if I click log here is the error message it gives me Unable to retrieve the log for instance “b2c8fbea-c063-4737-a886-521456f92dbd”.
help me
I am getting this error. [Error: No valid host was found. There are not enough hosts available.] What to do?
While launching the instance.
@Sanya,
Please check with the following command that compute node as enabled and up.
If its down, you need to restart the nova-compute service on the compute node and make sure that networking from controller to compute node configured properly. Can you able to ping controller node from compute node?
Also make that libvirt is up on compute node.
Create external network with an administrative user.
Hello, thanks for your tutorial, but i have only question, when we are selecting the network for the instances we must select the “external network” ? (Of course what i want to test is external access but when i select the external network on my log i can see a message like this ” ExternalNetworkAttachForbidden: It is not allowed to create an interface on external network “) but if i select internal net when i am creating the instance there is no error but i can’t access to my instance from lan :(
Ever find a solution? I am faced with the same prohlem