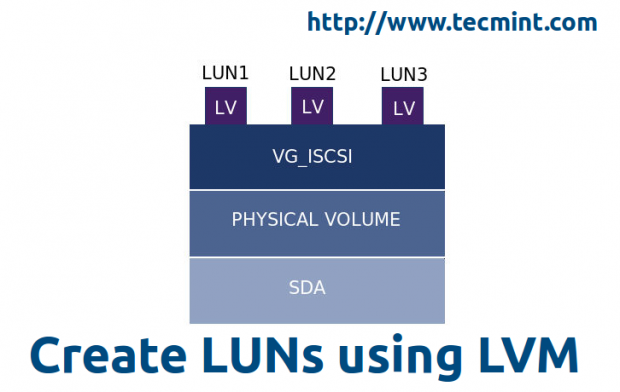
LUN is a Logical Unit Number, which shared from the iSCSI Storage Server. The Physical drive of iSCSI target server shares its drive to initiator over TCP/IP network. A Collection of drives called LUNs to form a large storage as SAN (Storage Area Network). In real environment LUNs are defined in LVM, if so it can be expandable as per space requirements.
Why LUNS are Used?
LUNS used for storage purpose, SAN Storage’s are build with mostly Groups of LUNS to become a pool, LUNs are Chunks of a Physical disk from target server. We can use LUNS as our systems Physical Disk to install Operating systems, LUNS are used in Clusters, Virtual servers, SAN etc. The main purpose of Using LUNS in Virtual servers for OS storage purpose. LUNS performance and reliability will be according to which kind of disk we using while creating a Target storage server.
Requirements
To know about creating a ISCSI Target Server follow the below link.
Master Server Setup
System information’s and Network setup are same as iSCSI Target Server as shown in Part – I, As we are defining LUNs in same server.
- Operating System – CentOS release 6.5 (Final)
- iSCSI Target IP – 192.168.0.200
- Ports Used : TCP 860, 3260
- Configuration file : /etc/tgt/targets.conf
Creating LUNs using LVM in iSCSI Target Server
First, find out the list of drives using fdisk -l command, this will manipulate a long list of information of every partitions on the system.
# fdisk -l
The above command only gives the drive information’s of base system. To get the storage device information, use the below command to get the list of storage devices.
# fdisk -l /dev/vda && fdisk -l /dev/sda

NOTE: Here vda is virtual machines hard drive as I’m using virtual machine for demonstration, /dev/sda is added additionally for storage.
Step 1: Creating LVM Drive for LUNs
We going to use /dev/sda drive for creating a LVM.
# fdisk -l /dev/sda

Now let’s Partition the drive using fdisk command as shown below.
# fdisk -cu /dev/sda
- The option ‘-c‘ switch off the DOS compatible mode.
- The option ‘-u‘ is used to listing partition tables, give sizes in sectors instead of cylinders.
Choose n to create a New Partition.
Command (m for help): n
Choose p to create a Primary partition.
Command action
   e   extended
   p   primary partition (1-4)
Give a Partition number which we need to create.
Partition number (1-4): 1
As here, we are going to setup a LVM drive. So, we need to use the default settings to use full size of Drive.
First sector (2048-37748735, default 2048):
Using default value 2048
Last sector, +sectors or +size{K,M,G} (2048-37748735, default 37748735):
Using default value 37748735
Choose the type of partition, Here we need to setup a LVM so use 8e. Use l option to see the list of type.
Command (m for help): t
Choose which partition want to change the type.
Selected partition 1
Hex code (type L to list codes): 8e
Changed system type of partition 1 to 8e (Linux LVM)
After changing the type, check the changes by print (p) option to list the partition table.
Command (m for help): p

Disk /dev/sda: 19.3 GB, 19327352832 bytes
255 heads, 63 sectors/track, 2349 cylinders, total 37748736 sectors
Units = sectors of 1 * 512 = 512 bytes
Sector size (logical/physical): 512 bytes / 512 bytes
I/O size (minimum/optimal): 512 bytes / 512 bytes
Disk identifier: 0x9fae99c8

   Device Boot      Start         End      Blocks   Id  System
/dev/sda1            2048    37748735    18873344   8e  Linux LVM
Write the changes using w to exit from fdisk utility, Restart the system to make changes.
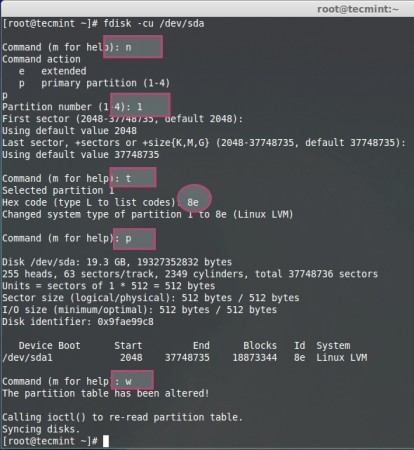
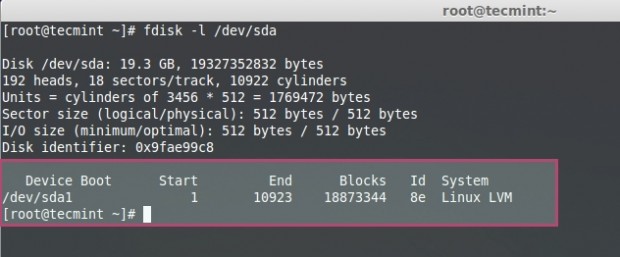
For your reference, I’ve attached screen shot below that will give you a clear idea about creating LVM drive.
After system reboot, list the Partition table using the following fdisk command.
# fdisk -l /dev/sda
Step 2: Creating Logical Volumes for LUNs
Now here, we going to create Physical volume using using ‘pvcreate’ command.
# pvcreate /dev/sda1
Create a Volume group with name of iSCSI to identify the group.
# vgcreate vg_iscsi /dev/sda1
Here I’m defining 4 Logical Volumes, if so there will be 4 LUNs in our iSCSI Target server.
# lvcreate -L 4G -n lv_iscsi vg_iscsi

# lvcreate -L 4G -n lv_iscsi-1 vg_iscsi

# lvcreate -L 4G -n lv_iscsi-2 vg_iscsi

# lvcreate -L 4G -n lv_iscsi-3 vg_iscsi
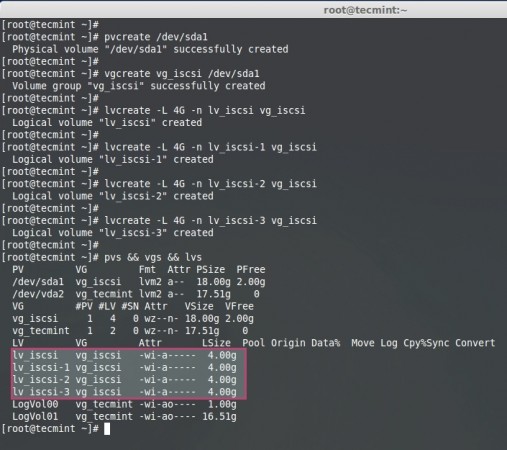
List the Physical volume, Volume group, logical volumes to confirm.
# pvs && vgs && lvs
# lvs
For better understanding of the above command, for your reference I’ve included a screen grab below.

Step 3: Define LUNs in Target Server
We have created Logical Volumes and ready to use with LUN, here we to define the LUNs in target configuration, if so only it will be available for client machines (Initiators).
Open and edit Targer configuration file located at ‘/etc/tgt/targets.conf’ with your choice of editor.
# vim /etc/tgt/targets.conf
Append the following volume definition in target conf file. Save and close the file.
<target iqn.2014-07.com.tecmint:tgt1>
       backing-store /dev/vg_iscsi/lv_iscsi
</target>
<target iqn.2014-07.com.tecmint:tgt1>
       backing-store /dev/vg_iscsi/lv_iscsi-1
</target>
<target iqn.2014-07.com.tecmint:tgt1>
       backing-store /dev/vg_iscsi/lv_iscsi-2
</target>
<target iqn.2014-07.com.tecmint:tgt1>
       backing-store /dev/vg_iscsi/lv_iscsi-3
</target

- iSCSI qualified name (iqn.2014-07.com.tecmint:tgt1).
- Use what ever as your wish.
- Identify using target, 1st target in this Server.
- 4. LVM Shared for particular LUN.
Next, reload the configuration by starting tgd service as shown below.
# /etc/init.d/tgtd reload

Next verify the available LUNs using the following command.
# tgtadm --mode target --op show
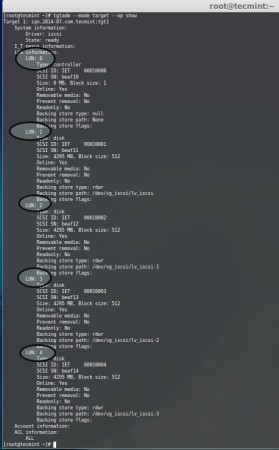
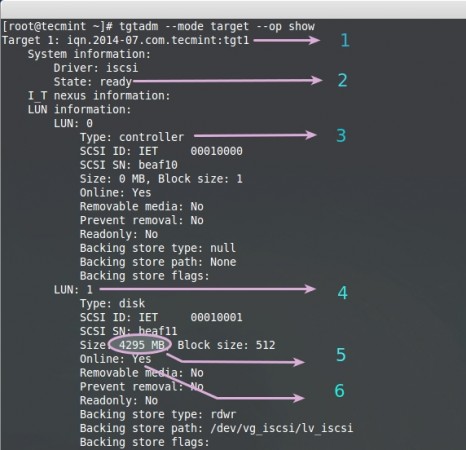
The above command will give long list of available LUNs with following information.
- iSCSI Qualified Name
- iSCSI is Ready to Use
- By Default LUN 0 will be reserved for Controller
- LUN 1, What we have Defined in the Target server
- Here i have defined 4 GB for a single LUN
- Online : Yes, Its ready to Use the LUN
Here we have defined the LUNs for target server using LVM, this can be expandable and support for many features such as snapshots. Let us see how to authenticate with Target server in PART-III and mount the remote Storage locally.


