One of the most reliable ways to protect your documents and their content from any alterations is using a digital signature. It is a mathematical technique used to validate the authenticity and integrity of a document. In other words, a digital signature creates a virtual fingerprint that is unique to a person and is used to identify users and protect information.
If you want to make the exchange of documents more secure with a digital signature, we recommend you to use ONLYOFFICE Desktop Editors. This is a free office app designed for creating and editing text documents, spreadsheets, and presentations. The desktop application is fully compatible with the Microsoft Office formats and can be easily installed on any Linux distribution.
The recently released version brings in a lot of useful features, including Seafile integration, password protection, data validation, slicers for pivot tables, custom number formats, table of figures, new functions, and new proofreading options for presentations. However, one of the most important updates is the ability to apply digital signatures for document protection.
In this article, you will learn how to add visible and invisible digital signatures to your documents and manage them using ONLYOFFICE Desktop Editors in Linux.
System Requirements
- CPU: dual-core 2 GHz or better.
- RAM: 2 GB or more.
- HDD: at least 2 GB of free space.
- OS: 64-bit Linux distribution with kernel version 3.8 or later.
Let’s install ONLYOFFICE Desktop Editors in Linux.
Installing ONLYOFFICE Desktop Editors in Linux
First of all, you need to have the desktop app installed on your computer. Let’s quickly get through the installation process on different Linux distributions.
Install ONLYOFFICE Desktop Editors in Debian, Ubuntu & Mint
To install the application on Ubuntu and its derivatives, you need to add the GPG key first:
$ sudo apt-key adv --keyserver hkp://keyserver.ubuntu.com:80 --recv-keys CB2DE8E5
Then add the desktop editors repository using any text editor to the /etc/apt/sources.list file (root rights required):
$ sudo nano /etc/apt/sources.list
Add the following record at the bottom of the file.
deb https://download.onlyoffice.com/repo/debian squeeze main
Update the package manager cache:
$ sudo apt-get update
Now the editors can be easily installed with this command:
$ sudo apt-get install onlyoffice-desktopeditors
Install ONLYOFFICE Desktop Editors in RHEL, CentOS & Fedora
The first step is to add the yum repository with the following command.
$ sudo yum install https://download.onlyoffice.com/repo/centos/main/noarch/onlyoffice-repo.noarch.rpm
Then you need to add the EPEL repository:
$ sudo yum install epel-release
Now the editors can be easily installed using the following command:
sudo yum install onlyoffice-desktopeditors -y
You can also download the latest version of ONLYOFFICE Desktop Editors from the official website.
Adding an Invisible Digital Signature to Documents
If you have a valid certificate issued by a certification authority, you can add two types of digital signatures. A visible signature includes metadata that holds a visible marker showing that it has been signed. An invisible signature omits this visible marker.
To add an invisible signature to your document, spreadsheet, or presentation:
- Launch ONLYOFFICE Desktop Editors.
- Open the required file.
- Switch to the Protection tab on the top toolbar.
- Click the Signature button.
- Choose the Add digital signature option (if you have made some changes to the document, you’ll be offered to save it).
- Fill in the Purpose for signing this document field in the opened window.
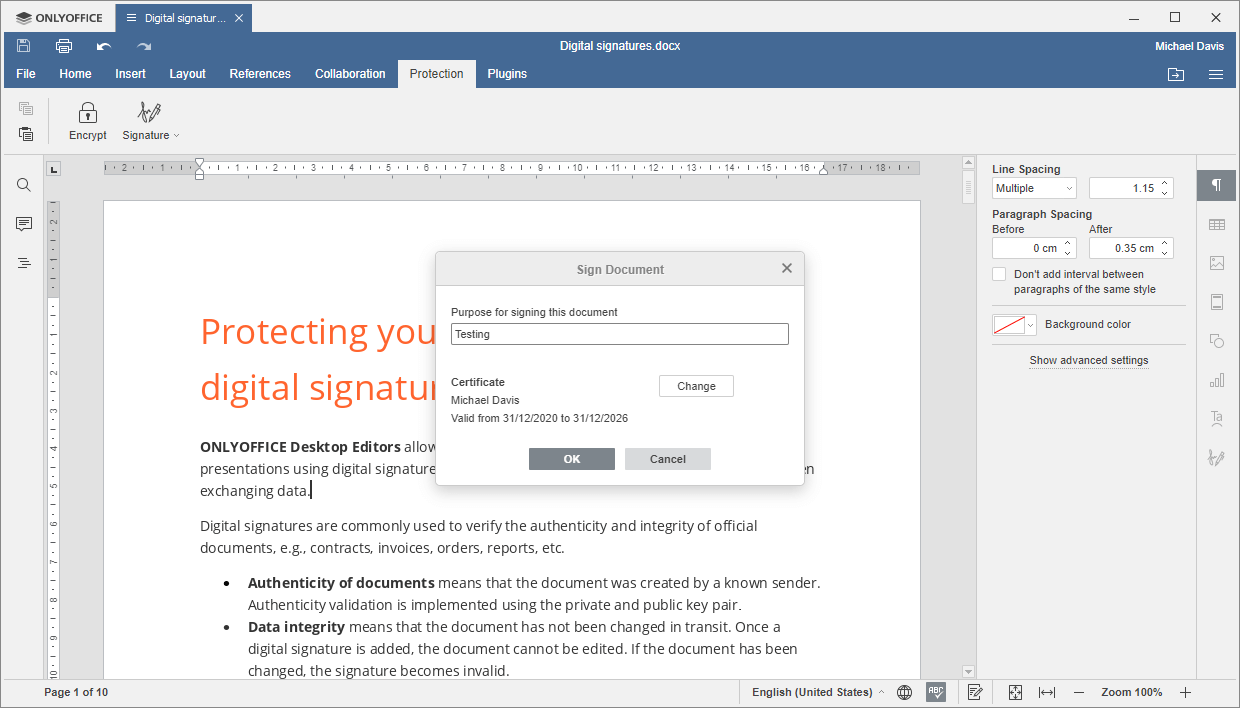
- Select a digital certificate by clicking the Select button.
- Click the button next to the select certificate file… field.
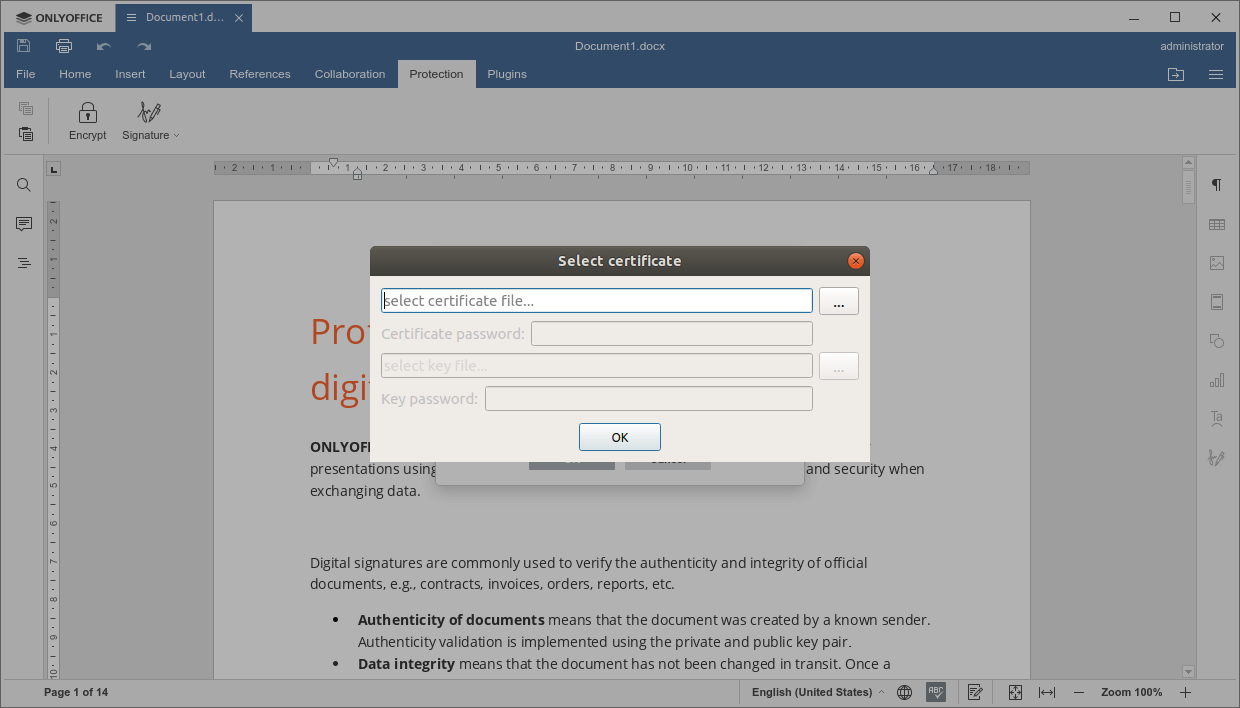
- Select the .crt file and choose Open (if your certificate is protected with a password, you will have to enter it in the corresponding field).
- Click OK and click the button next to the select key file… field.
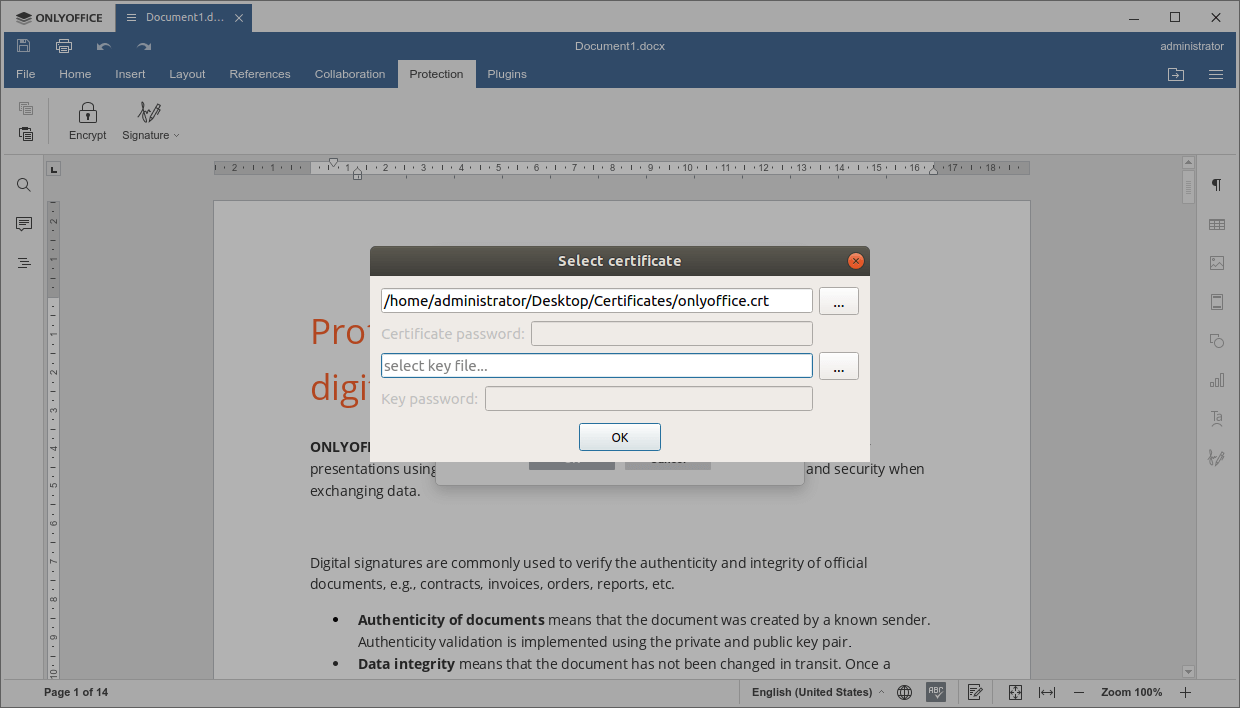
- Select the .key file and click Open (if your key is protected with a password, you will have to enter it in the corresponding field).
- Click OK.
That was the last step. Congratulations! You have just successfully added an invisible digital signature, and the document is now protected from being edited by someone else. A pop-up window on the right sidebar will inform you that there is a valid signature and the document cannot be edited.
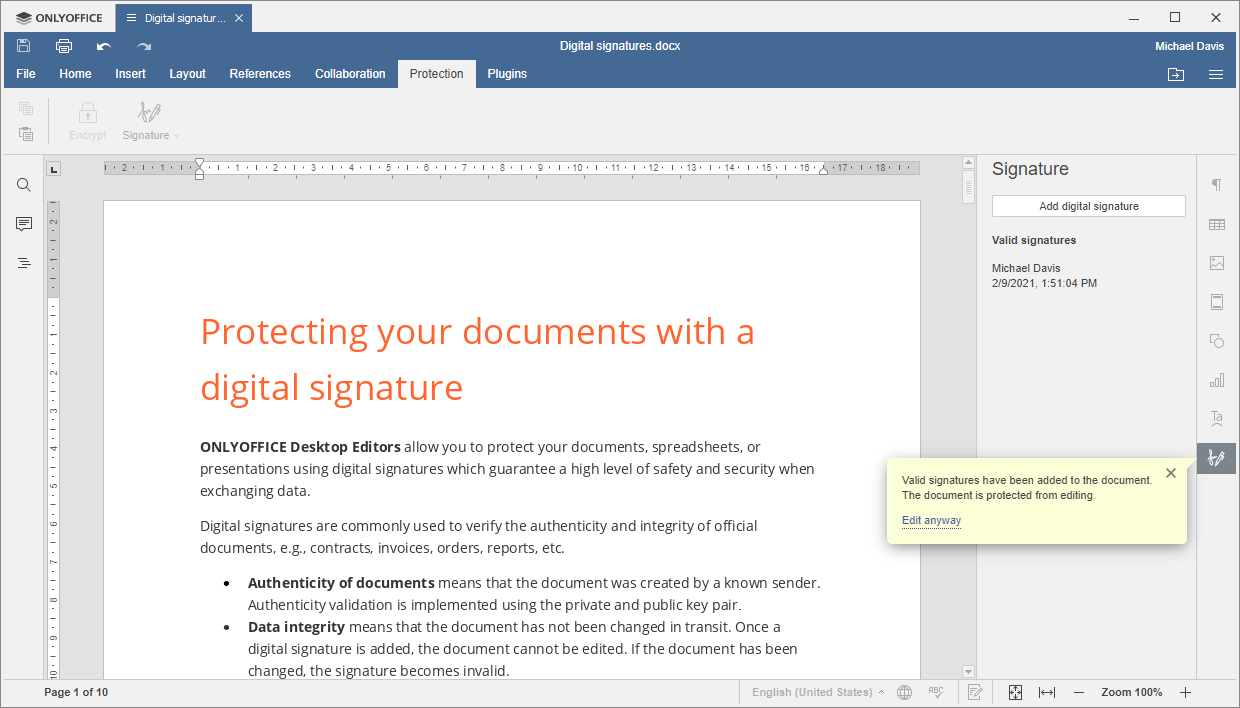
The added signature will not be visible. However, you can view the information about it on the right sidebar. This information includes the owner’s name, the date, and the time when the signature was added. If you click the signature, you will be able to choose the following options from the context menu:
- Signature Details to open the corresponding certificate and view its information.
- Remove Signature to delete the signature.
Adding a Visible Digital Signature Line
If you want to add a visible signature to your document, you need to add a signature line first. It allows you to sign the document yourself by adding a visible marker (a visual representation of your digital signature). You can also use a signature line to send the document to other people for digital signing.
To create a signature line, please follow these steps:
- Launch ONLYOFFICE Desktop Editors.
- Put the mouse cursor where you want to add a signature line.
- Switch to the Protection tab on the top toolbar.
- Click the Signature button.
- Choose the Add signature line option (if you have made some changes to the document, you’ll be offered to save it).
- In the Signature Setup window, fill in all the required fields (Name, Signer Title, E-mail, Instructions for Signer).
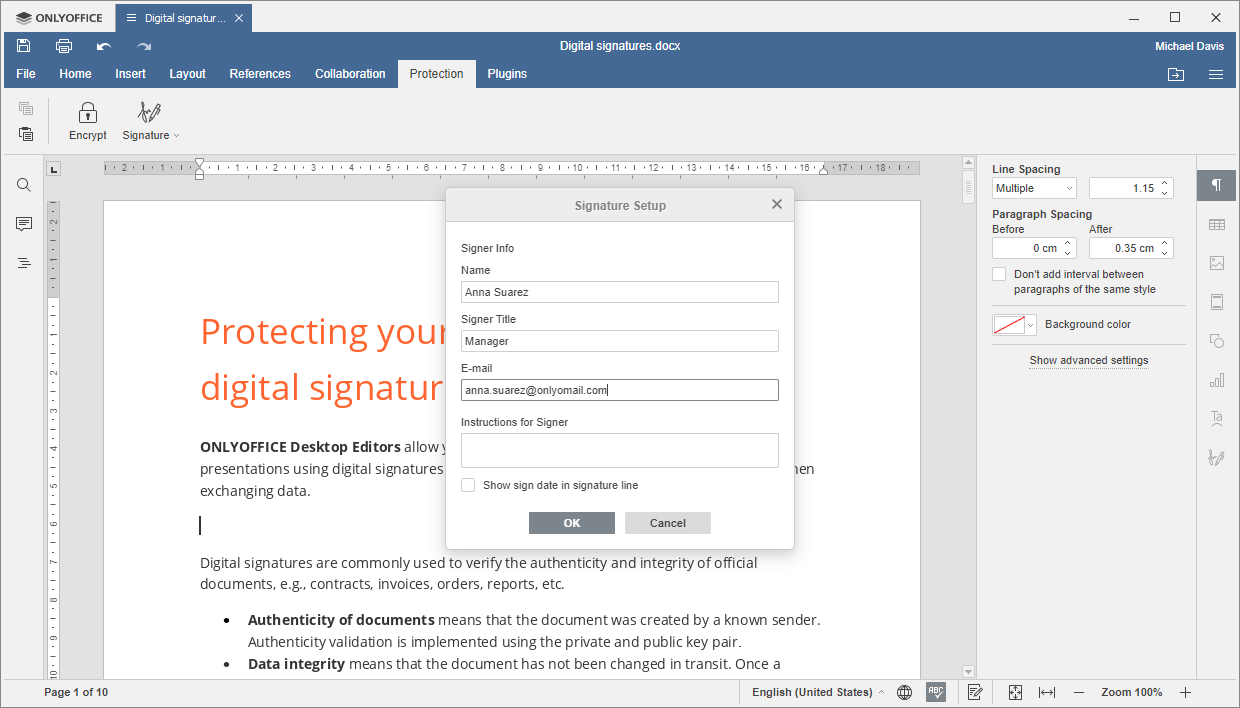
- Check the Show sign date in the signature line option is necessary.
- Click the OK button and save the document.
That’s it. Now there is a signature line in your document. If you wish, you can add multiple signature lines depending on the number of signers. You can also edit the added signature line by clicking the Signature settings icon on the right sidebar. To remove the signature line, just select it in the text and press Delete.
Adding a Visible Digital Signature to Documents
Now that you know how to add a signature line, you can use it to add a visible signature:
- Double-click the signature line.
- Choose the Sign option from the menu.
- In the Sign Document window, fill in the corresponding fields.
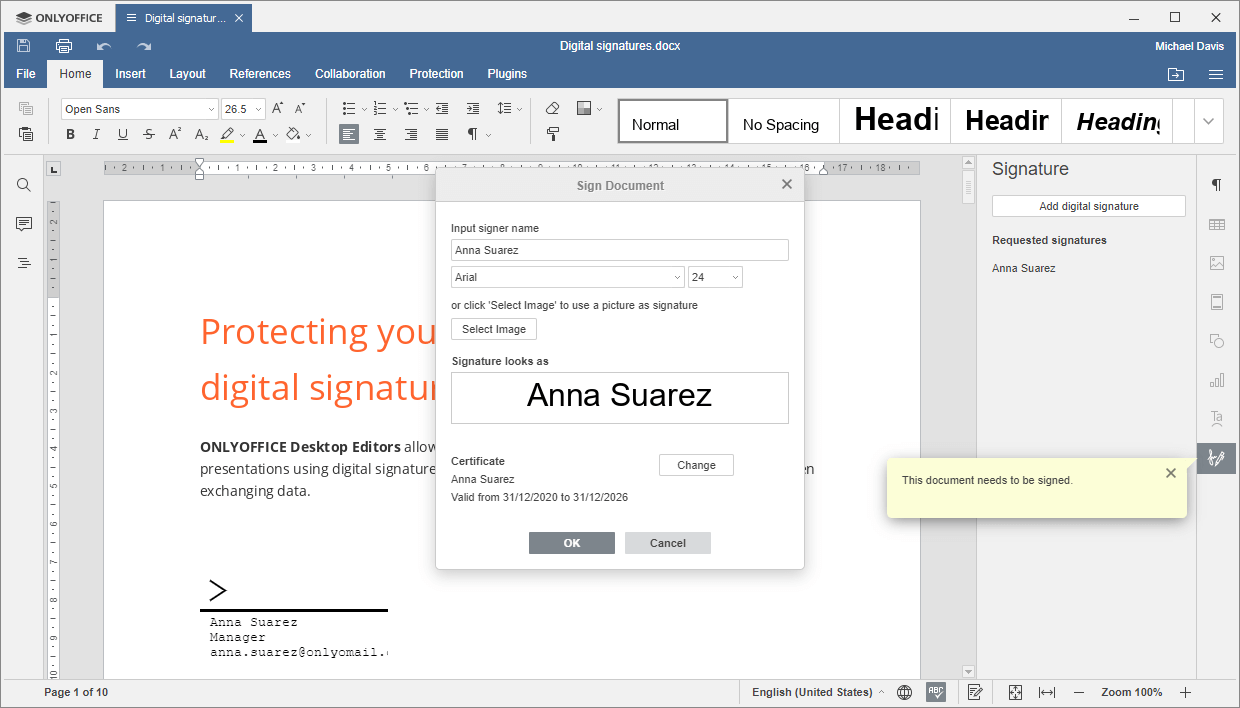
- Select a digital certificate (just repeat the same procedure as in the case of adding an invisible signature).
- Click the OK button to add your signature to the document.
Removing Digital Signature on Documents
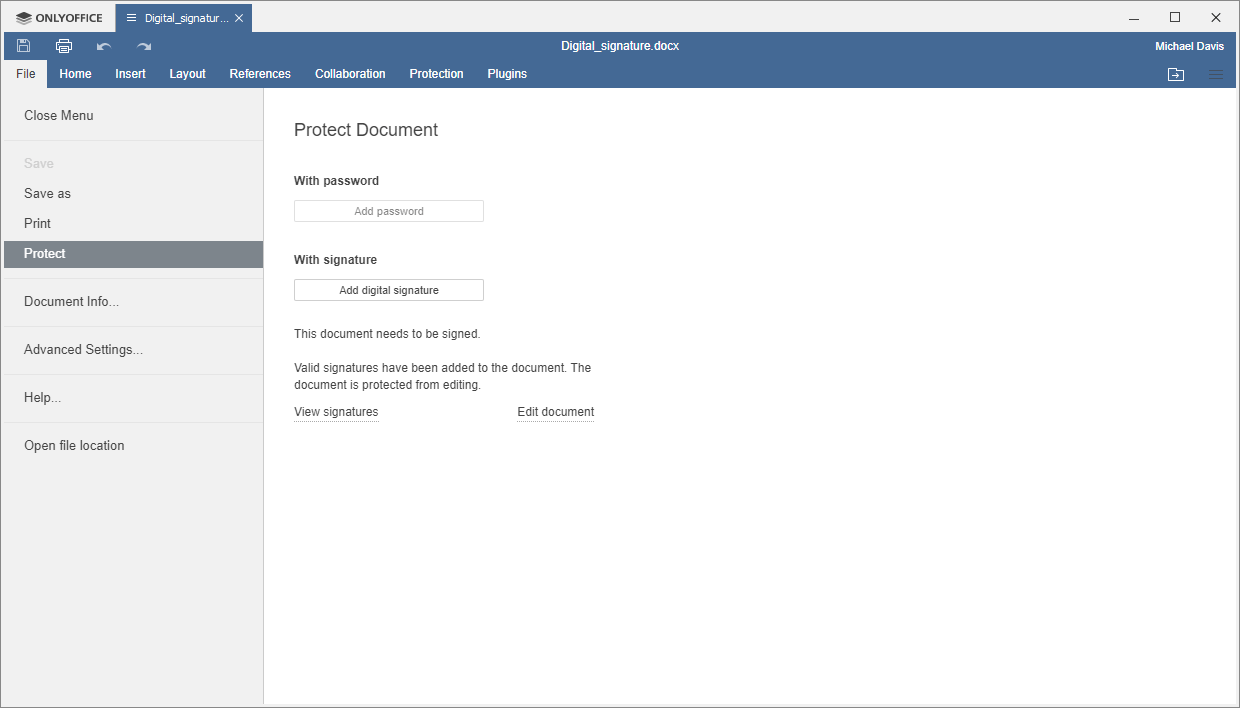
When a digital signature is added, the document is protected from being edited. If you want to edit it, click the Edit anyway option in the pop-up window on the right, and all the added digital signatures will be removed automatically.
Alternatively, you can remove all the signatures via the File tab. Just click Protect and choose the Edit document button.
Just a quick reminder: sign documents digitally are currently available in ONLYOFFICE Desktop Editors only. If you upload a digitally signed file to your cloud office and try to edit it, the added signatures will be removed.
We hope that this guide was helpful to you. Using ONLYOFFICE desktop editors, you can easily protect your confidential documents with a digital signature and make sure that they originate from you.


