direnv is a nifty open-source extension for your shell on a UNIX operating system such as Linux and macOS. It is compiled into a single static executable and supports shells such as bash, zsh, tcsh, and fish.
The main purpose of direnv is to allow for project-specific environment variables without cluttering ~/.profile or related shell startup files. It implements a new way to load and unload environment variables depending on the current directory.
It is used to load 12factor apps (a methodology for building software-as-a-service apps) environment variables, create per-project isolated development environments, and also load secrets for deployment. Additionally, it can be used to build multi-version installation and management solutions similar to rbenv, pyenv, and phpenv.
So How Does direnv Works?
Before the shell loads a command prompt, direnv checks for the existence of a .envrc file in the current (which you can display using the pwd command) and parent directory. The checking process is swift and can’t be noticed on each prompt.
Once it finds the .envrc file with the appropriate permissions, it loads it into a bash sub-shell and it captures all exported variables and makes them available to the current shell.
Installing direnv in Linux Systems
In most of the Linux distributions, the direnv package is available to install from the default repositories using your system package manager as shown.
$ sudo apt install direnv		#Debian,Ubuntu and Mint
$ sudo dnf install direnv		#Fedora
On other distributions such as Red Hat Enterprise Linux (RHEL) and CentOS or any distribution that supports snaps, you can install it as a snap. This requires you to have snapd installed on your system.
$ sudo snap install direnv
How to Hook direnv into Your Bash Shell
After installing direnv, you need to hook it into your current Linux shell. For example for Bash, add the following line at the end of the ~/.bashrc file.
Make sure that it appears even after rvm, git-prompt, and other shell extensions that manipulate the prompt.
eval "$(direnv hook bash)"
For ZSH Shell
Append the following line at the end of the ~/.zshrc file:
eval "$(direnv hook zsh)"
For FISH Shell
Append the following line at the end of the ~/.config/fish/config.fish file:
eval (direnv hook fish)
Then close the active terminal window and open a new shell or source the file as shown.
$ source ~/.bashrc
$ source  ~/.zshrc
$ source ~/.config/fish/config.fish
How to Use direnv in Linux Shell
To demonstrate how direnv works, we will create a new directory called tecmint_projects and move into it.
$ mkdir ~/tecmint_projects
$ cd tecmint_projects/
Next, let’s create a new variable called TEST_VARIABLE on the command line and when it is echoed, the value should be empty:
$ echo $TEST_VARIABLE
Now we will create a new .envrc file that contains Bash code that will be loaded by direnv. We also try to add the line “export the TEST_VARIABLE=tecmint” in it using the echo command and the output redirection character (>):
$ echo export TEST_VARIABLE=tecmint > .envrc
By default, the security mechanism blocks the loading of the .envrc file. Since we know it a secure file, we need to approve its content by running the following command:
$ direnv allow .
Now that the content of .envrc file has been allowed to load, let’s check the value of TEST_VARIABLE that we set before:
$ echo $TEST_VARIABLE
When we exit the tecmint_project directory, the direnv will be unloaded and if we check the value of TEST_VARIABLE once more, it should be empty:
$ cd ..
$ echo $TEST_VARIABLE
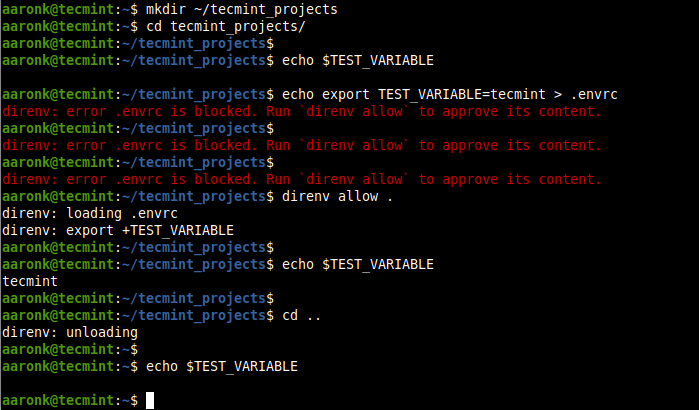
Every time you move into the tecmint_projects directory, the .envrc file will be loaded as shown in the following screenshot:
$ cd tecmint_projects/

To revoke the authorization of a given .envrc, use the deny command.
$ direnv deny .			#in current directory
OR
$ direnv deny /path/to/.envrc
For more information and usage instructions, see the direnv man page:
$ man direnv
Additionally, direnv also uses a stdlib (direnv-stdlib) comes with several functions that allow you to easily add new directories to your PATH and do so much more.
To find the documentation for all available functions, check the direnv-stdlib manual entry page:
$ man direnv-stdlib
That’s all we had for you! If you have any questions or thoughts to share with us, use the feedback form below.

