In this article, we will explain briefly about block encryption, Linux Unified Key Setup (LUKS), and describes the instructions to create an encrypted block device in Fedora Linux.
Block Device Encryption
Block device encryption is used to secure the data on a block device by encrypting it, and to decrypt data, a user must supply a passphrase or key to access. This gives extra security mechanisms as it safeguards the device’s contents even if it has been physically detached from the system.
Introduction to LUKS
LUKS (Linux Unified Key Setup) is the standard for block device encryption in Linux, which works by establishing an on-disk format for the data and a passphrase/key management policy. It stores all necessary setup information in the partition header (also known as LUKS header), thus allowing you to transport or migrate data seamlessly.
LUKS utilize the kernel device mapper subsystem with the dm-crypt module to provide a low-level mapping that holds encryption and decryption of the device data. You can use the cryptsetup program to execute user-level tasks such as creating and accessing encrypted devices.
Preparing a Block Device
The following instructions show the steps to create and configure encrypted block devices after installation.
Install the cryptsetup package.
# dnf install cryptsetup-luks
Next, fill the device with random data before encrypting it, as this will significantly increases the strength of the encryption using the following commands.
# dd if=/dev/urandom of=/dev/sdb1	           [slow with high quality random data ]
OR
# badblocks -c 10240 -s -w -t random -v /dev/sdb1  [fast with high quality random data]

Warning: The above commands will wipe out any existing data on the device.
Formatting an Encrypted Device
Next, use the cryptsetup command-line tool to format the device as a dm-crypt/LUKS encrypted device.
# cryptsetup luksFormat /dev/sdb1
After running the command, you will be prompted to enter YES (in uppercase) to supply a passphrase twice for the device to be formatted for use, as shown in the following screenshot.

To verify if the operation was successful, run the following command.
# cryptsetup isLuks /dev/sdb1 && echo Success

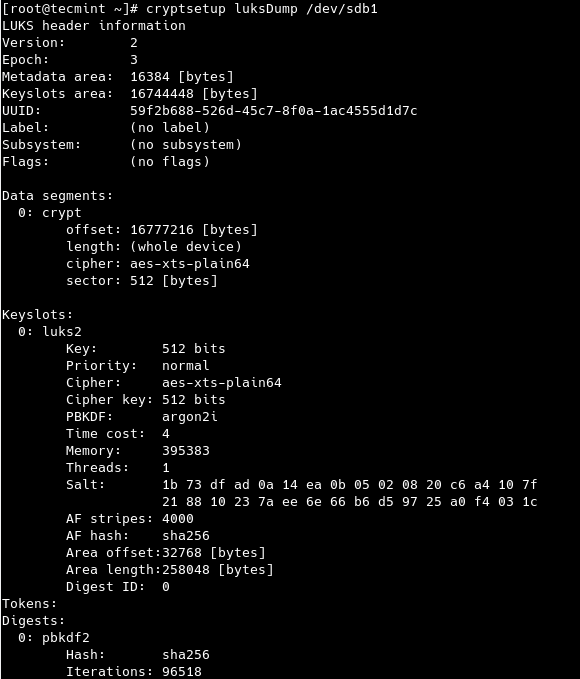
You can view a summary of the encryption information for the device.
# cryptsetup luksDump /dev/sdb1

Creating Mapping to Allow Access to a Decrypted Content
In this section, we will configure how to access the encrypted device’s decrypted contents. We will create a mapping using the kernel device-mapper. It is recommended to create a meaningful name for this mapping, something like luk-uuid (where <uuid> is replaced with the device’s LUKS UUID</strong (Universally Unique Identifier).
To get your encrypted device UUID, run the following command.
# cryptsetup luksUUID /dev/sdb1

After getting the UUID, you can create the mapping name as shown (you will be prompted to enter the passphrase created earlier on).
# cryptsetup luksOpen /dev/sdb1 luk-59f2b688-526d-45c7-8f0a-1ac4555d1d7c
If the command is successful, a device node called /dev/mapper/luk-59f2b688-526d-45c7-8f0a-1ac4555d1d7c which represents the decrypted device.

The block device which has just been created can be read from and written to like any other unencrypted block device. You can see some information about the mapped device by running the following command.
# dmsetup info /dev/mapper/luk-59f2b688-526d-45c7-8f0a-1ac4555d1d7c

Creating Filesystems on Mapped Device
Now we will look at how to create a filesystem on the mapped device, which will allow you to use the mapped device node just like any other block device.
To create an ext4 filesystem on the mapped device, run the following command.
# mkfs.ext4 /dev/mapper/luk-59f2b688-526d-45c7-8f0a-1ac4555d1d7c

To mount the above filesystem, create a mount point for it e.g /mnt/encrypted-device and then mount it as follows.
# mkdir -p /mnt/encrypted-device
# mount /dev/mapper/luk-59f2b688-526d-45c7-8f0a-1ac4555d1d7c /mnt/encrypted-device/
Add Mapping Information to /etc/crypttab and /etc/fstab
Next, we need to configure the system to automatically set up a mapping for the device as well as mount it at boot time.
You should add the mapping information in the /etc/crypttab file, in the with the following format.
luk-59f2b688-526d-45c7-8f0a-1ac4555d1d7c UUID=59f2b688-526d-45c7-8f0a-1ac4555d1d7c none
in the above format:
- luk-59f2b688-526d-45c7-8f0a-1ac4555d1d7c – is the mapping name
- UUID=59f2b688-526d-45c7-8f0a-1ac4555d1d7c – is the device name
Save the file and close it.
Next, add the following entry to /etc/fstab to automatically mount the mapped device at system boot.
/dev/mapper/luk-59f2b688-526d-45c7-8f0a-1ac4555d1d7c /mnt/encrypted-device ext4 0 0
Save the file and close it.
Then run the following command to update systemd units generated from these files.
# systemctl daemon-reload
Backup LUKS Headers
Lastly, we will cover how to back up the LUKS headers. This is a critical step to avoid losing all data in the encrypted block device, in case the sectors containing the LUKS headers are damaged by either user error or hardware failure. This action allows for data recovery.
To backup the LUKS headers.
# mkdir /root/backups
# cryptsetup luksHeaderBackup --header-backup-file luks-headers /dev/mapper/luk-59f2b688-526d-45c7-8f0a-1ac4555d1d7c
And to restore the LUKS headers.
# cryptsetup luksHeaderRestore --header-backup-file /root/backups/luks-headers /dev/mapper/luk-59f2b688-526d-45c7-8f0a-1ac4555d1d7c
That’s all! In this article, we’ve explained how to encrypt block devices using LUKS in Fedora Linux distribution. Do you have any queries or comments concerning this topic or guide, use the feedback form below to reach us.


Hi @Aaron, I stumbled over the same issue as @freedom.
Man cryptsetup:
And I figured that the device has to be the mount point, not the /dev/mapper/.
Only this worked on my CentOS 7:
Same with restore:
-r——–. 1 root root 1052672 2. Jun 18:59 /root/backups/luk-back
[root@centos7 backups]# cryptsetup -v luksHeaderRestore –header-backup-file /root/backups/luk-back /dev/mapper/luk-a6ca7926-d9b9-4633-8567-7c42d1f1d1d9
WARNING!
========
Device /dev/mapper/luk-a6ca7926-d9b9-4633-8567-7c42d1f1d1d9 does not contain LUKS header. Replacing header can destroy data on that device.
Are you sure? (Type uppercase yes): n
Command failed with code -1 (wrong or missing parameters).
[root@centos7 backups]# cryptsetup -v luksHeaderRestore –header-backup-file /root/backups/luk-back /dev/sdb1
WARNING!
========
Device /dev/sdb1 already contains LUKS header. Replacing header will destroy existing keyslots.
Are you sure? (Type uppercase yes): YES
Command successful.
[root@centos7 backups]# ls -l /mnt/test1
total 4
-rw-r–r–. 1 root root 5 2. Jun 19:00 test.txt
[root@centos7 backups]#
Hi @aaron:
In fstabs I have to include ‘defaults‘ after the file system xfs, otherwise, I boot to service mode.
Hi Aaron,
thanks for this tutorial!
Will give it a try (for my two partitions)
Just one question: given that both passphrases are the same for both partitions, is there a way to configure the system to ask just once and open both?
Unfortunately there is no password caching script (decrypt_keyctl , Debian/Ubuntu ) for Fedora. I tried to install this (deb) package in Fedora – but failed to do so.
Any hint would be very helpful.
Walter
@Walter
You have to enter the passphrases twice to open both partitions. If you can find a password caching script for Fedora, you can try using it. Besides, you have to find an RPM package for Fedora.
Thank you,
All steps are valid except the last line: restore the LUKS headers.
Device /root/backups/luks-headers doesn’t exist or access denied.
The header backup file does not contain a compatible LUKS header.
Hi Aaron,
Thanks for a very clear instruction! And this is an only luksDump image that I can find from the internet to compare with mine.
I have a question on luks header, and wonder if you could help.
sh-4.4# cryptsetup luksDump /dev/mmcblk2gp0p2
LUKS header information
Version:        2
Epoch:          3
Metadata area:  16384 [bytes]
Keyslots area:  16744448 [bytes]                         < why keyslots take so much space?
UUID:           9037890e-0f2b-4d73-b93b-e2bb53579492
Label:          (no label)
Subsystem:      (no subsystem)
Flags:          (no flags)

Data segments:
  0: crypt
        offset: 16777216 [bytes]                       <  so this means the space available to user data is after keylots
        length: (whole device)
        cipher: aes-xts-plain64
        sector: 512 [bytes]
See your luksDump above, you had exactly the same values for those two commented entries.
I actually also looked into the device content using the dd command, and see indeed space before 16777216 bytes (10 M) is all scatted filled with something, only after that point, it is all '0'. I zeroed out the entire device before doing cryptsetup luksFormat.
Is there anything wrong? Should luks take so much space for its overhead?
I appreciate it greatly if you could share your thinking on this.
Thank you!
@Hualing,
I would like to know something. What was the original disk space you are trying to encrypt and what was the disk size after encryption?
I had the same reaction the first time I used luks. If you zeroed the device and applied luksFormat, it is perfectly normal to find zeros after the header. This is because luksFormat does not attempt to encrypt the data in the specified device.
Those zeros are now the encrypted form of “a decrypted something” that can be retrieved by reading the device created by luksOpen. Of course, as soon as you write in luksOpen, the zeros in /dev/mmcblk2gp0p2 will be replaced by encrypted data that look random.
The key slots area is large because it can store multiple keys of size 258048 (see in the luksDump output and also the luksAdd command). One could argue that 16744448/258048 = 64 keys is a bit too much.
You can reduce the size and so the maximum number of keys with the option
--luks2-keyslots-size(see man cryptsetup).