Step 4: Querying NTP Server Network
4. This is a moderately restrictive configuration for a network. As a result of these restrictions, there will be some issues with the time servers that this server wishes to query.
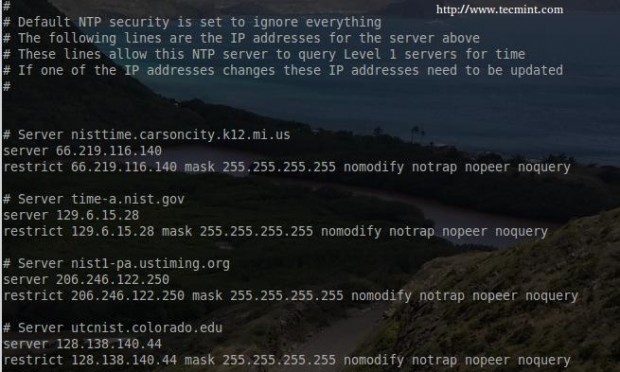
In order to correct this issue, a restrict statement needs to be added for each of the time servers that are being queried. These restrict stanzas ensure that this server can access higher level servers to get the appropriate time off-set. Below is the proper stanzas for allowing the servers previously configured in the ntp.conf file.

Back just before step three, a list of servers was determined to be the primary NTP servers for this server to query. As configured currently though, the ‘restrict default ignore‘ stanza will prevent this server from communicating with the servers configured.
This can be changed by creating a specific server/restrict stanza for each server. This is an easy process and must be done for each server.
- Server 129.6.15.28: This line must have the IP address rather than the host name. This is for safety and will help avoid issues should DNS be compromised.
- restrict 129.6.15.28 mask 255.255.255.255 nomodify notrap nopeer noquery: This line does quite a bit. The first part allows the server 129.6.15.28. The nomodify, nopeer, notrap, and noquery restrict what the server (129.6.15.28) is allowed to do to this NTP server.
Note: The IP address for this part can be easily determined with the use of the nslookup command.
# nslookup time-a.nist.gov [The system will reply back with the IP address]
5. At this point, the system will be ready to start keeping track of time. The configuration changes now need to be saved and the NTP service needs to be restarted.
# service ntp restart
The server will take a few seconds to synchronize with the configured NTP servers but the process can easily be monitored with ‘ntpdc‘ or ‘ntpq‘ utilities.
# ntpdc -pn   [This utility will provide basic information about the higher level NTP servers]
# ntpq -pn    [This utility will provide slightly more information than 'ntpdc']
The arguments in the two commands do the same thing. The ‘-p‘ will print a list of peers as well as the current state and the ‘-n‘ will tell the utilities to show the remote server’s IP address rather than hostname.

The important piece of this 'ntpdc' output is the far left of the IP addresses. The asterisk ( * ) character indicates that server has chosen that server’s clock to synchronize time.

The important part from this output is again the asterisk ( * ) character as it indicates a synchronization. The other symbols have meanings as well, for instance the plus ( + ) symbol denotes possible candidates for synchronization and then the minus ( - ) indicates an outlier that is discarded for the time being. The minus doesn’t mean the other servers wont be used, rather it indicates that the particular server isn’t the best option.
At this point and assuming that the server’s time zone has been set properly, the server will be reflecting the right time and have synced with an upper strata server! At this point, more internal servers can be added and ‘peered’ or hosts within the network can be directed to the new internal NTP server rather than having to query out to the public NTP servers.
Step 5: NTP Client Configuration
6. The purpose behind this server setup was to create a Strata 2 server that an internal network could query for time. At this point, the server is running ( and hosts need to be directed to query this newly created internal server.
These next steps will assume a Linux machine is attempting to gather time from the newly created Strata 2 server. The first step on the Linux host is to install the NTP package.
# apt-get install ntp
This will install the same NTP package that was just installed on the server but this time, NTP will be configured to look at the local server rather than public NTP severs. On the host, open the configuration file ‘/etc/ntp.conf‘.
# nano /etc/ntp.conf
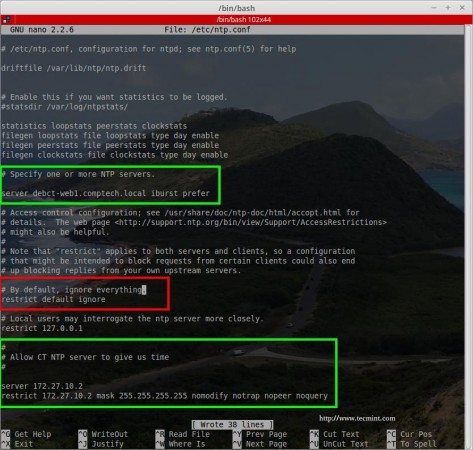
Much of the configuration will be the same on this Linux host except the server stanzas will now point to the internal server as seen below.

Save the configuration and exit nano. At this point the client is configured to listen to time from the newly created server (be sure to substitute the appropriate server name and IP addresses in the green boxes)! Next restart the NTP service and confirm that the host is synchronizing with the newly created Debian NTP server.
# service ntp restart
# ntpdc -pn
# ntpq -pn
The following screen-shots confirm that this host is synchronizing clocks with the newly created NTP server. This is confirmed both with ‘ntpdc‘ and ‘ntpq‘ by verifying the asterisk ( * ) by the IP address of the local NTP server.


At this point the Debian server is pulling the correct time from the Strata 1 servers and then handing out proper time to the internal network hosts. Now other devices can be configured to query this NTP server as well for time.
This particular configuration has been tested and works with multiple Cisco devices, other Debian Linux servers, and several Debian/Ubuntu based distributions. Enjoy the newly functioning Debian NTP server!


I didn’t understand this concept properly. could you please explain easily so that the common person also able to understands.
Thanks in advance.
@Jaipalreddy,
What you didn’t understand? could you explain more where you didn’t understand and what you looking us to explain more in depth?
Great article. Thanks
This is most useful and helpful article about ntp restrictions, thank You author!! It really works