cPanel is a well known, most reliable and intuitive commercial control panel for web hosting services. It is rich in feature and can be used via a powerful graphical user interface to manage all shared, reseller and business hosting services and more.
It comes with a cPanel and Web Host Manager(WHM), which makes web hosting easier for web admins:
- WHM provides root and reseller level access interface, where users can manage settings related to server administration and account management.
- While cPanel offers user level access interface to manage a web hosting account on the server.
Features of cPanel/WHM
- Intuitive and powerful GUI to control your server with WHM.
- Now supports EV Certificates.
- Supports API Authentication Tokens.
- Now offers AutoSSL supporting Proxy Subdomains.
- Enables you to view SSL Status in cPanel.
- Supports operations such as Backups, Migrations and restorations in a very easy and smooth manner.
- Supports excellent DNS and mail server management for main server and as well as client account.
- Supports management (start/stop/enable/disable) of services on server.
- Enables you to configure SSL/TLS for all server services and client domains.
- Easy integration with Phpmyadmin manage your MySQL databases from web browser.
- Supports rebranding.
- Allows integration with WHMCS to automate billing management and so much more.
In this article, we will describe how to install cPanel and WHM on RHEL/CentOS 7 and cover initial configurations to manage cPanel and WHM.
Suggested Read: How to Install cPanel & WHM in CentOS 6
Installation Requirements
- A clean fresh minimal installation of CentOS 7 server.
- Minimum of 1 GB RAM (but 2 GB recommended).
- At least 20GB of free disk space (but 40 GB recommended).
- A valid cPanel license.
- Standard hostname (FQDN or Fully Qualified Domain Name)
- Perl
Before we proceed to the installation section, you must note these to important points:
- Once you have installed cPanel/WHM, it can’t be removed from your system. You will have to reinstall your the operating system to remove it.
- cPanel is commercial software and requires a licence to work, however, there is a 15 day trial (which is automatically activated once you install cPanel), you can install your software using the trial then purchase the software later.
Installation of cPanel in CentOS 7
1. Ensure that your server has a standard hostname (FQDN or Fully Qualified Domain Name), otherwise set it as follows (in this example, cpanel is the hostname and tecmint.lan is the domain name):
# hostnamectl set-hostname cpanel.tecmint.lan
2. cPanel is written in Perl, ensure that you have Perl installed on your server, other wise run the command below to install it on your system.
# yum install perl
3. You do not have to run any commands to install it, there is an auto installer script built for you. All you have to do is download the cPanel installer script with the cURL command, if you don’t have the cURL command installed, first install it like so.
# yum install curl
4. Then download the latest installer script to home directory.
# curl -o latest -L https://securedownloads.cpanel.net/latest
5. Now, run the auto installer script. Note that if you have logged in the server using SSH, we strongly recommend running cPanel auto installer script in screen mode, because it takes 40-60 mins to complete the installation depending on your server resources and Internet connection speeds.
# sh latest
Sample Output
Verifying archive integrity... All good.
Uncompressing cPanel & WHM Installer.....
        ____                  _
    ___|  _ \ __ _ _ __   ___| |
   / __| |_) / _` | '_ \ / _ \ |
  | (__|  __/ (_| | | | |  __/ |
   \___|_|   \__,_|_| |_|\___|_|

  Installer Version v00061 r019cb5809ce1f2644bbf195d18f15f513a4f5263

Beginning main installation.
2017-03-04 04:52:33  720 ( INFO): cPanel & WHM installation started at: Sat Mar  4 04:52:33 2017!
2017-03-04 04:52:33  721 ( INFO): This installation will require 20-50 minutes, depending on your hardware.
2017-03-04 04:52:33  722 ( INFO): Now is the time to go get another cup of coffee/jolt.
2017-03-04 04:52:33  723 ( INFO): The install will log to the /var/log/cpanel-install.log file.
2017-03-04 04:52:33  724 ( INFO):
2017-03-04 04:52:33  725 ( INFO): Beginning Installation v3...
2017-03-04 04:52:33  428 ( INFO): CentOS 6 (Linux) detected!
2017-03-04 04:52:33  444 ( INFO): Checking RAM now...
2017-03-04 04:52:33  233 ( WARN):
2017-03-04 04:52:33  233 ( WARN): To take full advantage of all of cPanel & WHM's features,
2017-03-04 04:52:33  233 ( WARN): such as multiple SSL certificates on a single IPv4 Address
2017-03-04 04:52:33  233 ( WARN): and significantly improved performance and startup times,
2017-03-04 04:52:33  233 ( WARN): we highly recommend that you use CentOS version 7.
2017-03-04 04:52:33  233 ( WARN):
2017-03-04 04:52:33  233 ( WARN): Installation will begin in 5 seconds.
....
At this point, sit back and relax, perhaps, you can grab yourself a cup of coffee as you wait for the cPanel installer script to complete the installation.
How The Auto cPanel Installer Script Works
Take note that cPanel will massively modify your operating system, and this is how the auto installer script works:
- It examines various packages to ensure that there will be no conflicts and it finds any package conflict, it updates and uninstalls previous packages with yum cPanel on a Fresh OS.
- It also downloads language and base files for installation.
- Installs various Perl modules through CPAN and other required packages with yum.
- It downloads and compiles PHP and Apache with various associated modules.
When the installation completes, you’ll view the output below. You may be asked to reboot the server after installation.
6. After that you need to complete the installation wizard from its web based interface and you can access WHM with the following URL:
http://SERVER_IP:2087
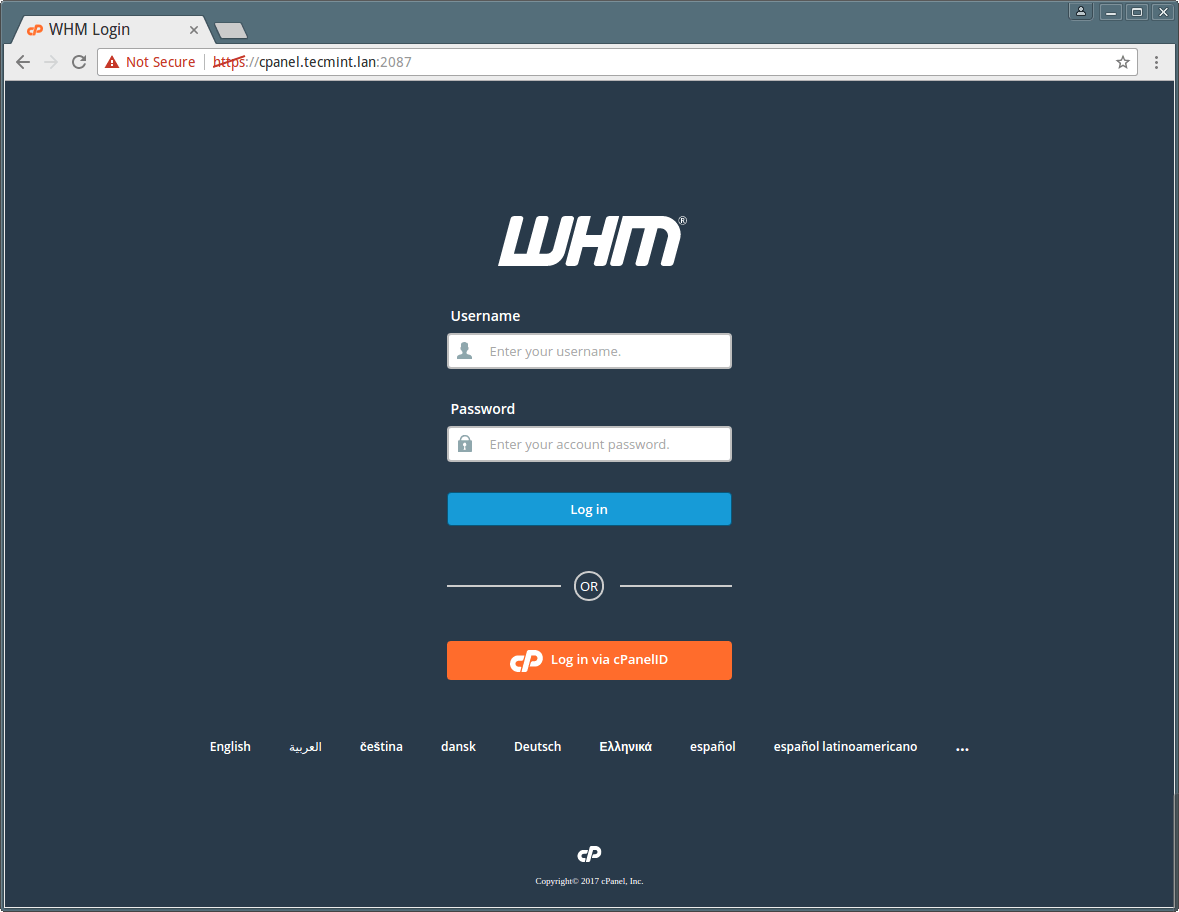
Now login with user “root” and your password. There are some more clicks remaining to complete the cPanel installation.
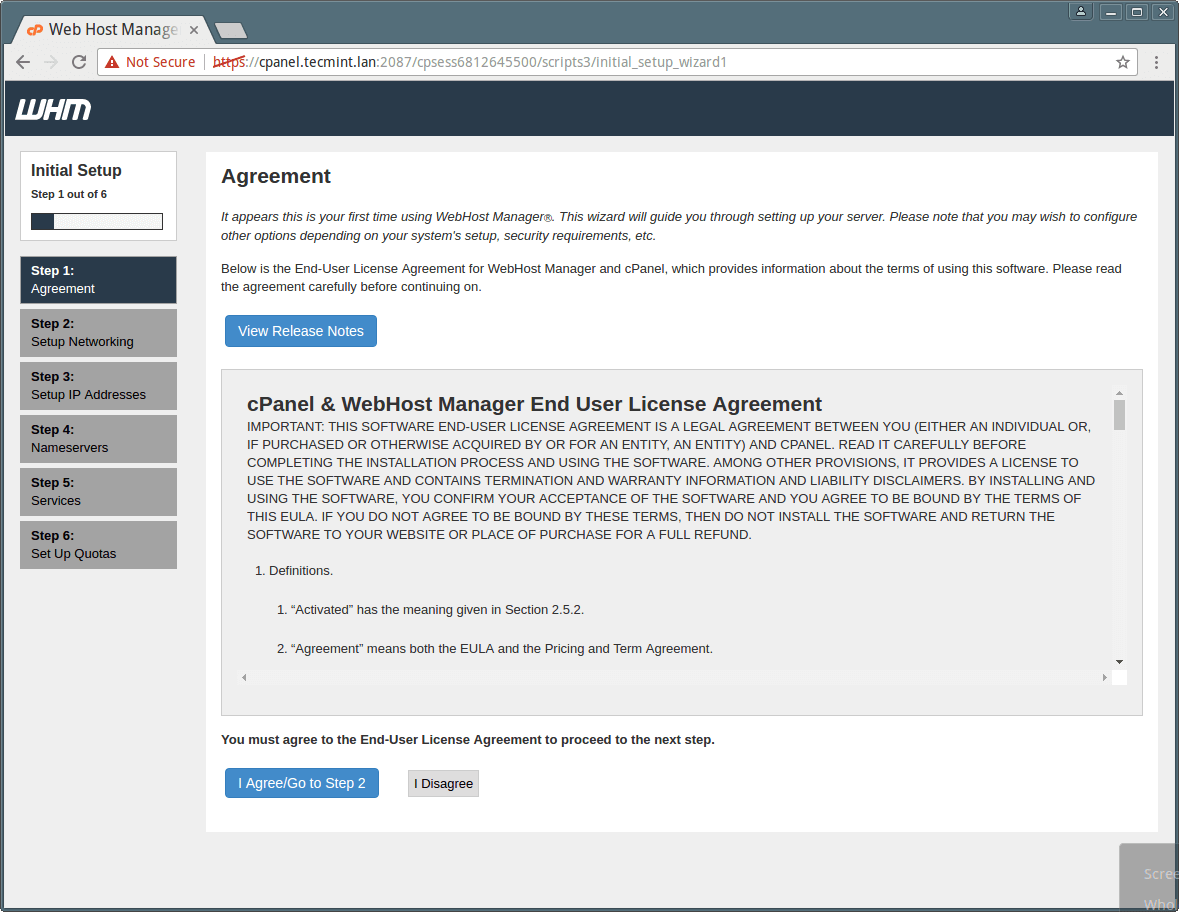
7. Next, read the End User License Agreement and accept the terms by clicking on “I Agree?/Go Step 2” button to proceed.
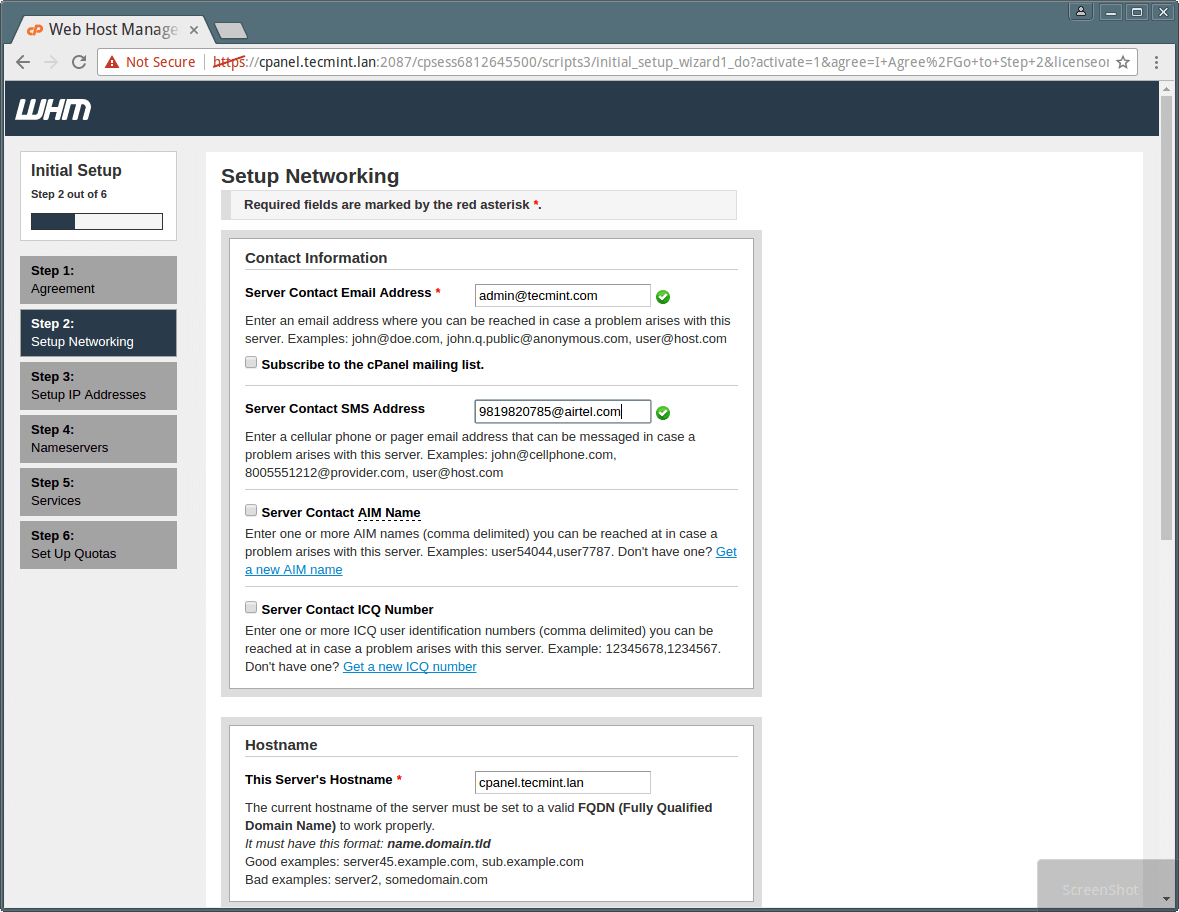
8. Then you’ll move to the Setup Networking section, provide your working email address and contact SMS address in the column of “Server Contact Email Address” and “Server contact SMS address” respectively.
This will enable cPanel to send all important alerts, notification to this EMail-id (Recommended). You can fill the rest details as well, as required.
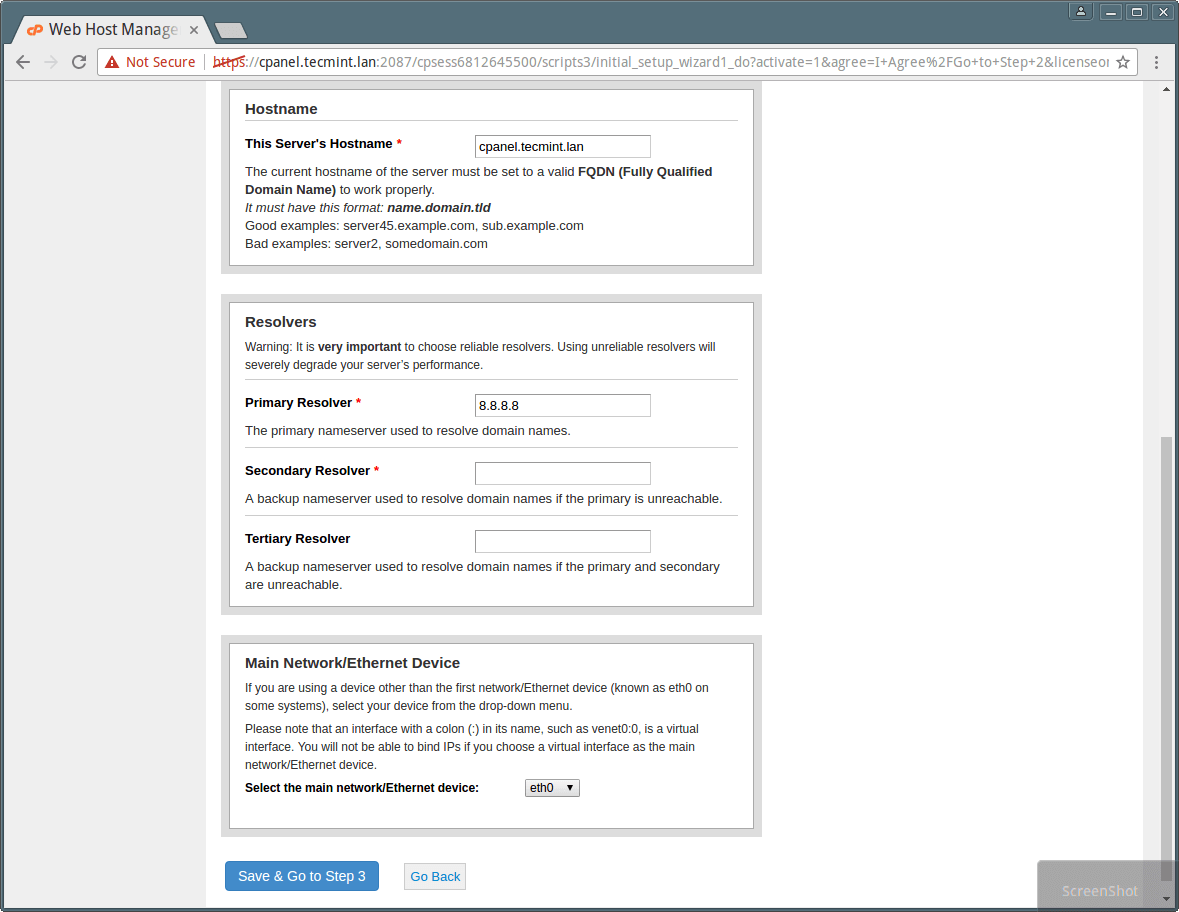
9. Next, move to the Hostname section, enter a valid FQDN hostname and Resolver entries for your server in the Networking section as shown in the screenshot below.
You can use Google resolvers in this section if you don’t have your ISP’s resolvers.
10. Afterwards, proceed to select the Main Network/Ethernet Device, an IP available on that device will be considered as the main IP address of your server. And click on “Save & Go to Step 5” button.
11. Now set your servers static IP address. If you have more than one IP attached with your NIC card and you want to set up a specific IP for your Server’s main IP, you can do that from here, to do so please choose the IP from the drop down and click on “Go to Setup 4”.
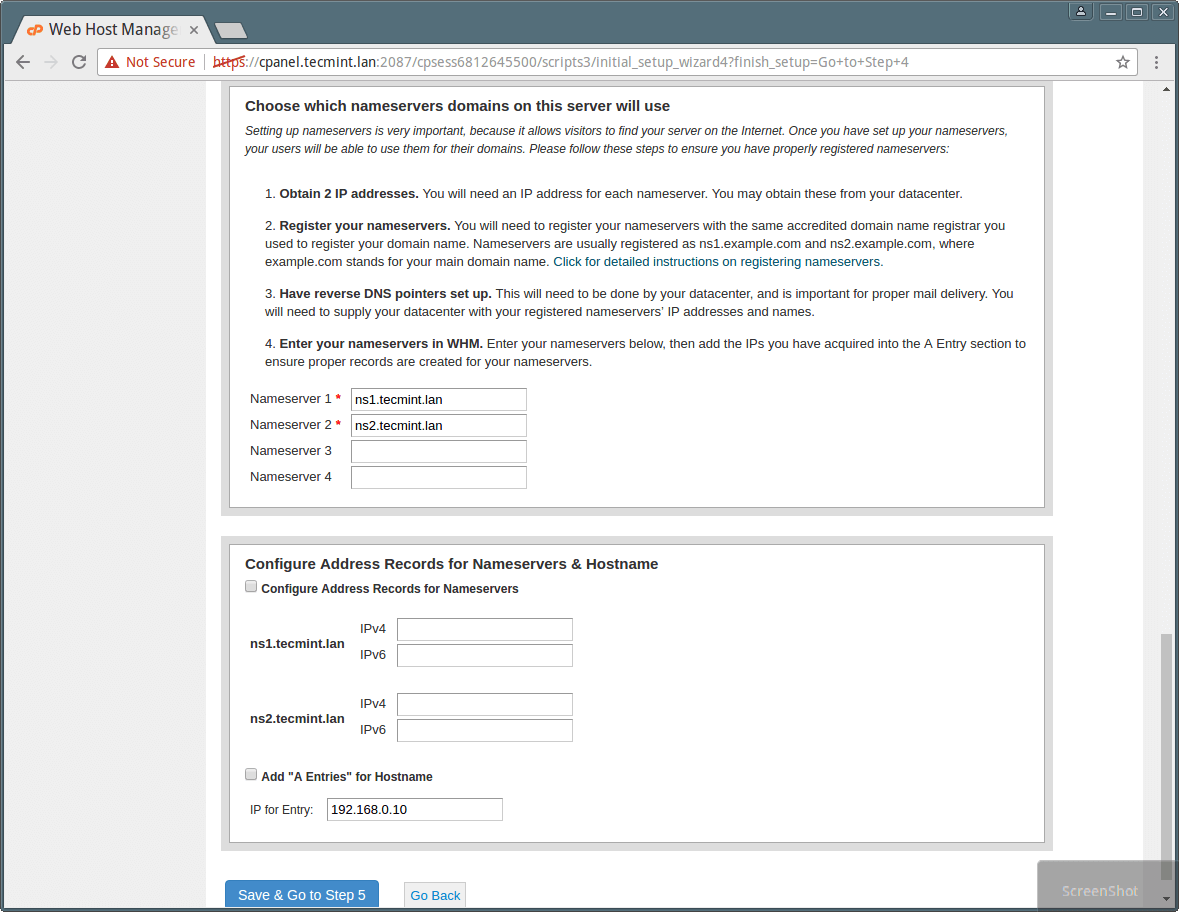
Next, add the “A Entries” for Nameservers & Hostname your server will use. Add Nameservers for your want to use in the empty fields: ns1/ns2.example.com.
In addition, add an entry for your hostname and nameserver by selecting the check box, as shown in the screenshot below. Then click on “Save & Go to Step 5” button.
12. Now, configure different services like FTP, Mail and Cphulk in the Step 5, of this web based wizard.
In FTP configuration, there are two FTP applications, select the one you want to use, but Pure-FTPD is recommended. Choose the disabled option if you want to disable the local FTP server.
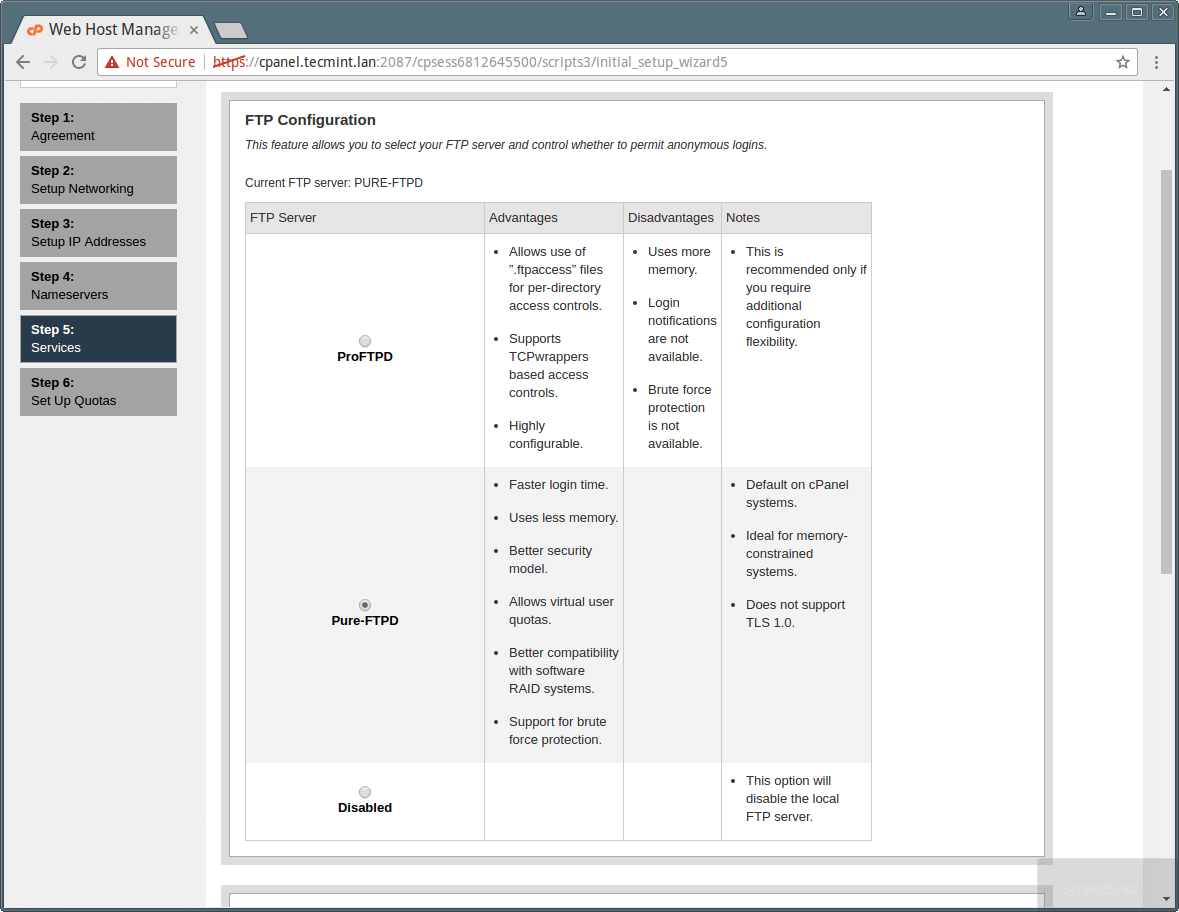
In the same wizard, you can select your Mail server to be used for all your mailing activities in future. You can add MTAs like Exim with your cPanel in future. You can either choose Dovecot which is also recommended or you can choose to disable mail server by choosing disabled option.
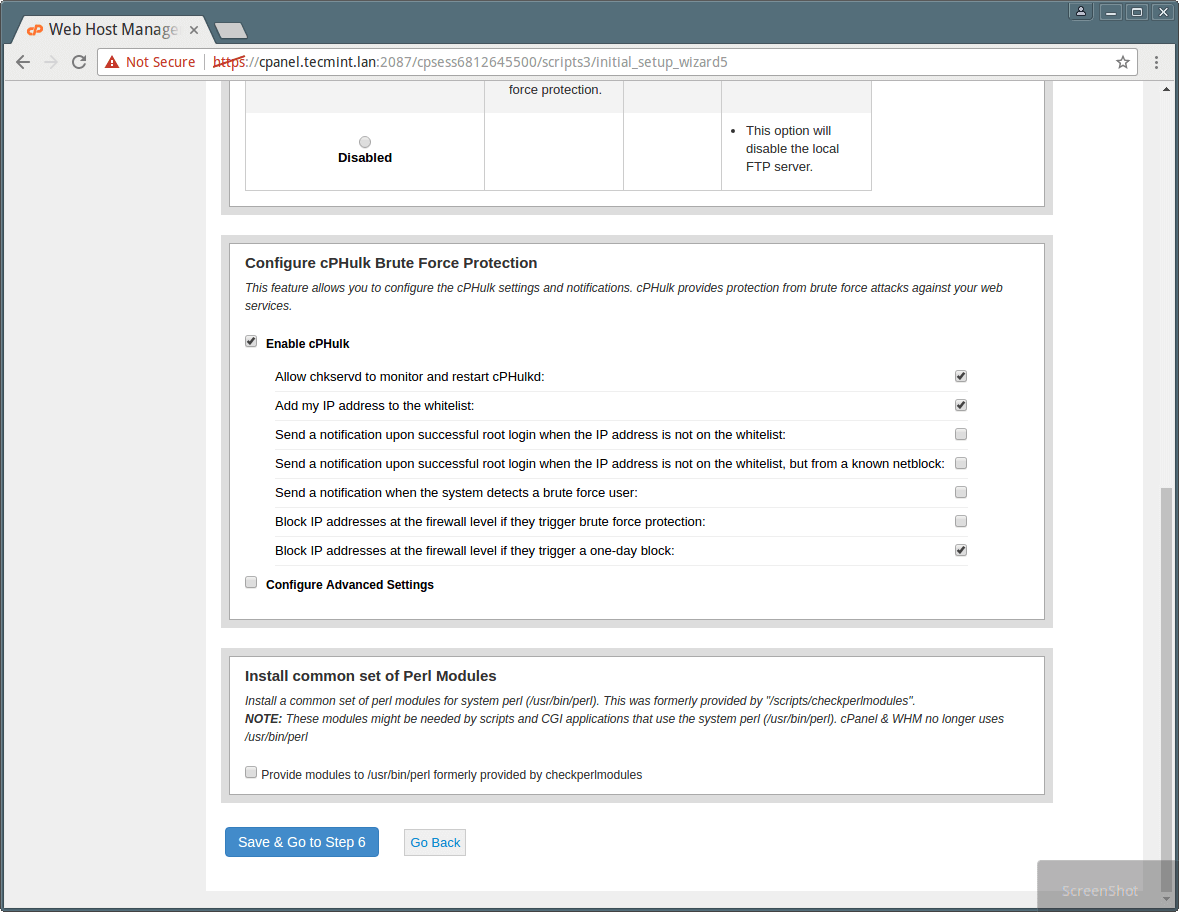
13. Move on to set Cphulk brute force protection which detects and blocks false password attacks activities and block their IP for your server. You can enable/disable and configure it as shown in the screenshot below.
14. Lastly in Step 6, you can enable quotas which helps you to track down the disk space usages. Select “Use file system quotas” and click on “Finish setup wizard” to complete the Installation process.
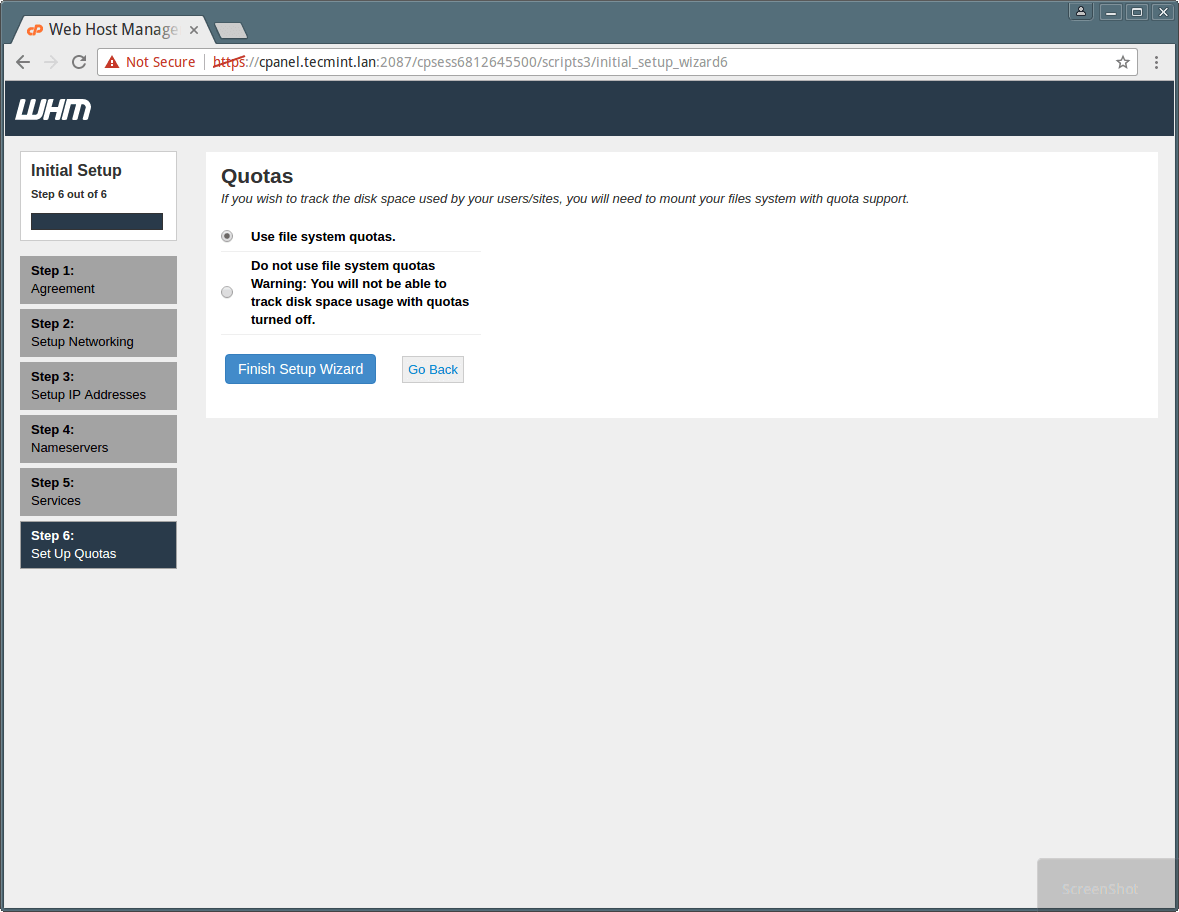
Note: If you don’t use file system quotas then you will not be able to monitor the amount of disk space used by any user or website.
Now you can see some new features of cPanel in its Feature Showcase. In recommended features you will see cPanelID, which enables a user to login to cPanel with his/her cPanelID. This feature enables a user to login to multiple cPanels with single user id. You can enable this feature by choosing the enable option, otherwise disable it by choosing No, thank you.
Once you are done with Installation, WHM’s home page will Appear as shown in the screenshot below. You can see that Home page of WHM is displaying all Control panel option and sidebar with search facility which enables you to search options by just typing their names.
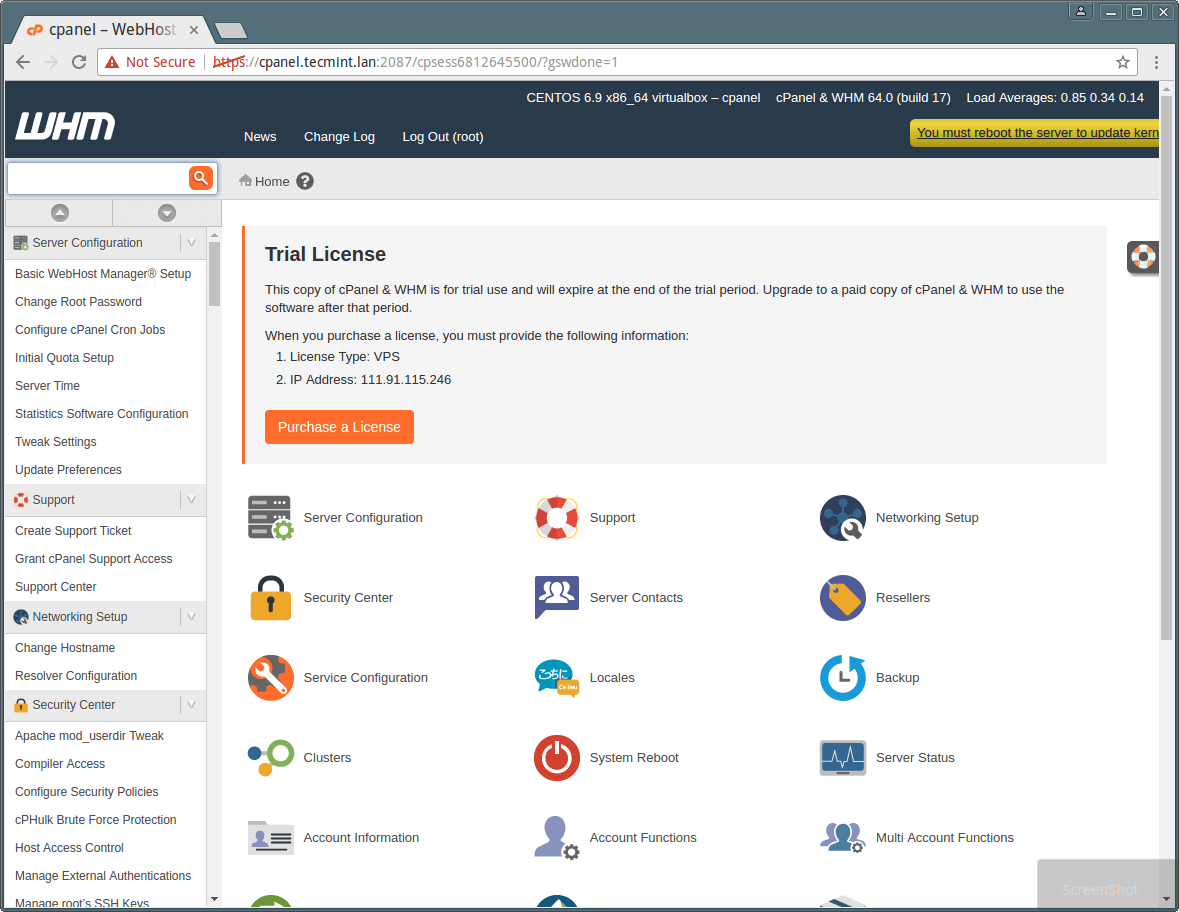
Important: Sometimes, cPanel installer script is not able to update the licence because of firewall or resolvers entries and you’ll see trial warning in the page. You can do it manually with following command.
# /usr/local/cpanel/cpkeyclt
Remember at the beginning we mentioned that, Cpanel is for user level access and WHM is for root level access, you need to create an account with option available in WHM. In this example, we created a test account with the username “tecmint” to show you the view of cPanel for users.
Below are useful lists of cPanel backend and config files you may want to know about before starting to work with Cpanel and WHM.
CPanel Backend Files
- Cpanel directory : /usr/local/cpanel
- Third Party tools : /usr/local/cpanel/3rdparty/
- Cpanel addons directory : /usr/local/cpanel/addons/
- Base files like Phpmyadmin, skins : /usr/local/cpanel/base/
- cPanel binaries : /usr/local/cpanel/bin/
- CGI files : /usr/local/cpanel/cgi-sys/
- Cpanel access & error log files : /usr/local/cpanel/logs/
- Whm related files : /usr/local/cpanel/whostmgr/
Important cPanel Configuration Files
- Apache configuration file: /etc/httpd/conf/httpd.conf
- Exim mail server conf file:/etc/exim.conf
- Named conf file : /etc/named.conf
- ProFTP and Pureftpd conf file :/etc/proftpd.conf and /etc/pure-ftpd.conf
- Cpanel user file: /var/cpanel/users/username
- Cpanel configuration file (Tweak settings) : /var/cpanel/cpanel.config
- Networking configuration file: /etc/sysconfig/network
- Addons, parked and subdomain information: /etc/userdomains
- Cpanel update config file: /etc/cpupdate.conf
- Clamav conf file: /etc/clamav.conf
- Mysql configuration file: /etc/my.cnf
- PHP ini conf file : /usr/local/lib/php.ini
For more informatin visit: cPanel Homepage
That’s all! In this article, we described how to install cPanel and WHM on RHEL/CentOS 7 and covered initial configurations to manage cPanel and WHM. Do not forget to share any valuable thoughts in the feedback form below.




Hi,
can install customize versions of Cpanel and mysql servers too.
Do we have to buy Cpanel Or keep using it with that warning?
Can you please make the same tutorial but for Rocky Linux 8, since the CentOS project is about to come to an end soon? Thank you.
@Ferg,
Your article request is accepted, give us some time to create an article on How to Install CPanel in Rocky Linux 8.
Please how do I use the
--forcecommand to force centOS 6 to install the cPanel?@Jasom
As you can see in the guide, the installation process is scripted, unless you edit the script, there is no way of adding the
--forceswitch on the command line to cause it to force the installation.Sir,
I understand this but what are the prerequisites in order to install this cpanel ? I mean to say that what next steps I need to do after just installing a fresh server centos 7? What are the hidden steps between fresh server minimal installation and cPanel installation?
I want to know full step by step sequences of installing process prior to cPanel Installation
@Arindom,
These are the requirements for installing Cpanel:
What other softwares needed to be pre installed like apache, php mysql, etc etc..I need to know about software applications required before installing cPanel whm in sequence
Thanks for the great article But I want more help from you,
@Ayush,
Please share your problems here, we will reply with solutions anything related to CPanel.
Is there a tutorial to harden your CentOS7 WHM server?
@Adam
Check this out: https://www.tecmint.com/security-and-hardening-centos-7-guide/
Dear Brother. Thanks.
The installation that you have shown for CentOS-7. Can you show me the installation process in RHEL-7??
@Sharif,
CentOS 7 is a clone of RHEL 7, so whatever instructions works on CentOS they work on RHEL 7 as well..
Hello,
Anyone else get “Errno 256 – No more mirrors to try” after setting the FQDN? I noticed yum worked until I set the FQDN. So far no luck in resolving it. If someone could help that would be awesome, likewise if I get it, I will post it in case anyone else has the same problem. :-D
How can I downgrade MySQL version from 5.7 to 5.6, can you help me ??
1. Can we disable button option for new subdomain registration from cpanel cli script in /usr/local/cpanel/scripts folder?
2. can we disable mod_security from cpanel cli in /usr/local/cpanel/scripts folder?
@anshoo
You can consult the cpanel documentation: https://documentation.cpanel.net/
Hello,
I did all the work. I use vagrant. I don’t access
https://ip adress:2087. I don’t insert virtualhost code inhttpd.conf. Can you help me?@Murat
As you can see from the article, there is no step for inserting any virtualhost config in httpd.conf file, everything is setup by the cpanel installer. You can consult the vagrant documentation for any help.
systemctl set-hostname cpanel.tecmint.lan
systemctl??????
wtf???
Try hostnamectl instead of systemctl
hostnamectl set-hostname
How did you manage to install in private ip. After installation you need to verify your domain, How did you mangae it
@Sarfaraz
You can try it out and see how it works. It is possible to install with a trial license.