During the last Microsoft Build Developer Conference held from March 30th to April 1st, Microsoft released an announcement and gave a presentation that surprised the industry: beginning with Windows 10 update #14136, it would be possible to run bash on Ubuntu on top of Windows.
Although this update has already been released by now, it is still in beta and is only available for insiders / developers and not for the public in general.
Without a doubt, when this feature reaches stable status and is available for everyone to use, it will be welcome with open arms – especially by FOSS professionals who work with technologies (Python, Ruby, etc) that are native to the Linux command line environment. Unfortunately, it will only be available in Windows 10 and not on previous versions.
However, Cygwin a well-known and widely-used Linux environment for Windows has been around for quite some time and has been extensively utilized by Linux pros whenever they’ve had the need to work on a Windows computer.
While foundationally different from “Bash on Ubuntu on Windows”, Cygwin is free software and provides a large set of GNU and Open Source tools that you can use as if you were on Linux, and a DLL that which contributes with substantial POSIX API functionality. On top of that, you can use Cygwin on all 32 and 64-bit Windows versions starting with XP SP3.
Downloading and Installing Cygwin
In this article we will guide you how to set up Cygwin with the most frequently used tools in the Linux command line. Depending on the available storage space and on your specific needs, you can later choose to install others very easily.
To install Cygwin (note that the same instructions apply to updating the software), we will need to download the Cygwin setup, depending on your version of Microsoft Windows. Once downloaded, double click on the .exe file to begin with the installation and follow the steps outlined below to complete it.
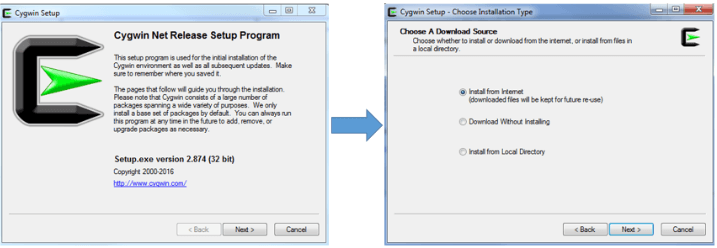
Step 1 – Launch the installation process and choose “Install from Internet”:
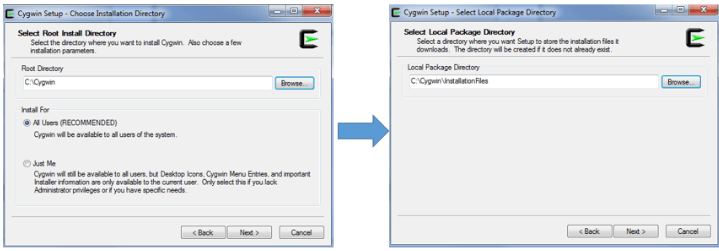
Step 2 – Select an existing directory where you want to install Cygwin and its installation file (Warning: don’t choose folders with spaces on their names):
Step 3 – Choose your Internet connection type and a select a FTP or HTTP mirror (go to https://cygwin.com/mirrors.html to select a mirror near your geographical location and then click Add to insert the desired mirror in the site list) to proceed with the download:
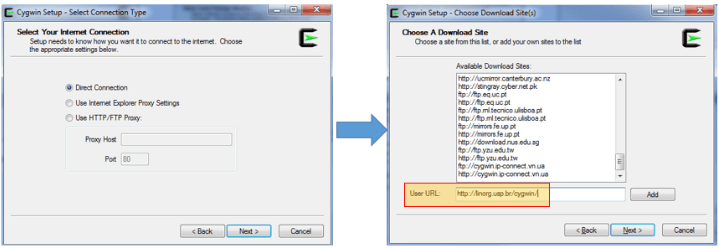
After you click next in the last screen, some preliminary packages -which will guide the actual installation process- will be retrieved first. If the chosen mirror is not operational or does not contain all the necessary files, you will be prompted to use another one. You can also choose a FTP server if the HTTP counterpart does not work.
If everything goes as expected, within a matter of minutes you will be presented with the package selection screen. In my case, I ended up choosing ftp://mirrors.kernel.org after others failed.
Step 4 – Select the packages you want to install by clicking on each desired category. Note you can also choose to install the source code as well. You can also search for packages using the input textbox. When you’re done selecting the packages you need, click Next.
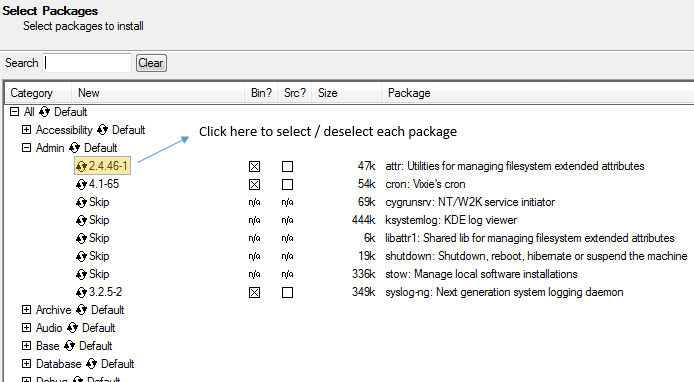
If you selected a package that has dependencies, you will be prompted to confirm the installation of dependencies as well.
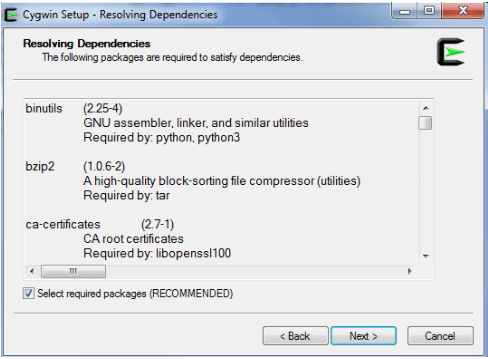
As it is to be expected, the download time will depend on the number of packages you selected previously and their required dependencies. In any event, you should see the following screen after 15-20 minutes.
Select the desired options (Create icon on Desktop / Add icon to Start Menu) and click Finish to complete the installation:
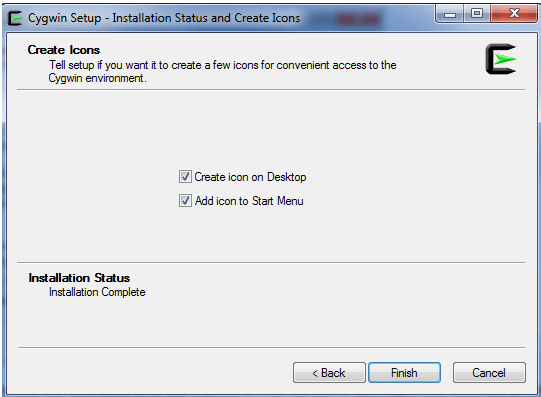
After you have successfully completed steps 1 through 4, we can open Cygwin by double clicking its icon on the Windows desktop, as we will see in the next section.






how to install software like gsac, python using cygwin in windows
Please refer to Step 4. If the packages you want to install are not listed under the software categories, you may attempt to install them from the command line once Cygwin it’s installed. However, keep in mind that Cygwin may have some limitations in this regard. On a side note, if you want to have Python in Windows, just install it in Windows.
@Jeff,
Of course they do :) – Please note I never said Python and Ruby apps don’t run on Windows, but they are native of command-line environments :).
Python and ruby apps run just fine on Windows. So do Java apps, in general. Where you run into problems is when the applications are binaries, such a C C++ or FORTRAN or COBOL.
@Jeff,
Of course they do :) – Please note I never said Python and Ruby apps don’t run on Windows, but they are native of command-line environments :).