This article was earlier written for APC (Alternative PHP Cache), but APC is deprecated and no longer working with PHP 5.4 onwards, now you should use OPcache for better and faster performance as explained in this article…
OpCache is an advanced caching module based on opcode that works similar to other caching solutions. It significantly improves PHP performance, and your website by extension, by storing your site’s pre-compiled PHP pages in shared memory. This eliminates the need for PHP to constantly load these pages on each request by the server.
[ You might also like: 10 Top Open Source Caching Tools for Linux ]
In this guide, we will walk you through the installation of the Zend OPcache in Debian-based Linux distributions such as Ubuntu and Mint.
For demonstration purposes, we will use Ubuntu 20.04 and show you how you can install and enable the module both on Apache and Nginx web servers.
Install and Configure PHP OPcache for Apache
To set the ball rolling, launch your terminal and update your package index:
$ sudo apt update
Next, install Apache web server, PHP, and PHP modules including the php-opcache module as follows.
$ sudo apt install apache2 libapache2-mod-php php-curl php-mbstring php-opcache php-mysql php-xml php-gd
The command installs the latest Apache web server and PHP 7.4 and associated extensions. To verify the version of PHP installed, run the command:
$ php --version

The next step is to enable the OPcache caching module. Therefore, edit the php.ini configuration file.
$ sudo nano /etc/php/7.4/apache2/php.ini
OR
$ sudo vim /etc/php/7.4/apache2/php.ini
Locate and uncomment the following lines
opcache.enable=1
opcache.memory_consumption=128
opcache.max_accelerated_files=10000
opcache.revalidate_freq=200
Save the changes and exit.
Then restart Apache to apply the changes.
$ sudo systemctl restart apache2
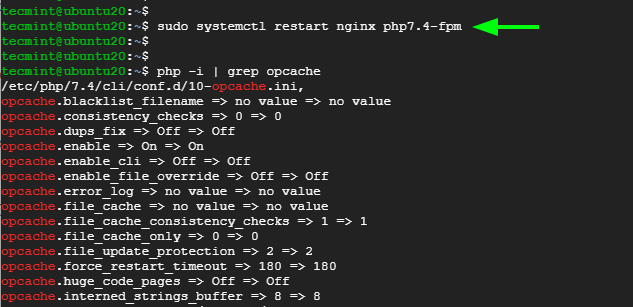
Finally, verify that Opcache has been enabled as follows:
$ php -i | grep opcache
The following output will be displayed on your screen.

This is proof enough that the Opcache module has been successfully installed.
Install and Configure PHP OPcache for Nginx
If you are planning to have Nginx as your webserver of choice and still have Opcache installed, follow the steps below.
Install Nginx, PHP, and associated PHP extensions as before.
$ sudo apt install nginx php php-fpm php-cli php-curl php-mbstring php-opcache php-mysql php-xml php-gd
Once again, confirm the PHP version installed.
$ php -v

Next, access the php.ini configuration file to enable Opcache.
$ sudo nano /etc/php/7.4/fpm/php.ini
OR
$ sudo vim /etc/php/7.4/fpm/php.ini
As before, uncomment the following lines to enable Opcache for Nginx.
opcache.enable=1
opcache.memory_consumption=128
opcache.max_accelerated_files=10000
opcache.revalidate_freq=200
Save the changes and exit.
Then restart the Nginx web server and PHP-FPM service.
$ sudo systemctl restart nginx php7.4-fpm
Finally, confirm that Opcache was successfully installed:
$ php -i | grep opcache

And that was about it as far as the installation of the Zend Opcache caching module. Your feedback is most welcome.


Hi Ravi. Thanks for publishing this. I was able to use your instructions to install APC on my server’s default PHP version without a problem. However, I’m running a few other versions of PHP on the same server, and I’d like to use it on one of those, specifically PHP 5.6.35.
I installed that with Plesk and the path to the php.d directory is /opt/plesk/php/5.6/etc/php.d. I tried placing the apc.ini file there, but that didn’t work. I also tried adding the directive “extension=apc.so” directly to that PHPs php.ini file. It’s still not running.
Do you have any advice to get this working?
@James,
I suggest you to compile APC for your PHP 5.6 version to /opt/plesk/php/5.6/etc/php.d directory.. This is the only solution, I think.
Hello,
I am working on one of my client’s project scislides.com which loads up very very slowly. I was going through the possible fix and came across below one but not sure whether this would work or not. Can somebody help?
How to fix – Page Cache Test (Server Side Caching)
In order to pass this test, you are advised to use a caching mechanism for your pages. There are three methods which can be used to caching your web pages:
Alternative PHP caching
– Alternative PHP Cache (APC) is an open source framework which caches data using intermediate PHP code. Most web programmers who are familiar with the PHP programming language can easily set up Alternative
PHP Cache for your site.
Quickcache
– Quickcache is a lightweight page caching solution which was formerly known as jpcache. Quickcache caches the page output rather than compiling the PHP page, making it a superior version of page caching to the Alternative PHP caching. Quickcache can be quickly downloaded from their website and can reduce your page load time up to 80%.
WP Super Cache
– If you have a WordPress website, WP Super Cache can be installed within seconds and without no programming knowledge.
Regards
Mary Rax
Good Tutorial, installed with no problems. Thanks for Share
where can I find the version 3.1.15-dev to Centos?
thank you
Best regards
@Alessandro,
I am sorry but apc deprecated, now you should use opcache with PHP 5.4 onwards for better and faster performance..
The article posted was very informative and useful. You people are doing a great job. Keep going.
Thanks you ! Very easy and works like a charm !
Thank you Ravi or this tutorial very detailed and easy to follow can now sort out the caching problem on our new server.
Excellent thank you
Installed with no problems. Thanks
Hi,
Thakns for this nice tutorial.
APC is now installed but it seems not to work : the uptime value is always 0, so I think APC is not working ! How can I check if it really caches my magento site ?
Regards :)
Hi ravi,
I am having some problem with APC working properly. File cache always shows Hits = 1 and misses keep increasing, but at the same time, the cached file entries show some numbers in hundreds over some time.
User cache entries shows to be working normally it seems.
But almost twice a day i keep getting Internal server error and then have to restar php-fpm.
I hv allocated 1024M memory and some other regular config stuff.
If you have more idea, can i have your email ID to discuss this and send you more details about it.
Warm rgds
Satya
Surely, please use our contact us link and send me more details about your problem.
@katal2hod:
First, make sure you already have these things installed on your Centos:
make, gcc, php-devel, php-pear.
And then, type “pecl install uploadprogress”
You should see something like this after the installation has finished:
Build process completed successfully
Installing ‘/usr/lib64/php/modules/uploadprogress.so’
install ok: channel://pecl.php.net/uploadprogress-1.0.3.1
Note that I’m using Centos 64 bit, if you’re using 32 bit, then the path will show
Installing ‘/usr/lib/php/modules/uploadprogress.so’
Then, use “vi /etc/php.ini” (or Nano, or VIM)
Add this line on the bottom:
extension=uploadprogress.so
Save and close, then restart your Apache by using service httpd restart
Done ;)
@Andre Luis de Andrade:
APC works by storing the compiled bytecode of your PHP script on the memory, so next time when a request for the same page appears, APC will provide the cached code instead of re-read and recompile the code again from your disk, thus increasing the load speed.
Hello!
OK! APC is installed and I can view the Statistics.
And now, how APC will cache my PHP sites?
The APC is not creating /etc/apc.* files.
The statistics is displaying NO PHP FILES cached.
Thanks a lot. I want to understand how APC works.
Do you have tutorial for installing PECL uploadprogress library in centos 6.5?
Thanks :)
No, we haven’t yet covered that topic, but will cover it as you requested..
Thank you! Very well written and explained!
Thanks alot mate!! Perfect!!
can’t uninstall get: pecl/apc not installed
Any ideas?
I’m trying to downgrade from 13 to 9
What is the difference between Xcache and this one? can I install both of them on same server? (one optimizes what it can while other optimizes the rest :D )
Thanks :) . The article is very useful.
Hi,
I have installed APC on CentOS6.4 64Bit. I am using WHM. Everything went fine and APC shows as enabled in phpinfo. Then I moved the file from /usr/local/lib/php/apc.php to /home/domain.com/.
However, for some reasons I am unable to run domain.com/apc.php
It throws back the 500 Internal Server Error.
Any suggestions? Like .HTACCESS or Apache config file? or some settings in APC.php or PHP.INI?
Thanks in advance.
Hi, I think the 500 error is apache “deny from all” directive somewhere :)
(probably in /etc/httpd/conf/httpd.conf or something.. maybe also in “conf.d/” there, like if you install phpMyAdmin, it gives you 500 error on “site.com/phpmyadmin” until you configure /etc/httpd/conf.d/phpmyadmin.conf (sorry if i confuse a little bit names and path, im not good remembering this, i often use ‘find / -name myfilename’ myself :D ) )
so you need to go through apache config files I think and find where you can give permission to ‘all’ to access this path on your server.
if you have “allowoverride all” at least, so you can use .htaccess in root of your website to allow access to certain path.
hope it helps :) and hope i didnt confuse anyone, coz im still learning linux myself :) not a pro.
Thank you. I just installed it on my CentOS 5.x system as instructed. No errors.
Thanks for the tutorial. Saved me some time.
Good, I find this article on Google,It better than Chinese’s article,Best regards
Thank you man :)