A database server is an critical component of the network infrastructure necessary for today’s applications. Without the ability to store, retrieve, update, and delete data (when needed), the usefulness and scope of web and desktop apps becomes very limited.
In addition, knowing how to install, manage, and configure a database server (so that it operates as expected) is an essential skill that every system administrator must have.
In this article we will briefly review how to install and secure a MariaDB database server and then we will explain how to configure it.
Installing and Securing a MariaDB Server
In CentOS 7.x, MariaDB replaced MySQL, which still can be found in the Ubuntu (along with MariaDB). The same is true for openSUSE.
For brevity, we will only use MariaDB in this tutorial, but please note that besides having different names and development philosophies, both Relational DataBase Management Systems (RDBMSs for short) are almost identical.
This means that the client-side commands are the same on both MySQL and MariaDB, and the configuration files are named and located in the same places.
To install MariaDB, do:
--------------- On CentOS/RHEL 7 and Fedora 23 ---------------
# yum update && yum install mariadb mariadb-server # CentOS

--------------- On Debian and Ubuntu ---------------
$ sudo aptitude update && sudo aptitude install mariadb-client mariadb-server

--------------- On openSUSE ---------------
# zypper update && zypper install mariadb mariadb-tools # openSUSE
Note that, in Ubuntu, you will be asked to enter a password for the RDBMS root user.
Once the above packages have been installed, make sure the database service is running and has been activated to start on boot (in CentOS and openSUSE you will need to perform this operation manually, whereas in Ubuntu the installation process will have already taken care of it for you):
--------------- On CentOS/RHEL 7 and Fedora 23 ---------------
# systemctl start mariadb && systemctl enable mariadb

--------------- On openSUSE ---------------
# systemctl start mysql && systemctl enable mysql
Then run the mysql_secure_installation script. This process will allow you to:
- set / reset the password for the RDBMS root user
- remove anonymous logins (thus enabling only users with a valid account to log in to the RDBMS)
- disable root access for machines other than localhost
- remove the test database (which anyone can access)
- activate the changes associated with 1 through 4.
For a more detailed description of this process, you can refer to the Post installation section in Install MariaDB Database in RHEL/CentOS/Fedora and Debian/Ubuntu.
Configuring MariaDB Server
The default configuration options are read from the following files in the given order: /etc/mysql/my.cnf, /etc/my.cnf, and ~/.my.cnf.
Most often, only /etc/my.cnf exists. It is on this file that we will set the server-wide settings (which can be overridden with the same settings in ~/.my.cnf for each user).
The first thing that we need to note about my.cnf is that settings are organized into categories (or groups) where each category name is enclosed with square brackets.
Server system configurations are given in the [mysqld] section, where typically you will find only the first two settings in the table below. The rest are other frequently used options (where indicated, we will change the default value with a custom one of our choosing):
| Setting and description | Default value |
| datadir is the directory where the data files are stored. | datadir=/var/lib/mysql |
| socket indicates the name and location of the socket file that is used for local client connections. Keep in mind that a socket file is a resource that is utilized to pass information between applications. | socket=/var/lib/mysql/mysql.sock |
| bind_address is the address where the database server will listen on for TCP/IP connections. If you need your server to listen on more than one IP address, leave out this setting (0.0.0.0 which means it will listen on all IP addresses assigned to this specific host).
We will change this to instruct the service to listen only on its main address (192.168.0.13): bind_address=192.168.0.13 |
bind_address=0.0.0.0 |
| port represents the port where the database server will be listening.
We will replace the default value(3306) with 20500 (but we need to make sure nothing else is using that port): While some people will argue that security through obscurity is not good practice, changing the default application ports for higher ones is a rudimentary -yet effective- method to discourage port scans. |
port=3306 |
| innodb_buffer_pool_size is the buffer pool (in bytes) of memory that is allocated for data and indexes that are accessed frequently when using Innodb (which is the default in MariaDB) or XtraDB as storage engine.
We will replace the default value with 256 MB: innodb_buffer_pool_size=256M |
innodb_buffer_pool_size=134217728 |
| skip_name_resolve indicates whether hostnames will be resolved or not on incoming connections. If set to 1, as we will do in this guide, only IP addresses.
Unless you require hostnames to determine permissions, it is advisable to disable this variable (in order to speed up connections and queries) by setting its value to 1: skip_name_resolve=1 |
skip_name_resolve=0 |
| query_cache_size represents the size (in bytes) available to the query cache in disk, where the results of SELECT queries are stored for future use when an identical query (to the same database and using the same protocol and same character set) is performed.
You should choose a query cache size that matches your needs based on 1) the number of repetitive queries, and 2) the approximate number of records those repetitive queries are expected to return. We will set this value to 100 MB for the time being: query_cache_size=100M |
query_cache_size=0 (which means it is disabled by default) |
| max_connections is the maximum number of simultaneous client connections to the server. We will set this value to 30: max_connections=30Each connection will use a thread, and thus will consume memory. Take this fact into account while setting max_connections. |
max_connections=151 |
| thread_cache_size indicates the numbers of threads that the server allocates for reuse after a client disconnects and frees thread(s) previously in use. In this situation, it is cheaper (performance-wise) to reuse a thread than instantiating a new one.
Again, this depends on the number of connections you are expecting. We can safely set this value to half the number of max_connections: thread_cache_size=15 |
thread_cache_size=0 (disabled by default) |
In CentOS, we will need to tell SELinux to allow MariaDB to listen on a non-standard port (20500) before restarting the service:
# yum install policycoreutils-python
# semanage port -a -t mysqld_port_t -p tcp 20500
Then restart the MariaDB service.
Tuning MariaDB Performance
To assist us in checking and tuning the configuration as per our specific needs, we can install mysqltuner (a script that will provide suggestions to improve the performance of our database server and increase its stability):
# wget https://github.com/major/MySQLTuner-perl/tarball/master
# tar xzf master
Then change directory into the folder extracted from the tarball (the exact version may differ in your case):
# cd major-MySQLTuner-perl-7dabf27
and run it (you will be prompted to enter the credentials of your administrative MariaDB account)
# ./mysqltuner.pl
The output of the script is in itself very interesting, but let’s skip to the bottom where the variables to adjust are listed with the recommended value:
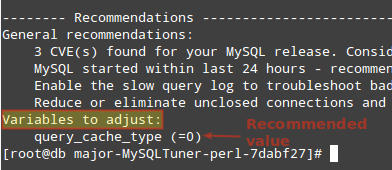
The query_cache_type setting indicates whether the query cache is disabled (0) or enabled (1). In this case, mysqltuner is advising us to disable it.
So why are we advised to deactivate it now? The reason is that the query cache is useful mostly in high-read / low-write scenarios (which is not our case, since we just installed the database server).
WARNING: Before making changes to the configuration of a production server, you are highly encouraged to consult an expert database administrator to ensure that a recommendation given by mysqltuner will not impact negatively on an existing setting.
Summary
In this article we have explained how to configure a MariaDB database server after we have installed and secured it. The configuration variables listed in the table above are only a few settings that you may want to consider while preparing the server for use or when tuning it later. Always refer to the official MariaDB documentation before making changes or refer to our MariaDB Performance tuning tips:
Don’t Miss: 15 Useful MariaDB Performance Tuning and Optimization Tips
As always, don’t hesitate to let us know if you have any questions or comments about this article. Are there any other server settings you like to use? Feel free to share with the rest of the community using the comment form below.






@Ravi,
Please move this article into the LFCS series and remove the one about Cygwin. Feel free to remove this comment afterwards.