Squid is a most popular caching and forwarding HTTP web proxy server used my wide range of companies to cache web pages from a web server to improve web server speed, reduce response times and reduce network bandwidth usage.
Read Also: How to Create an HTTP Proxy Using Squid on CentOS 7
In this article, we will explain how to install a squid proxy server on Ubuntu and Debian distributions and use it as an HTTP proxy server.
How to Install Squid on Ubuntu
Before we begin, you should know that Squid server doesn’t have any requirements, but the amount of RAM utilization may differ based on the clients browsing the internet via the proxy server.
Squid package is available to install from the base Ubuntu repository, but before that make sure to update your packages by running.
$ sudo apt update
Once your packages are up to date, you can proceed further to install squid and start and enable it on system startup using following commands.
$ sudo apt -y install squid
$ sudo systemctl start squid
$ sudo systemctl enable squid
At this point your Squid web proxy should already be running and you can verify the status of the service with.
$ sudo systemctl status squid
Sample Output
● squid.service - LSB: Squid HTTP Proxy version 3.x
   Loaded: loaded (/etc/init.d/squid; generated)
   Active: active (running) since Tue 2018-12-04 06:42:43 UTC; 14min ago
     Docs: man:systemd-sysv-generator(8)
    Tasks: 4 (limit: 1717)
   CGroup: /system.slice/squid.service
           ├─2761 /usr/sbin/squid -YC -f /etc/squid/squid.conf
           ├─2766 (squid-1) -YC -f /etc/squid/squid.conf
           ├─2768 (logfile-daemon) /var/log/squid/access.log
           └─2772 (pinger)

Dec 04 06:42:43 tecmint systemd[1]: Starting LSB: Squid HTTP Proxy version 3.x...
Dec 04 06:42:43 tecmint squid[2708]:  * Starting Squid HTTP Proxy squid
Dec 04 06:42:43 tecmint squid[2708]:    ...done.
Dec 04 06:42:43 tecmint systemd[1]: Started LSB: Squid HTTP Proxy version 3.x.
Dec 04 06:42:43 tecmint squid[2761]: Squid Parent: will start 1 kids
Dec 04 06:42:43 tecmint squid[2761]: Squid Parent: (squid-1) process 2766 started
Following are the some important squid file locations you should be aware of:
- Squid configuration file: /etc/squid/squid.conf
- Squid Access log: /var/log/squid/access.log
- Squid Cache log: /var/log/squid/cache.log
The default configuration file contains some configuration directives that needs to be configured to affect the behavior of the Squid.
Now open this file for editing using Vi editor and make changes as shown below.
$ sudo vim /etc/squid/squid.conf
Now, you may search about the following lines and change them as requested, in the Vi editor, you may search about those lines by hitting the ‘ESC’ and typing “/” key to writing the specific lines to look for.
- http_port : This is the default port for the HTTP proxy server, by default it is 3128, you may change it to any other port that you want, you may also add the “transparent” tag to the end of the line like http_port 8888 transparent to make Squid proxy act like a transparent proxy if you want.
- http_access deny all : This line won’t let anybody to access the HTTP proxy server, that’s why you need to change it to http_access allow all to start using your Squid proxy server.
- visible_hostname : This directive is used to set the specific hostname to a squid server. You can give any hostname to squid.
After making above changes, you may restart the Squid proxy server using the command.
$ sudo systemctl restart squid
Configuring Squid as an HTTP Proxy on Ubuntu
In this squid configuration section, we will explain you how to configure squid as an HTTP proxy using only the client IP address for authentication.
Add Squid ACLs
If you wish to allow only one IP address to access the internet through your new proxy server, you will need to define new acl (access control list) in the configuration file.
$ sudo vim /etc/squid/squid.conf
The acl rule you should add is:
acl localnet src XX.XX.XX.XX
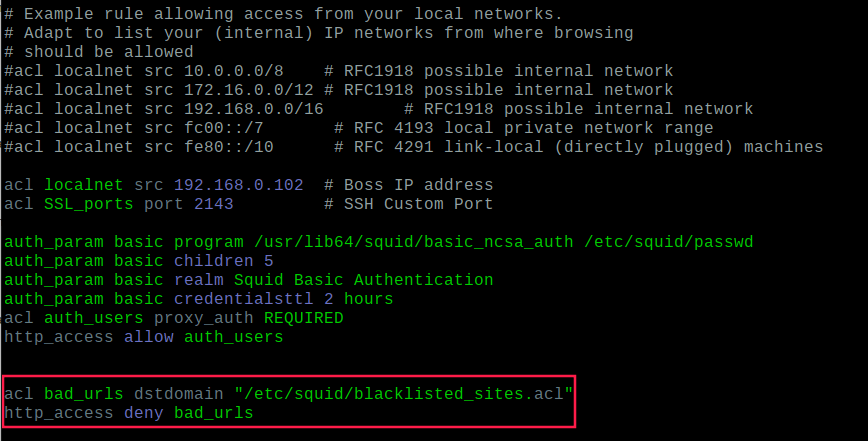
Where XX.XX.XX.XX is the IP address of client machine. This acl should be added in the beginning of the ACL’s section as shown in the following screenshot.

It is always a good practice to define a comment next to ACL which will describe who uses this IP address, for example.
acl localnet src 192.168.0.102 # Boss IP address
You will need to restart Squid service to take the new changes into effect.
$ sudo systemctl restart squid
Open Ports in Squid Proxy
By default, only certain ports are allowed in the squid configuration, if you wish to add more just define them in the configuration file as shown.
acl Safe_ports port XXX
Where XXX is the port number that you wish to allow. Again it is a good practive to define a comment next to acl that will describe what the port is going to be used for.

For the changes to take effect, you will need to restart squid once more.
$ sudo systemctl restart squid
Squid Proxy Client Authentication
To allow users to authenticate before using the proxy, you need to enable basic http authentication in the configuration file, but before that you need to install apache2-utils package using following command.
$ sudo apt install apache2-utils
Now create a file called “passwd” that will later store the username for the authentication. Squid runs with user “proxy” so the file should be owned by that user.
$ sudo touch /etc/squid/passwd
$ sudo chown proxy: /etc/squid/passwd
$ ls -l /etc/squid/passwd
Now we will create a new user called “tecmint” and setup its password.
$ sudo htpasswd /etc/squid/passwd tecmint

New password:
Re-type new password:
Adding password for user tecmint
Now to enable basic http authentication open the configuration file.
$ sudo vim /etc/squid/squid.conf
After the ports ACLs add the following lines:
auth_param basic program /usr/lib64/squid/basic_ncsa_auth /etc/squid/passwd
auth_param basic children 5
auth_param basic realm Squid Basic Authentication
auth_param basic credentialsttl 2 hours
acl auth_users proxy_auth REQUIRED
http_access allow auth_users

Save the file and restart squid so that the new changes can take effect:
$ sudo systemctl restart squid
Block Websites on Squid Proxy
To block access to unwanted websites, first create a file called “blacklisted_sites.acl” that will store the blacklisted sites in it.
$ sudo touch /etc/squid/blacklisted_sites.acl
Now add the websites that you wish to block access, for example.
.badsite1.com
.badsite2.com
The proceeding dot informs squid to block all references to that sites including www.badsite1, subsite.badsite1.com etc.
Now open Squid’s configuration file.
$ sudo vim /etc/squid/squid.conf
Just after the above ACLs add the following two lines:
acl bad_urls dstdomain "/etc/squid/blacklisted_sites.acl"
http_access deny bad_urls

Now save the file and restart squid:
$ sudo systemctl restart squid
Block Specific Keyword with Squid
To block a list of keywords, first create a file called “blockkeywords.lst” that will store the blacklisted keywords in it.
$ sudo touch /etc/squid/blockkeywords.lst
Now add the keywords that you wish to block access, for example.
facebook
instagram
gmail
Now open Squid’s configuration file and add the following rule.
acl blockkeywordlist url_regex "/etc/squid/blockkeywords.lst"
http_access deny blockkeywordlist
Now save the file and restart squid:
$ sudo systemctl restart squid
Once everything configured accurately, you can now configure your local client web browser or operating system’s network settings to use your newly configured squid HTTP proxy.
Configure Client to Use Squid Proxy
Now to test that your proxy server is working or not, you may open Firefox and go to Edit –> Preferences –> Advanced –> Network –> Settings and select “Manual proxy configuration” and enter your proxy server IP address and Port to be used for all connection as it follows.

Once you fill all the required proxy details, you will be able to surf the Web using your Squid proxy server, you may do the same thing in any other browser or program you want.
To make sure that you are surfing the web using your proxy server, you may visit http://www.ipaddresslocation.org/, in the right top corner you must see the same IP address as your server IP address.
For more additional configuration settings, you may check official squid documentation. If you have any questions or comments, please add them in the comment section below.


