Varnish Cache (also called Varnish) is an open source, high-performance HTTP accelerator with a modern design. It stores the cache in memory ensuring that web server resources are not wasted in creating the same web page over and over again when requested by a client.
It can be configured to run in front of a web server to serve pages in a much faster way thus making websites load quickly. It supports load balancing with health checking of backends, URL rewriting, graceful handling of “dead” backends and offers partial support for ESI (Edge Side Includes).
In our series of articles concerning Varnish Cache, we showed how to setup Varnish for Nginx and Varnish for Apache web servers on a CentOS 7 system.
In this article, we will explain how to install and configure Varnish Cache 5.2 as a front-end to Apache HTTP server on a Debian and Ubuntu systems.
Requirements:
- A Ubuntu system installed with LAMP Stack
- A Debian system installed with LAMP Stack
- A Debian/Ubuntu system with static IP address
Step 1: Install Varnish Cache on Debian and Ubuntu
1. Luckily, there are pre-compiled packages for latest version of Varnish Cache 5 (i.e 5.2 at the time of writing), so you need to add official Varnish repository in your system as shown below.
$ curl -L https://packagecloud.io/varnishcache/varnish5/gpgkey | sudo apt-key add -
Important: If you are using Debian, install debian-archive-keyring package for verifying the official Debian repositories.
$ sudo apt-get install debian-archive-keyring
2. After that, create a file named /etc/apt/sources.list.d/varnishcache_varnish5.list that contains the repository configuration below. Make sure to replace ubuntu and xenial with your Linux distribution and version.
deb https://packagecloud.io/varnishcache/varnish5/ubuntu/ xenial main
deb-src https://packagecloud.io/varnishcache/varnish5/ubuntu/ xenial  main
3. Next, update software package repository and install varnish cache using the following commands.
$ sudo apt update
$ sudo apt install varnish
4. After installing Varnish Cache, the main configuration files will be installed under /etc/varnish/ directory.
- /etc/default/varnish – the varnish environment configuration file.
- /etc/varnish/default.vcl – main varnish configuration file, it is written using vanish configuration language (VCL).
- /etc/varnish/secret – varnish secret file.
To confirm that the Varnish installation was successful, run the following command to see the version.
$ varnishd -V

Step 2: Configure Apache to Work With Varnish Cache
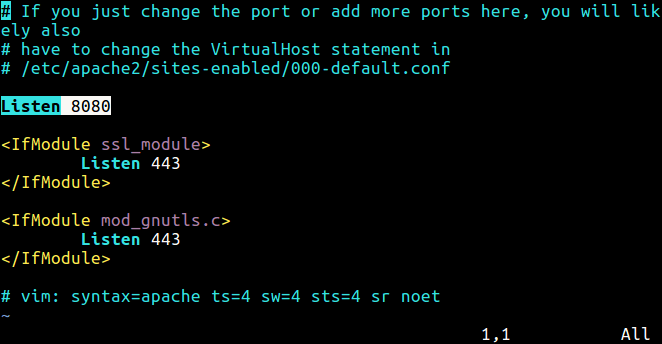
5. Now you need to configure Apache to work with Varnish Cache. By default Apache listens on port 80, you need change the default Apache port to 8080 to enable it run behind Varnish caching.
So open the Apache ports configuration file /etc/apache2/ports.conf and find the line listen 80, then change it to listen 8080.
Alternatively, just run the sed command to change port 80 to 8080 as follows.
$ sudo sed -i "s/Listen 80/Listen 8080/" /etc/apache2/ports.conf
6. You also need to make changes to your virtual host file located in /etc/apache2/sites-available/.
$ sudo vi /etc/apache2/sites-available/000-default.conf
Change the port number to 8080.
<VirtualHost *:8080>
	#virtual host configs here
</VirtualHost>

7. On systems using systemd, the /etc/default/varnish environment configuration file is deprecated and is not considered any more.
You need to copy the file /lib/systemd/system/varnish.service to /etc/systemd/system/ and make a few changes to it.
$ sudo cp /lib/systemd/system/varnish.service /etc/systemd/system/
$ sudo vi /etc/systemd/system/varnish.service
You need to modify the service directive ExecStart, it defines the varnish daemon runtime options. Set the value of the -a flag, which defines the port varnish listens to, from 6081 to 80.
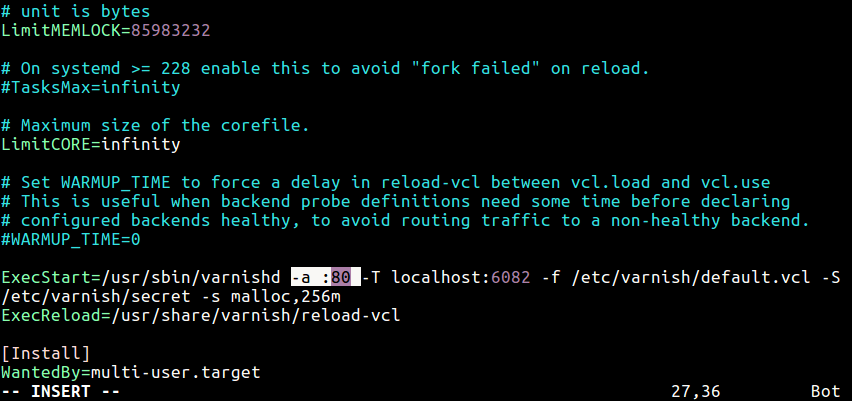
8. To effect the above changes to the varnish service unit file, run the following systemctl command:
$ sudo systemctl daemon-reload
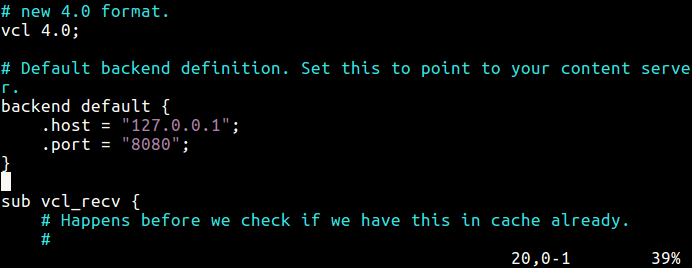
9. Then, configure Apache as a backend server for Varnish proxy, in the /etc/varnish/default.vcl configuration file.
# sudo vi /etc/varnish/default.vcl
Using the backend section, you can define the host IP and port for your content server. The following is the default backend configuration which uses the localhost (set this to point to your actual content server).
backend default {
    .host = "127.0.0.1";
    .port = "8080";
}
10. Once you have performed all the above configuration, restart Apache and Varnish daemon by typing following commands.
$ sudo systemctl restart apache
$ sudo systemctl start varnish
$ sudo systemctl enable varnish
$ sudo systemctl status varnish
Step 3: Test Varnish Cache on Apache
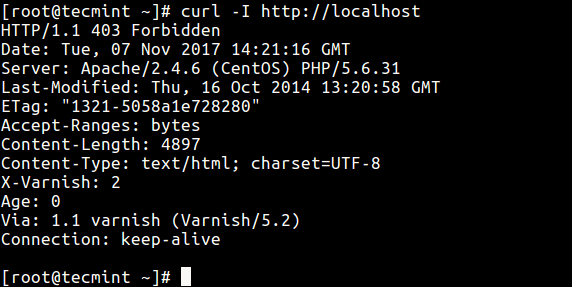
11. Finally, test if Varnish cache is enabled and working with the Apache HTTP server using the cURL command below to view the HTTP header.
$ curl -I http://localhost
That’s It! For more information about Varnish Cache, visit – https://github.com/varnishcache/varnish-cache
In this tutorial, we have explained how to setup Varnish Cache 5.2 for Apache HTTP server on Debian and Ubuntu systems. You can share any thoughts or queries with us via the feedback from below.




How to set up for HTTPS (Port 443)?
Hello Aaron,
I followed you exactly, something went wrong in first try. But in second try it worked perfectly. Lots of thanks to you sir.
@Purushotam
Okay, many thanks for the feedback.
On my Ubuntu 16 the exact first command doesn’t work:
sh: 0: getcwd() failed: No such file or directory
% Total % Received % Xferd Average Speed Time Time Time Current
Dload Upload Total Spent Left Speed
0 0 0 0 0 0 0 0 –:–:– –:–:– –:–:– 0sh: 0: getcwd() failed: No such file or directory
sh: 0: getcwd() failed: No such file or directory
0 0 0 0 0 0 0 0 –:–:– 0:00:01 –:–:– 0
100 3954 100 3954 0 0 2122 0 0:00:01 0:00:01 –:–:– 2122
sh: 0: getcwd() failed: No such file or directory
sh: 0: getcwd() failed: No such file or directory
sh: 0: getcwd() failed: No such file or directory
sh: 0: getcwd() failed: No such file or directory
sh: 0: getcwd() failed: No such file or directory
In order to solve this, I need to redirect the curl to a file and then I can cat that file and pipe it into apt-key add –
@vinci
That command should really work, ensure that you type(or copy and paste) the exact command. But all the same, if you found a way around then that’s fine.
Great tutorial I wanted to know how to install varnish on my Debian VPS but i didn’t know how to, now i followed the steps above it is working great now.
Many thanks…:)
@tony
Welcome, am glad that this helped you out. Many thanks for writing back.
Getting a lot of errors like “but option ‘subdir-objects’ is disabled” after typing in sh autogen.sh while installing but find no info on how to resolve them. Is this normal?
@MAV
We have an updated version of this article, that we will publish soon. It is much easier to follow, using the Varnish new repository. It will help you install the latest version, Varnish 5.2.
Hey Aaron, but I think changing the default http port is not suitable for production environments, isn’t it?
@Damon
If you want Varnish to run in front of the website, for web caching then you need to make it listen on the default HTTP port even in production environment. However, this is critical, therefore you should decide what works best for you: in-depth consultations(possibly from experts) can help you make the best decision.
Wow thanks so much! Helped me a lot, I couldn’t start varnish but this command help me so much:
sudo /usr/local/sbin/varnishd -a :80 -b localhost:8080
@jacob
Welcome, thanks for writing back and for following us as well.