As a Linux System Administrator, you need to have a firm grasp of basic administration concepts for you to effectively and seamlessly operate and manage Linux servers.
In this article of the RHCSA series, we shine the spotlight on key concepts that you need to have at your fingertips to enable you to execute your tasks like a professional.
Logging In and Switching Users in Linux Multiuser Targets
One of the fundamental skills a seasoned or budding Linux user needs to know is how to manage users on your system.
To log in to your system use the ssh syntax:
ssh root@server-IP
OR
ssh -l user@server-IP
Once logged in, you can confirm the user you are currently logged on using the command.
whoami
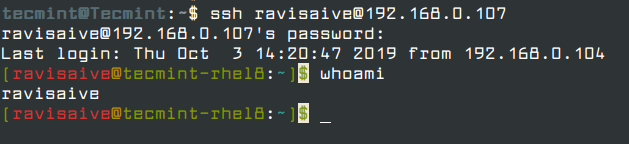
As seen from the output above, I’m logged in as a user called ravisaive.
You can further obtain additional details such as UID (User ID) and GID (Group ID) using the id command.
id

Linux users are stored in the /etc/passwd file. You can view the list of users by typing the command.
cat /etc/passwd
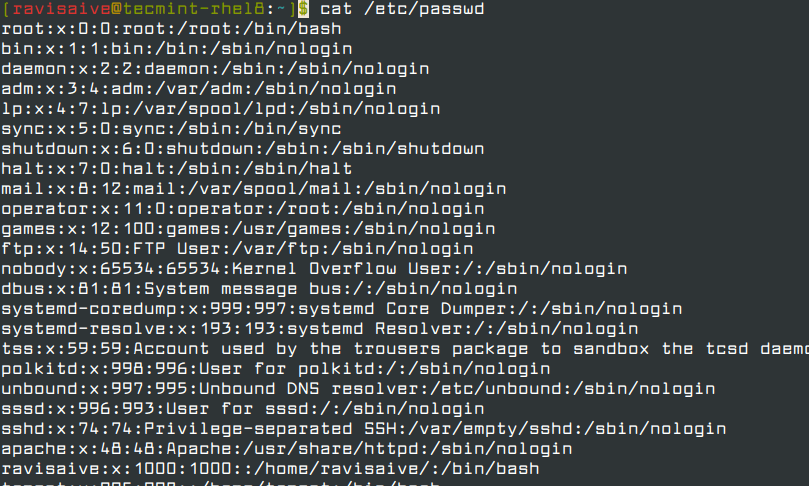
The /etc/passwd file contains both system users and regular users.
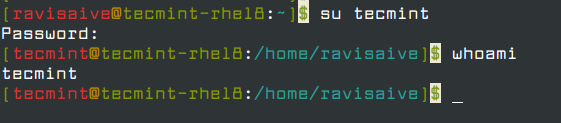
To switch to another user, simply use the command.
su username
For example, to switch to user tecmint, run.
su tecmint
Again, to confirm the user you are currently logged on to, execute the command.
whoami
System users are identified using the /sbin/nologin suffix at the end of the user information detail. This implies that you cannot switch into them and use them for logon purposes.
You can only switch and log in to regular users with the /bin/bash at the tail end indicating that they are shell users.
Mastering System Startup, Restart, and Shutdown in Linux
In this section, we will tackle how to reboot and shut down a system.
Rebooting a Linux System
To reboot your system as a root user, try any of the commands as shown.
reboot
systemctl reboot
shutdown -r now
init 6
telinit 6
The last two commands instruct the system to switch to run level 6 which automatically reboots the system.
Shutting Down a Linux System
To shut down your Linux system issue any of these commands as a root user.
halt
systemctl halt
poweroff
systemctl poweroff
shutdown -h now
init 0
telinit 0
Boot Systems into Different Targets Manually
Before the advent of systemd systems, you could easily view the runlevel – presently referred to as targets in the /etc/inittab file.
To view the runlevel you were currently at, you would simply run the command: runlevel. However, this is no longer in use. Systemd uses ‘targets’ in place of runlevels.
To check the default target, use the systemctl command.
systemctl get-default
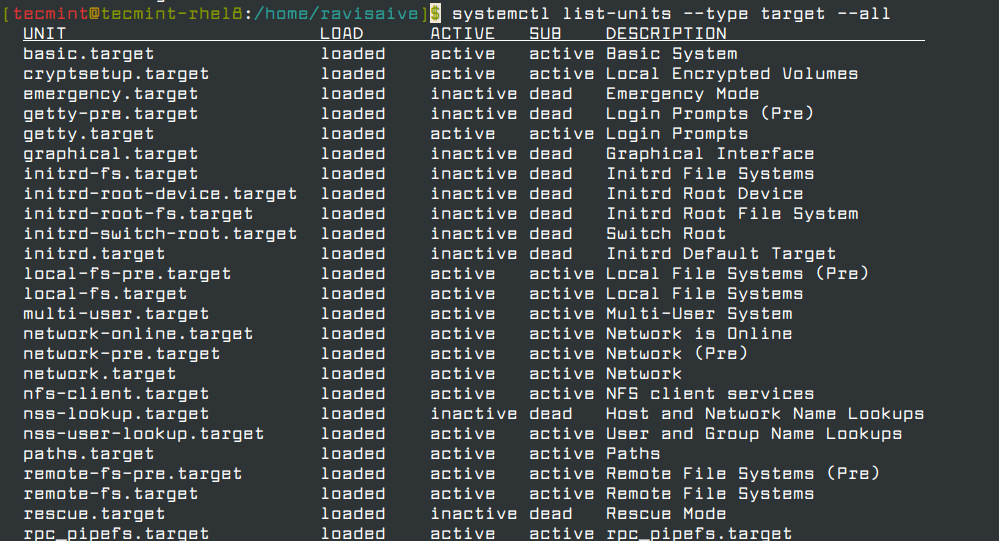
To view all the available targets run the command.
systemctl list-units --type target --all
To set a default target use the syntax:
systemctl set-default TARGET.target
For example, to switch to a graphical target, the syntax would be:
systemctl set-default graphical.target
Now simply reboot to boot into your new target.
Interrupting Boot Process to Access Linux System
In the event that you want to make a few system tweaks, you can momentarily interrupt the boot process and gain a shell. Suppose you have forgotten the root user’s password on your system and you want to reset it and gain access, how would you go about it?
To achieve this, first hit the e key on your keyboard when the grub2 menu is displayed.
After pressing the e key at the grub2 menu, scroll, and locate the line that begins with linux and append the following statement at the end of the line. Delete the words rhgb quiet that comes at the very end and append:
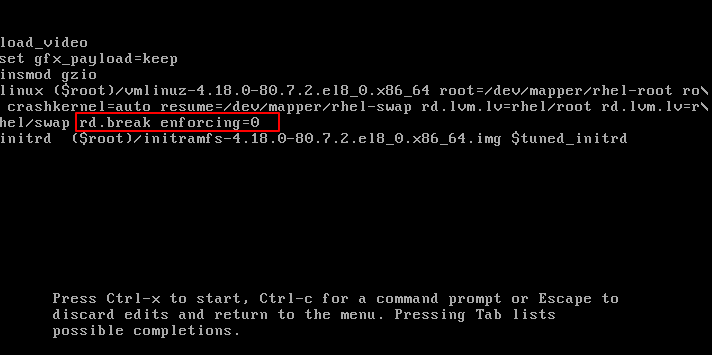
The rd.break triggers a break very early on in the booting process and enforcing=0 activates the SELinux permissive mode (Not to be confused with selinux=0)
Next, hit Ctrl + X to reboot the system.
The prompt will change to.
switch_root:/#
Next, you will mount the /sysroot partition in read and write mode.
switch_root:/# mount -o remount, rw /sysroot
Then run chroot /sysroot.
switch_root:/# chroot /sysroot
Now you can change the root’s password by running:
sh-4.4# passwd root
You will be prompted to type a NEW root password and later confirm it.
Finally, mount the file as read-only.
sh-4.4# mount -o remount,ro /
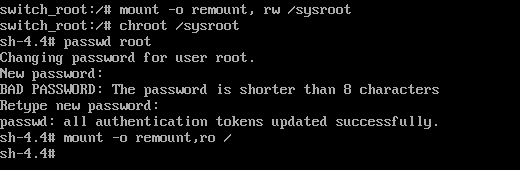
Exit twice and the system will reboot. You should now be able to log in as the root user using the newly set password.
Once successfully logged in, run the commands.
restorecon /etc/shadow
setenforce 1
Find & Kill Resource-Hungry Processes in Linux
Memory-intensive processes exert undue pressure on CPU and RAM and may cause freezing or sudden quitting of essential applications and applications. To avoid this, monitoring processes running on your Linux system is crucial as well as knowing how to stop them.
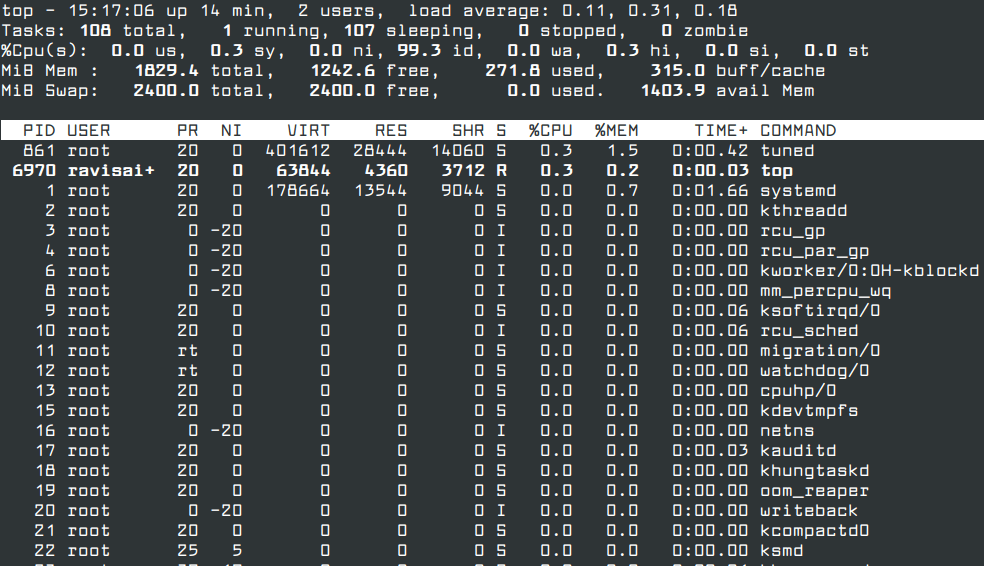
To have a glance at the running processes, run the command:
top
The top command displays a real-time view of processes running on your system along with other metrics such as system uptime, load average, CPU usage, and memory utilization.
An improvement of the top command is the htop command which displays detailed real-time system performance statistics and the impact each process has on the memory and CPU.
dnf install https://dl.fedoraproject.org/pub/epel/epel-release-latest-9.noarch.rpm
dnf install htop
htop

To end or kill a process, you can use its PID (Process ID) or process name:
kill PID
For example, to kill a process with a PID 1091 run.
kill 1091
To kill a process using its process name, for example, firefox use the syntax:
kill firefox
How to Adjust Process Scheduling in Linux
A scheduler is a part of the kernel that makes a decision as to which runnable processes will be executed by the CPU next.
The scheduler offers 2 main categories of scheduling policies:
- Normal policy
- Real-time policy
The real-time scheduling policy comprises of 2 sub-categories:
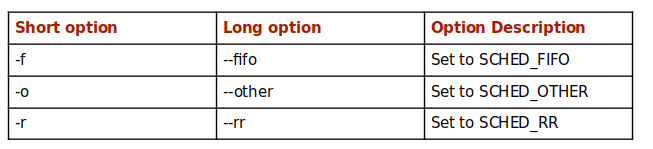
- SCHED_RR – For tasks with the same priority, this policy uses a round-robin model. In this policy, tasks are assigned an equal time interval run.
- SCHED_FIFO – For tasks with the same priority, the first task has to yield before the next one can be executed.
For Normal policy, we have:
- SCHED_OTHER – This is the default time-sharing scheduler policy used for normal time-sharing.
To switch from one policy to the other, we use the chrt command, which sets a process with a PID of 1091 to use SCHED_INFO denoted by -f flag with a priority of 10.
chrt -f -p 10 1091
The command below sets the same process PID 1091 to use SCHED_OTHER denoted by the -o flag.
chrt -0 -p 10 1091
How to Find & Understand Linux System Logs
Traditionally, system log files are stored in /var/log directory along with Other log files and their storage file paths are as indicated.
- /var/log/audit/audit.log – Stores SELinux events
- /var/log/maillog – Stores mail-related messages
- /var/log/boot.log – Stores startup log messages
- /var/log/secure – Stores authentication-related logs
- /var/log/cron – Stores logs about cron jobs
- /var/log/httpd – Stores logs about the Apache Web server
- /var/log/sssd – Stores logs about sssd services
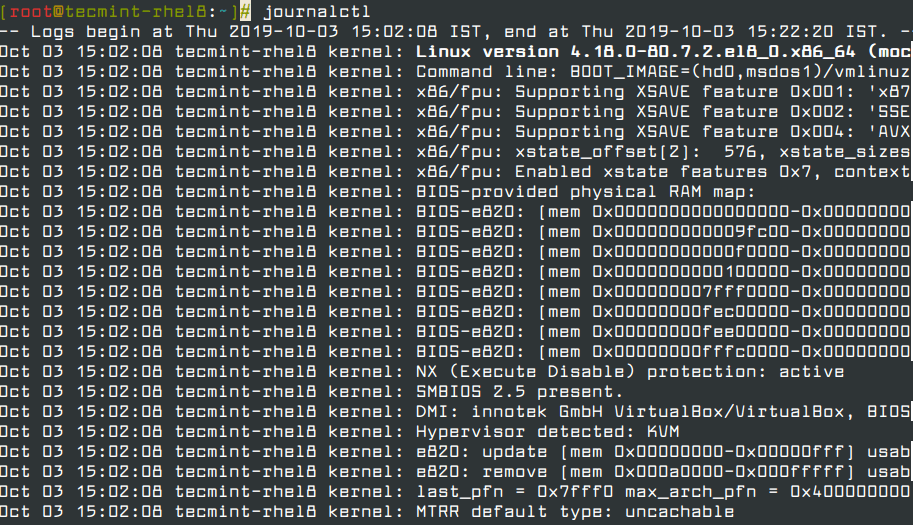
To view log files in systemd systems, use the command journalctl.
Journalctl command queries and displays logs from journald, which is a systemd daemon that collects and stores log data. It makes the work of administrators easy in having an overview of the system’s relevant logs.
journalctl
To view all event logs since the last boot use the -b option as shown.
journalctl -b
To view all event logs that were logged to today, use the command.
journalctl --since=today
To display the most recent messages, run.
journalctl -f
To display boot summary process run.
systemd-analyze
To view the time spent by each process on boot execute the command:
systemd-analyze-blame
How to Save System Logs in Linux
In the previous subtopic, you were able to have a view of the relevant system logs using journalctl. However, by default, the system logs do not survive after a reboot.
You, therefore, need to make a few adjustments to allow for the preservation or permanent storage of the logs.
First, create a journal directory in /var/log.
mkdir /var/log/journal
The only drawback with this is that it can take up a lot of space on your hard disk.
To limit the disk space utilization, you need to edit the /etc/systemd/journald.conf file.
vim /etc/systemd/journald.conf
Locate the SystemMaxUse attribute and define the maximum disk space usage. In this case, we have defined the Maximum space as 100Mb.
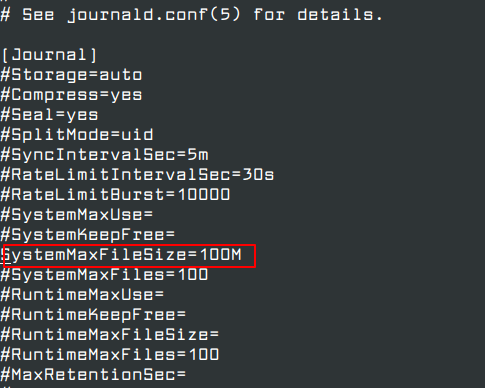
Next, save the changes and exit the configuration file.
Finally, run the command below for the changes to come into effect.
systemctl restart systemd-journald
How to Start, Stop, Check Status of Network Services
Let’s now look at how to manage network services.
Starting & Stopping a Service
To start and stop a service, for example SSH, use the syntax:
systemctl start sshd.service
systemctl stop sshd.service
Checking the Status of a Service
To check the state of a service, for instance, to check if ssh is running or not, run.
systemctl status sshd.service
Restart or Reload a Service
To restart a service, use any of the commands:
systemctl restart name.service
systemctl try-restart name.service
systemctl reload name.service
For example to restart ssh run any of the commands.
systemctl restart sshd.service
Enable or Disable a Service
To configure a service in such a manner that it starts upon a system boot run.
systemctl enable service.name
To stop a service from starting automatically on boot, simply execute the command:
systemctl disable service.name
List All Running Services
To list all services, run the command.
systemctl list-units --type service
Securely Transfer Files Between Linux Systems
To keep your files private and confidential when sending them from one system to another consider using the scp command. Short for Secure Copy, the SCP command rides on SSH protocol to encrypt the files during transmission thereby keeping intruders at bay.
The syntax is as follows:
scp /path/to/file username@remote-IP address:/destination path
For example, to send a file called linux_fundamentals from the present working directory to a remote Linux system in the /tmp directory, run the command:
scp linux_fundamentals.pdf [email protected]:/tmp
You will be prompted whether to continue connecting or not and required to provide the remote system’s Password. Thereafter, the file will be saved at the specified directory on the remote system.
Conclusion
We have discussed the core concepts and skills that every system administrator needs to be familiar with in order to efficiently operate and manage various running services and operations.
As we up, It’s our hope that this guide was beneficial and will further challenge you to become better at your systems administration skills.