Debian Linux is a popular Linux distribution and caters to end user workstations as well as network servers. Debian is often praised for being a very stable Linux distribution. Debian’s stability paired with the flexibility of LVM makes for a highly flexible storage solution that anyone can appreciate.
Before continuing with this tutorial, Tecmint offers a great review and overview of the installation of Debian 7.8 “Wheezy” which can be found here:
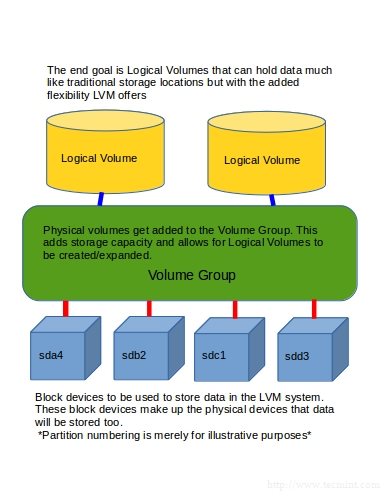
Logical Volume Management (LVM) is a method of disk management that allows multiples disks or partitions to be collected into one large storage pool that can be broken up into storage allocations known as Logical Volumes.
Since an administrator can add more disks/partitions as they desire, LVM becomes a very viable option for changing storage requirements. Aside from the easy expandability of LVM, some data resiliency features are also built into LVM. Features such as snap-shot abilities and data migration from failing drives, provide LVM with even more abilities to maintain data integrity and availability.
Installation Environment
- Operating System – Debian 7.7 Wheezy
- 40gb boot drive – sda
- 2 Seagate 500gb drives in Linux Raid – md0 (RAID not necessary)
- Network/Internet connection
Installing and Configuring LVM on Debian
1. Root/administrative access to the system is needed. This can be obtained in Debian through the use of the su command or if the appropriate sudo settings have been configured, sudo can be used as well. However this guide will assume root login with su.
2. At this point the LVM2 package needs to be installed onto the system. This can be accomplished by entering the following into the command line:
# apt-get update && apt-get install lvm2
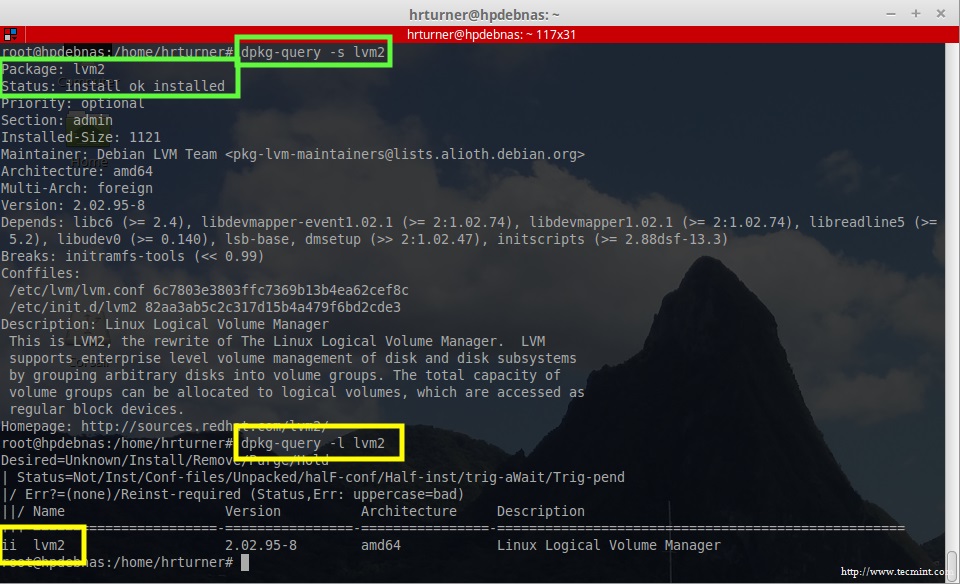
At this point one of two commands can be run to ensure that LVM is indeed installed and ready to be used on the system:
# dpkg-query -s lvm2
# dpkg-query -l lvm2
3. Now that the LVM software is installed, it is time to prepare the devices for use in an LVM Volume Group and eventually into Logical Volumes.
To do this the pvcreate utility will be used to prepare the disks. Normally LVM would be done on a per partition basis using a tool such as fdisk, cfdisk, parted, or gparted to partition and flag the partitions for use in a LVM setup, however for this setup two 500gb drives were raided together to create a RAID array called /dev/md0.
This RAID array is a simple mirror array for redundancy purposes. In the future, an article explaining how RAID is accomplished will also be written. For now, let’s move ahead with the preparation of the physical volumes (The blue blocks in the diagram at the beginning of the article).
If not using a RAID device, substitute the devices that are to be part of the LVM setup for ‘/dev/md0‘. Issuing the following command will prepare the RAID device for use in an LVM setup:
# pvcreate /dev/md0
4. Once the RAID array has been prepared, it needs to be added to a Volume Group (the green rectangle in the diagram at the beginning of the article) and this is accomplished with the use of the vgcreate command.
The vgcreate command will require at minimum two arguments passed to it at this point. The first argument will be the name of the Volume Group to be created and the second argument will be the name of the RAID device prepared with pvcreate in step 3 (/dev/md0). Putting all of the components together would yield a command as follows:
# vgcreate storage /dev/md0
At this point, LVM has been instructed to create a volume group called ‘storage‘ that will use the device ‘/dev/md0‘ to store the data that is sent to any logical volumes that are a member of the ‘storage‘ volume group. However, at this point there still aren’t any Logical Volumes to be used for data storage purposes.
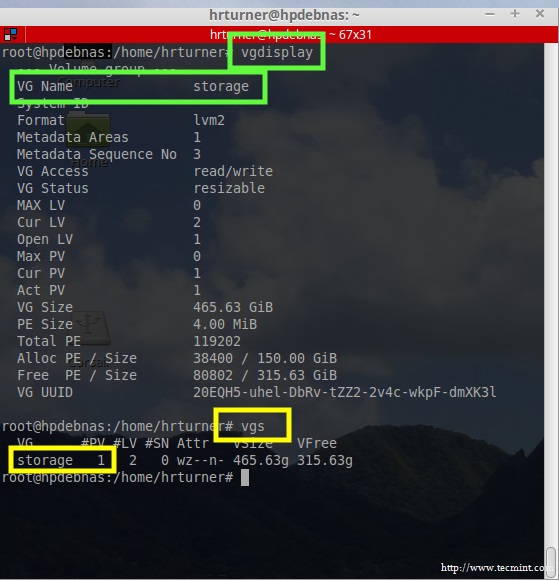
5. Two command can quickly be issued to confirm that the Volume Group was successfully created.
- vgdisplay – Will provide far greater detail about the Volume Group.
- vgs – A quick one line output to confirm that the Volume Group is in existence.
# vgdisplay
# vgs
6. Now that the Volume Group is confirmed ready, the Logical Volumes themselves, can be created. This is the end goal of LVM and these Logical Volumes are were data will be sent in order to get written to the underlying physical volumes (PV) that make up the Volume Group (VG).
To create the Logical Volumes, several arguments need to be passed to the lvcreate utility. The most important and essential arguments include: the size of the Logical Volume, the name of the Logical Volume, and which Volume Group (VG) this newly created Logical Volume (LV) will belong. Putting all this together yields a lvcreate command as follows:
# lvcreate -L 100G -n Music storage
Effectively this command says to do the following: create a Logical Volume that is 100 gigabytes in length that has a name of Music and belongs to the Volume Group storage. Let’s go ahead and create another LV for Documents with a size of 50 gigabytes and make it a member of the same Volume Group:
# lvcreate -L 50G -n Documents storage
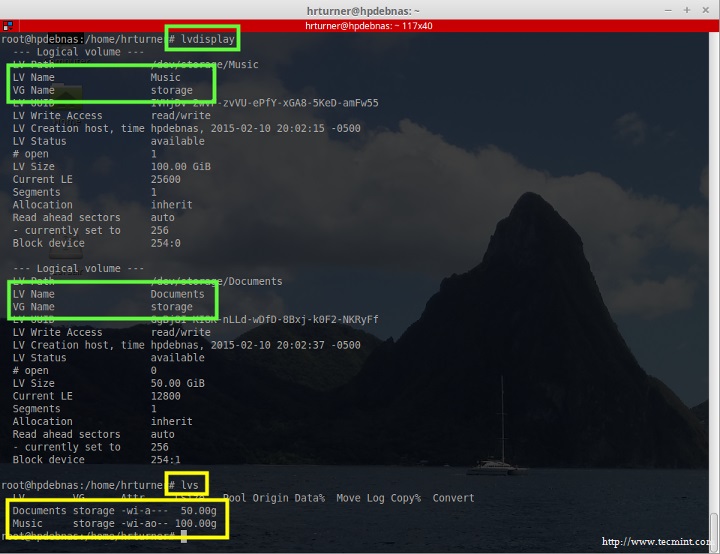
The creation of the Logical Volumes can be confirmed with one of the following commands:
- lvdisplay – Detailed output of the Logical Volumes.
- lvs – Less detailed output of the Logical Volumes.
# lvdisplay
# lvs





A couple of things missing from this tutorial is 1) how to remove a disk or a partition from the array, 2) how to reduce the amount of space used by the array without removing disks or partitions.
Hi,
I have reduced the remove the RAID-1 array (/dev/md0) to 48G size and it is configured on the lvm and trying to reduce respective disk space (sda4) as well to 48G from 58G.
But i am not able to accomplish this, could you please help me regarding this.
root@sekhar~# lsblk
NAME                    MAJ:MIN RM   SIZE RO TYPE  MOUNTPOINT
sda                       8:0    0 232.9G  0 disk
├─sda1                    8:1    0  16.5G  0 part
└─sda4                    8:4    0    58G  0 part
  └─md0                   9:0    0    48G  0 raid1
    ├─vg0-root (dm-0)   252:0    0  26.6G  0 lvm   /
    ├─vg0-backup (dm-1) 252:1    0  19.6G  0 lvm
    └─vg0-swap (dm-2)   252:2    0   1.9G  0 lvm   [SWAP]
sr0                      11:0    1  1024M  0 rom
root@sekhar~:~# cat /proc/mdstat Personalities : [linear] [multipath] [raid0] [raid1] [raid6] [raid5] [raid4] [raid10] md0 : active raid1 sda4[3] 50331648 blocks super 1.2 [2/1] [U_] unused devices:Thank you so much for this how to guide, i’m going to be doing my LFCS soon and was cracking my head to understand LVM and it all clicked while reading this HOW TO. Thank you for the easy to understand write up, you sir I salute.
Dibs,
You are quite welcome and best of luck on the LCFS. It’s a great test to challenge yourself with common Linux tasks!
I love LVM2 and software raid in Linux. One tip if you want to try this before making something for real, use USB memory sticks as disks. They work great as such. Swell to test disk craches and rebuilding RAID-5 or RAID-6.
Anders, I prefer LVM on hardware RAID but this little NAS box didnt support HW RAID. The USB drive option is a fantastic idea for testing a potential install! No reason to risk the real drives when USB media is so cheap.
Actually, hardware Raid have hardware dependencies. Linux software Raided disks can be moved between machines, for instance when replace a faulty motherboard or disc controller. That can’t be done securly unless replaced with the same brand and version of hardware.
By the way, it is dead easy to move a volume group and its logical volumes to new disks and remove old that are about to crach. Just add a physical volume to the volume group and then move all data off the bad one. Lastly remove the bad one. No need to do any manual moving. Used it to move a raid that was degenerated out and a new, larger in.
Lastly, I would have recommended to mount under /srv and not /mnt. As /mnt are meant for temporary mounts and /srv are for server storage. Makes it easier to backup, like /home for user data. ;-)
Anders, To each their own. /mnt was only used for illustrative purposes. The box that these drives are actually in, does mount the LVM’s in a different location.
Please let me know if the LVM is same for other distro’s as well.
Satish, You’re very welcome. LVM2 is very similar across most distributions. I can’t speak for de facto but I would say that most of the LVM stuff will be the same across distributions. The only realy differences will likely be Distro specific things and maybe naming conventions of the LVM package.
Great articule!!!!please more on the like of this.
Thanks
You’re very welcome. There will be several more Debian based article coming down the pipe soon!
I am waiting since very long time for this.
Many Thanks @Rob Turner @Tecmint