Managing a RHEL server, as it is the case with any other Linux server, will require that you know how to add, edit, suspend, or delete user accounts, and grant users the necessary permissions to files, directories, and other system resources to perform their assigned tasks.
Managing User Accounts
To add a new user account to a RHEL server, you can run either of the following two commands (adduser or useradd) as root:
adduser [new_account]
useradd [new_account]
When a new user account is added, by default the following operations are performed.
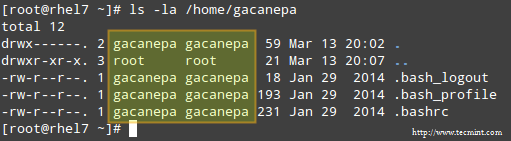
- His/her home directory is created (
/home/usernameunless specified otherwise). - These
.bash_logout,.bash_profileand.bashrchidden files are copied inside the user’s home directory, and will be used to provide environment variables for his/her user session. You can explore each of them for further details. - A mail spool directory is created for the added user account.
- A group is created with the same name as the new user account.
The full account summary is stored in the /etc/passwd file. This file holds a record per system user account and has the following format (fields are separated by a colon):
[username]:[x]:[UID]:[GID]:[Comment]:[Home directory]:[Default shell]
- These two fields
[username]and[Comment]are self-explanatory. - The second filed ‘x’ indicates that the account is secured by a shadowed password (in
/etc/shadow), which is used to login as[username]. - The fields
[UID]and[GID]are integers that show the User IDentification and the primary Group IDentification to which[username]belongs, equally.
Finally,
- The
[Home directory]shows the absolute location of[username]’shome directory, and [Default shell]is the shell that is committed to this user when he/she logs into the system.
Another important file that you must become familiar with is /etc/group, where group information is stored. As it is the case with /etc/passwd, there is one record per line, and its fields are also delimited by a colon:
[Group name]:[Group password]:[GID]:[Group members]
where,
[Group name]is the name of the group.- Does this group use a group password? (An “x” means no).
[GID]: same as in/etc/passwd.[Group members]: a list of users, separated by commas, that are members of each group.
After adding an account, at any time, you can edit the user’s account information using the usermod command, whose basic syntax is:
usermod [options] [username]
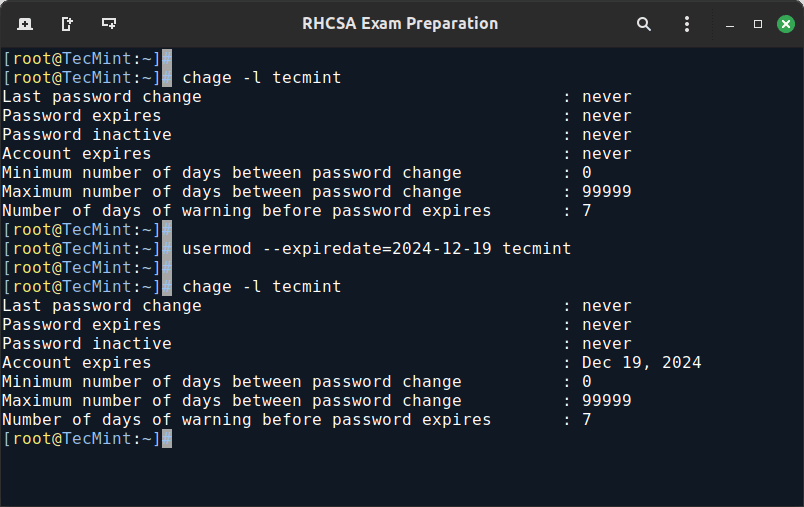
EXAMPLE 1: Set User Expiration Dates in Linux
If you work for a company that has some kind of policy to enable account for a certain interval of time, or if you want to grant access to a limited period of time, you can use the --expiredate flag followed by a date in YYYY-MM-DD format.
To verify that the change has been applied, you can compare the output of
chage -l tecmint
usermod --expiredate=2024-12-19 tecmint
chage -l tecmint
before and after updating the account expiry date, as shown in the following image.
EXAMPLE 2: Adding Users to Supplementary Groups
Besides the primary group that is created when a new user account is added to the system, a user can be added to supplementary groups using the combined -aG options, followed by a comma-separated list of groups.
usermod -a -G wheel tecmint
usermod -a -G group1, group2 tecmint
groups tecmint
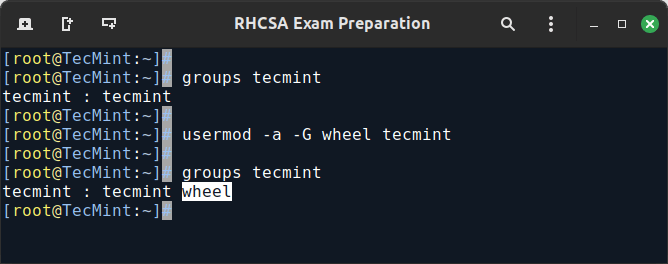
To remove a user from a group, run the following command and list the groups you want the user to belong.
sudo gpasswd -d tecmint wheel
groups tecmint
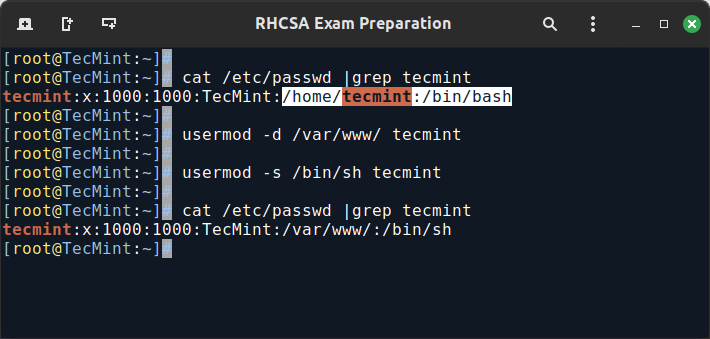
EXAMPLE 3: Changing User Home Directory and Shell
If for some reason you need to change the default location of the user’s home directory (other than /home/username), you will need to use the -d, or --home options, followed by the absolute path to the new home directory.
If a user wants to use another shell other than bash (for example, sh), which gets assigned by default, use usermod with the --shell flag, followed by the path to the new shell.
cat /etc/passwd |grep tecmint
usermod -d /var/www/ tecmint
usermod -s /bin/sh tecmint
cat /etc/passwd |grep tecmint
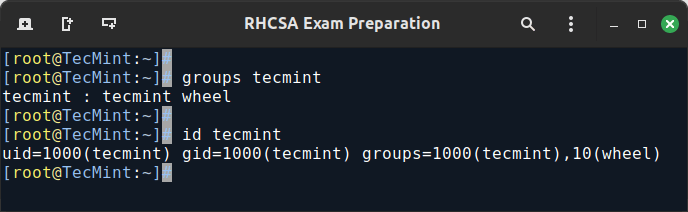
EXAMPLE 4: See Which Groups a User Belongs To
After adding the user to a supplementary group, you can verify that it now actually belongs to such group(s):
groups tecmint
id tecmint
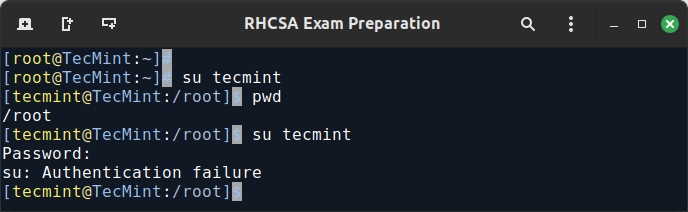
EXAMPLE 5: Disable a Linux Account by Locking Password
To disable an account, you will need to use either the -L (lowercase L) or the --lock option to lock a user’s password.
This will prevent the user from being able to log on.
usermod --lock tecmint
su tecmint
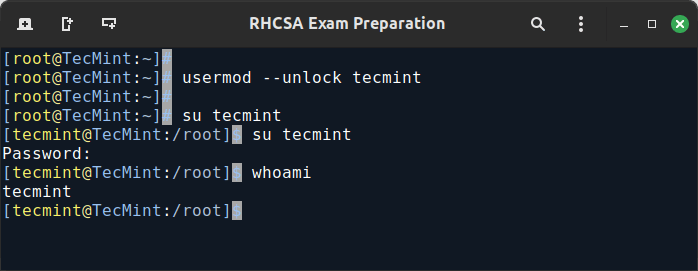
EXAMPLE 6: Unlocking User Account Password
When you need to re-enable the user so that he can log on to the server again, use the -U or the --unlock option to unlock a user’s password that was previously blocked, as explained in Example 5 above.
usermod --unlock tecmint
su tecmint
EXAMPLE 7: Deleting a Group or a User Account
To delete a group, you’ll want to use groupdel, whereas to delete a user account you will use userdel (add the –r switch if you also want to delete the contents of its home directory and mail spool):
groupdel [group_name]        # Delete a group
userdel -r [user_name]       # Remove user_name from the system, along with his/her home directory and mail spool
If there are files owned by group_name, they will not be deleted, but the group owner will be set to the GID of the group that was deleted.
Listing, Setting, and Changing Standard ugo/rwx Permissions
The well-known ls command is one of the best friends of any system administrator. When used with the -l flag, this tool allows you to view a list of a directory’s contents in a long (or detailed) format.
However, this command can also be applied to a single file. Either way, the first 10 characters in the output of ls -l represent each file’s attributes.
The first char of this 10-character sequence is used to indicate the file type:
-(hyphen): a regular filed: a directoryl: a symbolic linkc: a character device (which treats data as a stream of bytes, i.e. a terminal)b: a block device (which handles data in blocks, i.e. storage devices)
The next nine characters of the file attributes, divided into groups of three from left to right, are called the file mode and indicate the read (r), write(w), and execute (x) permissions granted to the file’s owner, the file’s group owner, and the rest of the users (commonly referred to as “the world”), respectively.
While the read permission on a file allows the same to be opened and read, the same permission on a directory allows its contents to be listed if the execute permission is also set. In addition, the execute permission in a file allows it to be handled as a program and run.
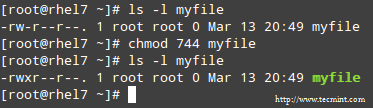
File permissions are changed with the chmod command, whose basic syntax is as follows:
chmod [new_mode] file
where new_mode is either an octal number or an expression that specifies the new permissions. Feel free to use the mode that works best for you in each case. Or perhaps you already have a preferred way to set a file’s permissions – so feel free to use the method that works best for you.
The octal number can be calculated based on the binary equivalent, which can in turn be obtained from the desired file permissions for the owner of the file, the owner group, and the world. The presence of a certain permission equals a power of 2 (r=22, w=21, x=20), while its absence means 0.
For example:

To set the file’s permissions as indicated above in octal form, type:
chmod 744 myfile
Please take a minute to compare our previous calculation to the actual output of ls -l after changing the file’s permissions:
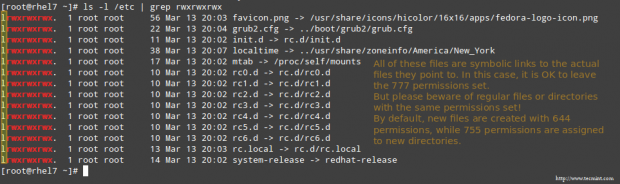
EXAMPLE 8: Find Files with 777 Permissions in Linux
As a security measure, you should make sure that files with 777 permissions (read, write, and execute for everyone) are avoided like the plague under normal circumstances.
Although we will explain in a later tutorial how to more effectively locate all the files in your system with a certain permission set, you can by now combine ls with grep command to obtain such information.
In the following example, we will look for files with 777 permissions in the /etc directory only. Note that we will use pipelining as explained in Part 3: File and Directory Management of this RHCSA series:
ls -l /etc | grep rwxrwxrwx
EXAMPLE 9: Assigning a Specific Permissions to All Users
Shell scripts, along with some binaries that all users should have access to (not just their corresponding owner and group), should have the execute bit set accordingly (please note that we will discuss a special case later):
chmod a+x script.sh
Note: That we can also set a file’s mode using an expression that indicates the owner’s rights with the letter u, the group owner’s rights with the letter g, and the rest with o.
All of these rights can be represented at the same time with the letter a. Permissions are granted (or revoked) with the + or - signs, respectively.

A long directory listing also shows the file’s owner and its group owner in the first and second columns, respectively. This feature serves as a first-level access control method to files in a system:
To change file ownership, you will use the chown command. Note that you can change the file and group ownership at the same time or separately:
chown user:group file
Note: That you can change the user or group, or the two attributes at the same time, as long as you don’t forget the colon, leaving the user or group blank if you want to update the other attribute, for example:
chown :group file              # Change group ownership only
chown user: file               # Change user ownership only
EXAMPLE 10: Cloning File Permissions in Linux
If you would like to “clone” ownership from one file to another, you can do so using the --reference flag, as follows:
chown --reference=ref_file file
where the owner and group of ref_file will be assigned to the file as well:

How to Set Up SETGID Directories in Linux
Should you need to grant access to all the files owned by a certain group inside a specific directory, you will most likely use the approach of setting the setgid bit for such a directory. When the setgid bit is set, the effective GID of the real user becomes that of the group owner.
Thus, any user can access a file under the privileges granted to the group owner of such file. In addition, when the setgid bit is set on a directory, newly created files inherit the same group as the directory, and newly created subdirectories will also inherit the setgid bit of the parent directory.
chmod g+s [filename]
To set the setgid in octal form, prepend the number 2 to the current (or desired) basic permissions.
chmod 2755 [directory]
Conclusion
A solid knowledge of user and group management, along with standard and special Linux permissions, when coupled with practice, will allow you to quickly identify and troubleshoot issues with file permissions in your RHEL server.
I assure you that as you follow the steps outlined in this article and use the system documentation (as explained in Part 2: Reviewing Essential Commands & System Documentation of this series) you will master this essential competence of system administration.
Feel free to let us know if you have any questions or comments using the form below.
For comprehensive RHCSA exam preparation, we have created a comprehensive ebook titled ‘RHCSA Exam Study Guide‘, covering all the objectives with practical examples.


EXAMPLE 5: Disabling account by locking password
To disable an account, you will need to use either the -l (lowercase L) or the –lock option to lock a user’s password. This will prevent the user from being able to log on & in example 6 as well:
Its capital L and capital U: not the small ones. small -l is used for new login name and -u is for userid. Please correct it.
@Neeraj,
You are correct.
@Ravi,
Please correct this in the writeup.
@Neeraj, @Gabriel,
Corrected in the article a suggested..
Great, being an RHCE was going through the articles so that can refer the same to the newbies. Being an OpenSource supporter, don’t think to re-write the things when something is already well written. Good job done, friends.
Which license have this session? Can I translate it?
@Pavlo,
No, you can’t translate to any other language…
Thanks Ravi.
Thanks for the tutorial on user management. Is it possible to explain about awk command with good examples for beginner.
@Satish,
Awk command series under progress, I hope the first part will going to be published today..stay tuned for updates….