Introduction to AppArmor and How to Use it on OpenSUSE and Ubuntu
The operation of AppArmor is based on profiles defined in plain text files where the allowed permissions and access control rules are set. Profiles are then used to place limits on how applications interact with processes and files in the system.
A set of profiles is provided out-of-the-box with the operating system, whereas others can be put in place either automatically by applications when they are installed or manually by the system administrator.
Like SELinux, AppArmor runs profiles in two modes. In enforce mode, applications are given the minimum permissions that are necessary for them to run, whereas in complain mode AppArmor allows an application to take restricted actions and saves the “complaints” resulting from that operation to a log (/var/log/kern.log, /var/log/audit/audit.log, and other logs inside /var/log/apparmor).
These logs will show through lines with the word audit in them errors that would occur should the profile be run in enforce mode. Thus, you can try out an application in complain mode and adjust its behavior before running it under AppArmor in enforce mode.
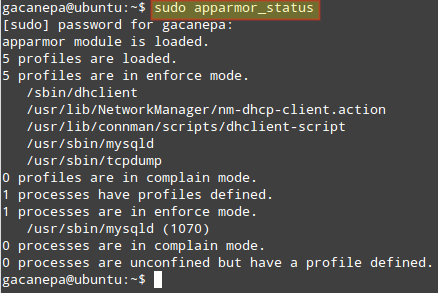
The current status of AppArmor can be shown using:
$ sudo apparmor_status

The image above indicates that the profiles /sbin/dhclient, /usr/sbin/, and /usr/sbin/tcpdump are in enforce mode (that is true by default in Ubuntu).
Since not all applications include the associated AppArmor profiles, the apparmor-profiles package, which provides other profiles that have not been shipped by the packages they provide confinement for. By default, they are configured to run in complain mode so that system administrators can test them and choose which ones are desired.
We will make use of apparmor-profiles since writing our own profiles is out of the scope of the LFCS certification. However, since profiles are plain text files, you can view them and study them in preparation to create your own profiles in the future.
AppArmor profiles are stored inside /etc/apparmor.d. Let’s take a look at the contents of that directory before and after installing apparmor-profiles:
$ ls /etc/apparmor.d

If you execute sudo apparmor_status again, you will see a longer list of profiles in complain mode. You can now perform the following operations:
To switch a profile currently in enforce mode to complain mode:
$ sudo aa-complain /path/to/file
and the other way around (complain –> enforce):
$ sudo aa-enforce /path/to/file
Wildcards are allowed in the above cases. For example,
$ sudo aa-complain /etc/apparmor.d/*
will place all profiles inside /etc/apparmor.d into complain mode, whereas
$ sudo aa-enforce /etc/apparmor.d/*
will switch all profiles to enforce mode.
To entirely disable a profile, create a symbolic link in the /etc/apparmor.d/disabled directory:
$ sudo ln -s /etc/apparmor.d/profile.name /etc/apparmor.d/disable/
For more information on AppArmor, please refer to the official AppArmor wiki and to the documentation provided by Ubuntu.
Summary
In this article we have gone through the basics of SELinux and AppArmor, two well-known MACs. When to use one or the other? To avoid difficulties, you may want to consider sticking with the one that comes with your chosen distribution. In any event, they will help you place restrictions on processes and access to system resources to increase the security in your servers.
Do you have any questions, comments, or suggestions about this article? Feel free to let us know using the form below. Don’t hesitate to let us know if you have any questions or comments.


semanage fcontext -a -t httpd_sys_content_t ‘/websrv/sites/gabriel/public_html(/.*)?’
Instead of using double quotation we have to use single quotations while changing the context of the file index.html
Thanks for another great write-up Gabriel. There isn’t much out there on AppArmor and how it may apply to the LFCS exam and your article is a huge help. I’d like to add that as of Ubuntu 16.04, in order to run the commands aa-enforce and aa-complain, you’ll need to first install the package named apparmor-utils.
Once this package is installed, it also provides the command aa-status, which does the same thing as apparmor_status.
Thanks again!
Very useful, thanks.
Do you also need to use restorecon to apply the policy change for the SSH example?
I’ve recently encountered an instance of SELinux blocking access to krb5.conf when trying to setup and configure Kerberos authentication (CentOS 7). At the time I wasn’t aware of SELinux, and rebooting the server had no effect on updating the newly installed packages.
I was unable to log in physically or SSH in with a Kerberos user account, but could use SU to switch to a Kerberos user account if I logged into a local account first. This all looked PAM realted.
It turned out that disabling and re-enabling SELinux updated the SELinux policy somehow, so I didn’t leave it disabled or permissive (rebooted, temporarily disabled selinux in grub by applying selinux=0 to the boot line, logged in with an account using Kerberos, then rebooted again without disabling selinux).
I’ll play again in due course with a fresh installation, and see if the commands here reveal anything interesting.
Show Debian/Ubuntu based distributions examples, please.
@Anon,
Debian is not one of the distributions that you can choose to take the exam. In Ubuntu, you can use AppArmor.