How can I allow traffic from a specific IP address in my private network or allow traffic from a specific private network through firewalld, to a specific port or service on a Red Hat Enterprise Linux (RHEL) or CentOS server?
In this short article, you will learn how to open a port for a specific IP address or network range in your RHEL or CentOS server running a firewalld firewall.
The most appropriate way to solve this is by using a firewalld zone. So, you need to create a new zone that will hold the new configurations (or you can use any of the secure default zones available).
Open Port for Specific IP Address in Firewalld
First create an appropriate zone name (in our case, we have used mariadb-access to allow access to the MySQL database server).
# firewall-cmd --new-zone=mariadb-access --permanent
Next, reload the firewalld settings to apply the new change. If you skip this step, you may get an error when you try to use the new zone name. This time around, the new zone should appear in the list of zones as highlighted in the following screenshot.
# firewall-cmd --reload
# firewall-cmd --get-zones

Next, add the source IP address (10.24.96.5/20) and the port (3306) you wish to open on the local server as shown. Then reload the firewalld settings to apply the new changes.
# firewall-cmd --zone=mariadb-access --add-source=10.24.96.5/20 --permanent
# firewall-cmd --zone=mariadb-access --add-port=3306/tcp  --permanent
# firewall-cmd --reload

Alternatively, you can allow traffic from the entire network (10.24.96.0/20) to a service or port.
# firewall-cmd --zone=mariadb-access --add-source=10.24.96.0/20 --permanent
# firewall-cmd --zone=mariadb-access --add-port=3306/tcp --permanent
# firewall-cmd --reload
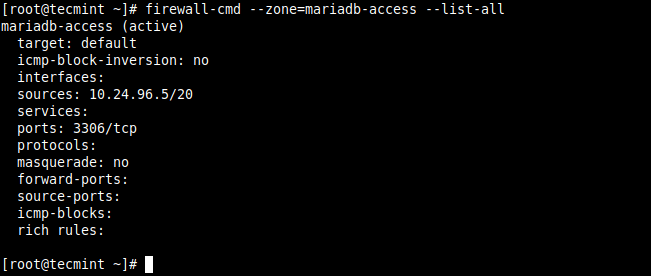
To confirm that the new zone has the required settings as added above, check its details with the following command.
# firewall-cmd --zone=mariadb-access --list-all

Remove Port and Zone from Firewalld
You can remove the source IP address or network as shown.
# firewall-cmd --zone=mariadb-access --remove-source=10.24.96.5/20 --permanent
# firewall-cmd --reload
To remove the port from the zone, issue the following command, and reload the firewalld settings:
# firewall-cmd --zone=mariadb-access --remove-port=3306/tcp --permanent
# firewall-cmd --reload
To remove the zone, run the following command, and reload the firewalld settings:
# firewall-cmd --permanent --delete-zone=mariadb-access
# firewall-cmd --reload
Last but not list, you can also use firewalld rich rules. Here is an example:
# firewall-cmd --permanent –zone=mariadb-access --add-rich-rule='rule family="ipv4" source address="10.24.96.5/20" port protocol="tcp" port="3306" accept'
Reference: Using and Configuring firewalld in the RHEL 8 documentation.
That’s it! We hope the above solutions worked for you. If yes, let us know via the feedback form below. You can as well ask questions or share general comments about this topic.


This helped me restrict iSCSI to access the right way to a production storage server that I created from scratch.
When I just try adding a port using the command;
The port does add fine and is accessible from all ip’s even though the Sources in the Zones are empty.
Why is that so..? Any idea..?
And what is the use of just adding a source like:
@Manu,
Adding source IP means, allowing access to this IP (source) address only…
Correct me if I’m wrong, but
--add-source=10.24.96.5/20will add the entire subnet, not just a single IP. For a single IP, you would use--add-source=10.24.96.5.@Stephen,
Yes, you are correct, for the entire subnet –
--add-source=10.24.96.5/20For a single IP –
--add-source=10.24.96.5That didn’t work for me. I have to add ‘/32’ for a single IP.
This is because the /32 subnet gives you only two usable ip addresses. So only 2 devices can try using the port whereas /20 has a whole subnet with more than 254 useable addresses.
Thanks a lot! You saved my night!
Just a small fix: the zone should be mariadb_access in all commands instead of mariadb-access which throws an “Error: INVALID_ZONE: mariadb-access” error.
@George,
Thanks, I have corrected the mariadb zone parameter in the article…
*throws :)
Can I use the fully qualified name: server.domain.com instead of 192.168.1.3?
@Mike,
hostnames not supported in firewall rules, only IP addresses are recognized…
In your first rule, you have the zone called mariadb_access (underscore) and all other rules use a hyphen.
How to add a port 5999 to the loopback interface by a firewall in RedHat 8.
@Kamakshya
If the request is on the local server, you can access all ports or services via the loopback interface without opening ports or services in the firewall, unless it is an external request.
Hi @Aaron,
Thanks a lot.
But, suppose I have to block all ports listening on loopback except than specific ports DNS, ssh n customize ports.
How it can be… Is it I have to use some rich rules…