MySQL is the world’s most used open source database management system on the Linux ecosystem and at the same time Linux newbies find it difficult to manage from the MySQL prompt.
PhpMyAdmin was created, is a web based MySQL database manage application, which provides a easy way for Linux newbies to interact with MySQL through a web interface. In this article, we’ll share how to secure phpMyAdmin interface with password protect on Linux systems.
Before you move forward with this article, we assume that you have completed a LAMP (Linux, Apache, MySQL/MariaDB, and PHP) and PhpMyAdmin installation on your Linux server. If not, you can follow our below guides to install LAMP stack on your respective distributions..
- Install LAMP and PhpMyAdmin in Cent/RHEL 7
- Install LAMP and PhpMyAdmin in Ubuntu 16.04
- Install LAMP and PhpMyAdmin in Fedora 22-24
If you want to install latest version of PhpMyAdmin, you can follow this guide on installing Latest PhpMyAdmin on Linux systems.
Once you are done with all these above steps, you are ready to get started with this article.
Just by adding the following lines to /etc/apache2/sites-available/000-default.conf in Debian or /etc/httpd/conf/httpd.conf in CentOS will require basic authentication AFTER confirming the security exception but BEFORE accessing the login page.
Thus, we will be adding an extra layer of security, also protected by the certificate.
Suggested Read: Setup HTTPS (SSL Certificates) to Secure PhpMyAdmin
Add these lines to the Apache configuration file (/etc/apache2/sites-available/000-default.conf or /etc/httpd/conf/httpd.conf):
<Directory /usr/share/phpmyadmin>
    AuthType Basic
    AuthName "Restricted Content"
    AuthUserFile /etc/apache2/.htpasswd
    Require valid-user
</Directory>
<Directory /usr/share/phpmyadmin>
    AuthType Basic
    AuthName "Restricted Content"
    AuthUserFile /etc/httpd/.htpasswd
    Require valid-user
</Directory>
Then use htpasswd to generate a password file for an account that will be authorized to access the phpmyadmin login page. We will use /etc/apache2/.htpasswd and tecmint in this case:
---------- On Ubuntu/Debian Systems ----------
# htpasswd -c /etc/apache2/.htpasswd tecmint

---------- On CentOS/RHEL Systems ----------
# htpasswd -c /etc/httpd/.htpasswd tecmint
Enter password twice and then change the permissions and ownership of the file. This is to prevent anyone not in the www-data or apache group from being able to read .htpasswd:
# chmod 640 /etc/apache2/.htpasswd

---------- On Ubuntu/Debian Systems ----------
# chgrp www-data /etc/apache2/.htpasswd

---------- On CentOS/RHEL Systems ----------
# chgrp apache /etc/httpd/.htpasswd
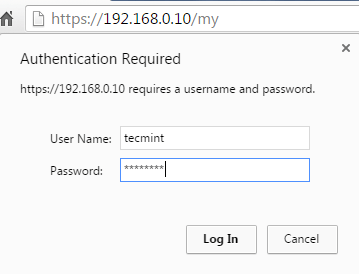
Go to http://<ip address>/phpmyadmin and you’ll see the authentication dialog before accessing the login page.
Suggested Read: Change and Secure Default PhpMyAdmin Login URL
You will need to enter the credentials of a valid account in /etc/apache2/.htpasswd or /etc/httpd/.htpasswd in order to proceed:

If the authentication is successful, you will be taken to the phpmyadmin login page.


Do not forget to do a service apache2 restart in order to take effect.
Good stuff!
Did’nt quite understands that last bit at the finish on.
“You will need to enter the credentials of a valid account in /etc/apache2/.htpasswd or /etc/httpd/.htpasswd in order to proceed:”
Kindly explain,
thanks in advance!
Firstly, thank you so much for the great instruction.
Please add to your note that httpd needs to be restarted for the changes to come in effect.
Cheers
Is it possible to create a log for the login attempts on this? Then, we can use fail2ban to ban bad IPs. That adds another level of security too.