As a system administrator, there are occasions when we need to send emails to users or others directly from the server. Traditionally, we’ve relied on web-based interfaces for this task. But is it really the most convenient option? Absolutely not.
Here in this tutorial, we’ll be using the mutt (a terminal email client) command to send email from the command line interlace.
What is Mutt?
Mutt is a command-line-based email client, which is a highly useful and powerful tool for sending and reading emails from the command line in Unix-based systems.
Mutt also supports POP and IMAP protocols for receiving emails. It opens with a colored interface, making it user-friendly for sending emails from the command line.
Mutt Features
Some other important features of Mutt are as follows:
- It’s very easy to install and configure.
- Allows us to send emails with attachments from the command line.
- It also has the features to add BCC (Blind Carbon Copy) and CC (Carbon Copy) while sending emails.
- It allows message threading.
- It provides us with the facility of mailing lists.
- It also supports many mailbox formats like Maildir, mbox, MH, and MMDF.
- Supports at least 20 languages.
- It also supports DSN (Delivery Status Notification).
How to Install Mutt in Linux
Mutt is often available in the package repositories of most Linux distributions and you can install it using your distribution’s package manager.
sudo apt install mutt         [On Debian, Ubuntu and Mint]
sudo yum install mutt         [On RHEL/CentOS/Fedora and Rocky/AlmaLinux]
sudo emerge -a sys-apps/mutt  [On Gentoo Linux]
sudo apk add mutt             [On Alpine Linux]
sudo pacman -S mutt           [On Arch Linux]
sudo zypper install mutt      [On OpenSUSE]
sudo pkg install mutt         [On FreeBSD]
Mutt Configuration Files
Configuration files of Mutt Email client.
- Main Configuration File – To make changes globally for all users for mutt, you can make changes in its main configuration file ‘/etc/Muttrc‘.
- User Configuration File of Mutt – If you want to set some specific configuration for a particular user for mutt, you can configure those settings in ~/.muttrc or ~/.mutt/muttrc files.
You can customize settings such as your email account credentials, display preferences, and keybindings in this file.
Reading Emails with Mutt
To read emails of the user with whom you are currently logged in, you just need to run “mutt” on the terminal, it will load the current user’s mailbox.
mutt
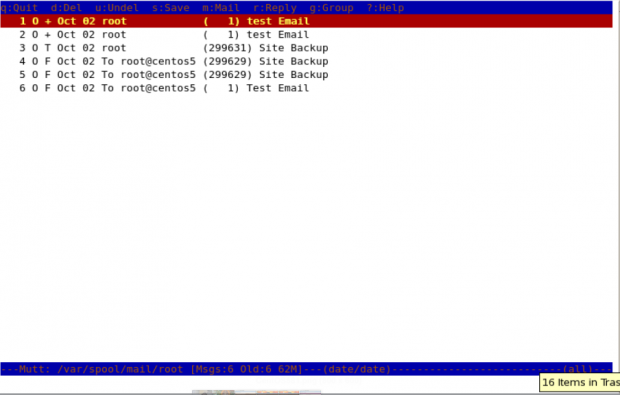
To read the emails of a specific user, you need to specify which mail file to read. For example, if you (as root) want to read the mails of user “John“, you need to specify his mail file with “-f" option with mutt command.
mutt -f /var/spool/mail/john
You may also use “-R” option to open a mailbox in read-only mode.
Sending Emails with mutt Command
In this example, the following command will send a test email to [email protected]. The “-s” option is used to specify the Subject of the mail.
mutt -s "Test Email" [email protected]
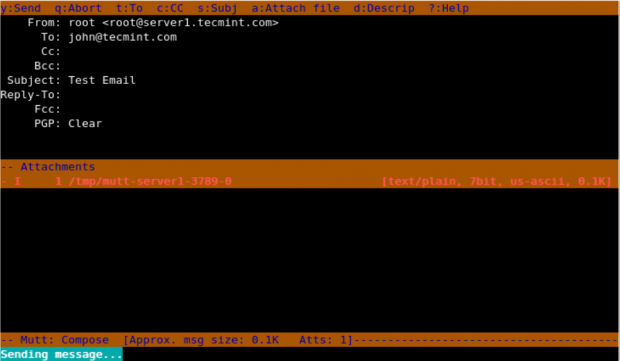
When you enter the above command in the terminal, it opens up an interface and confirms the recipient address and subject of the mail and opens up the interface, here you can make changes to the recipient’s mail address.
- Change the recipient’s email address by pressing t.
- Change Cc address with c.
- Attach files as attachments with a.
- Quit from the interface with q.
- Send that email by pressing y.
Note: When you press “y” it shows the status below that mutt is sending mail.
Adding Carbon Copy(Cc) and Blind Carbon copy(Bcc) with Mutt
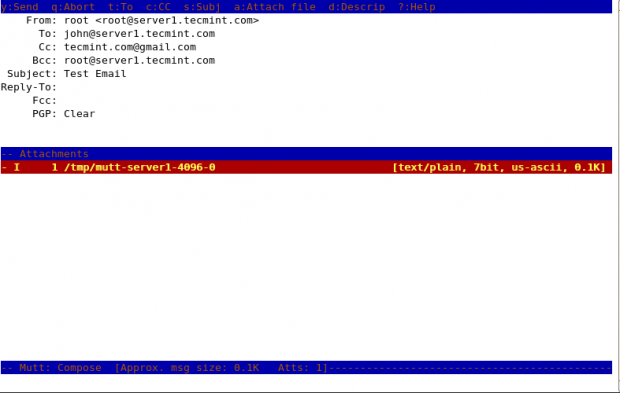
We can add Cc and Bcc with mutt command to our email with “-c” and “-b” option.
mutt -s "Subject" -c "[email protected]" -b "[email protected]" [email protected] < message.txt
mutt -s “Test Email” -c [email protected]  -b [email protected] [email protected] > message.txt
Here in this example, root is sending an email to [email protected] and putting [email protected] as the Cc address and [email protected] as Bcc.
Sending Emails with Attachments Using Mutt
We can send emails from the command line with attachments by using “-a” option with mutt command.
mutt -s "Site Backup" -a /backups/backup.tar -c [email protected] [email protected]
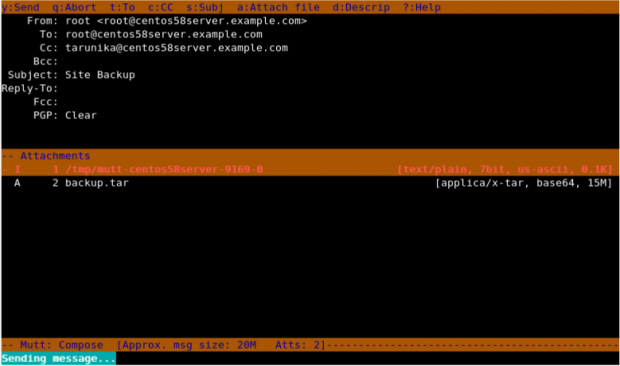
Here in the above snapshot, you can see that it shows an attachment attached with the mail.
Usage of muttrc File
If we want to change the sender’s name and email, then we need to create a file in that particular user’s home directory.
cat .muttrc
Add the following lines to it. Save and close it.
set from = "[email protected]"
set realname = "Realname of the user"
To print the help menu of “mutt”, we need to specify “-h” option with it.
mutt -h
Conclusion
Mutt offers a lightweight and efficient way to send and manage emails directly from the terminal. Its text-based interface, customizable configuration, and support for multiple protocols make it a valuable tool for users who prefer working in a command-line environment.


