Usually, when a client system connects to a network via WiFi or an ethernet cable, it automatically picks an IP address from the router. This is made possible through the DHCP server which auto-assigns IP addresses to clients from a pool of addresses.
The drawback with DHCP is that once the DHCP lease time has lapsed, the IP address of a system changes to a different one, and this leads to a disconnection in case the system was used for a particular service such as a file server. For this reason, you may want to set a static IP address so that it never changes even when the lease time is up.
In this guide, you will learn how to configure a static IP address on Ubuntu 20.04 server and desktop.
Network Configuration
Ubuntu uses the NetworkManager daemon for managing network configuration. You can configure a static IP either graphically or on the command line.
For this guide, we will focus on setting a static IP address using both the GUI and on the command line, and here is the IP configuration:
IP Address: 192.168.2.100
Netmask: 255.255.255.0
Default gateway route address: 192.168.2.1
DNS nameserver addresses: 8.8.8.8, 192.168.2.1
This information will be different for you, so replace the values accordingly according to your subnet.
On this page
How to Set Static IP Address On Ubuntu Desktop
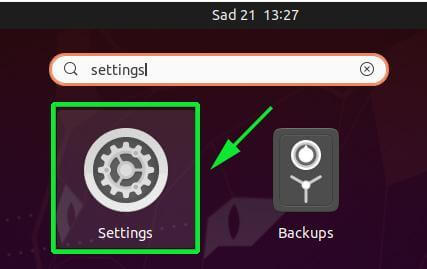
To get started, Launch ‘Settings’ from the application menu as shown.
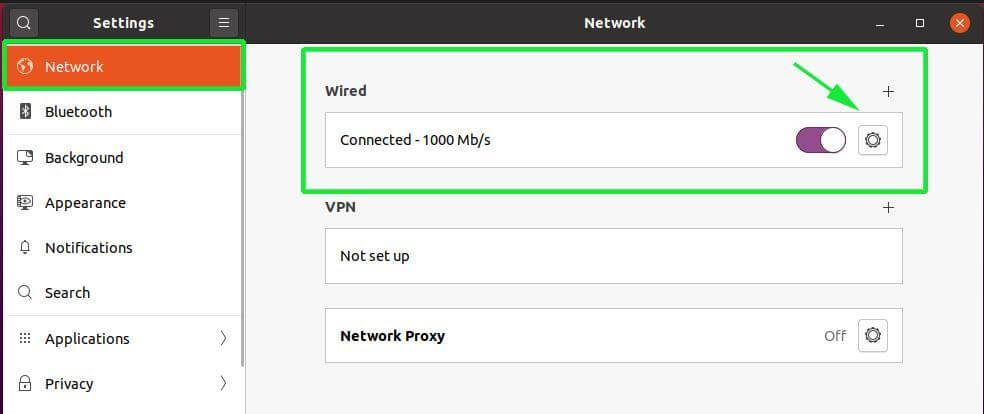
On the window that appears, click on the ‘Network’ tab at the left sidebar and then hit the gear icon on the network interface that you wish to configure. In my case, I’m configuring my wired interface.
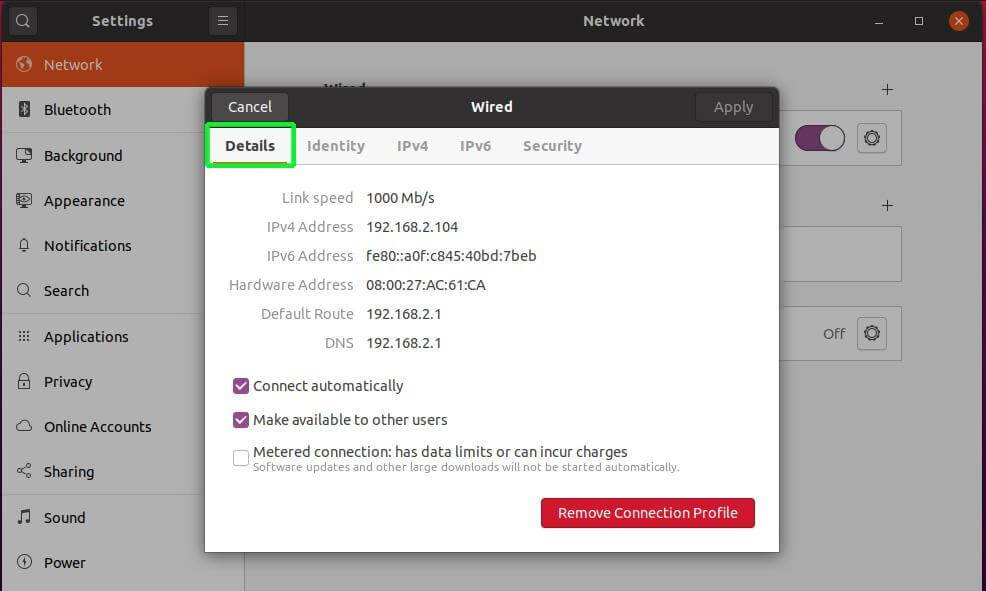
In the new window that appears, your interface’s network settings will be displayed as shown. By default, the IP address is set to use DHCP to automatically pick an IP address from the Router or any other DHCP server.
In our case, the current IP address assigned is 192.168.2.104.
Now select the IPv4 tab to start setting the static IP address. As you can see, the IP addressing is set to Automatic (DHCP) by default.
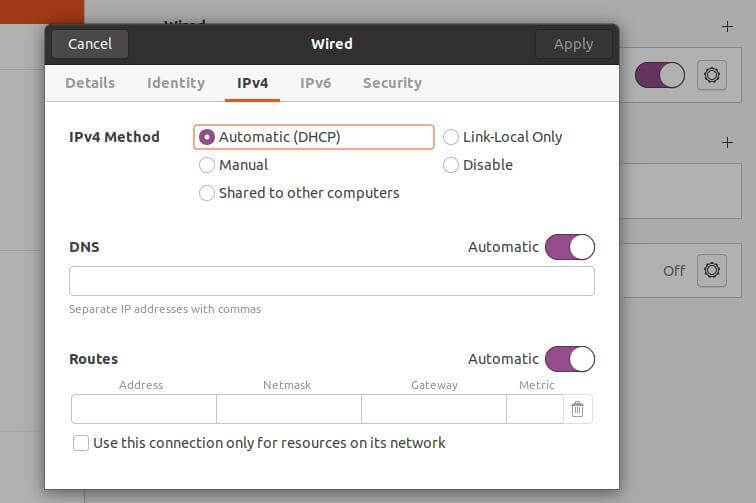
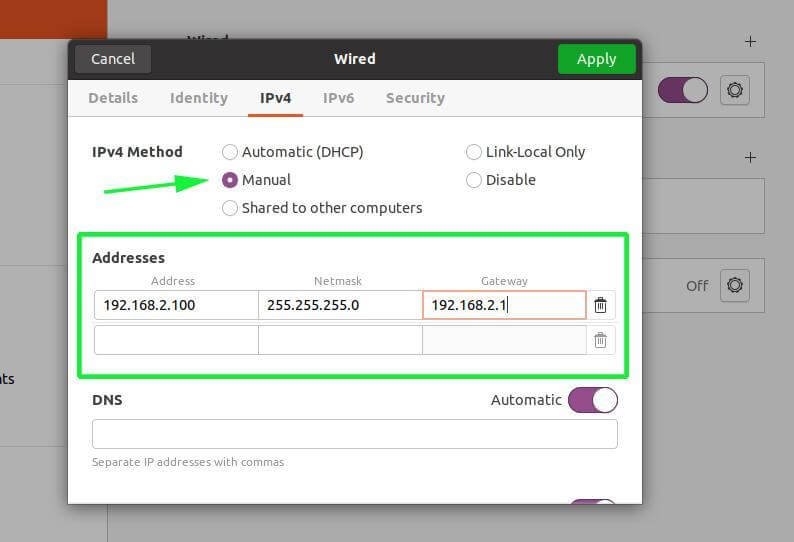
Click on the ‘Manual’ option and new address fields will be displayed. Fill out your preferred static IP address, netmask, and default gateway.
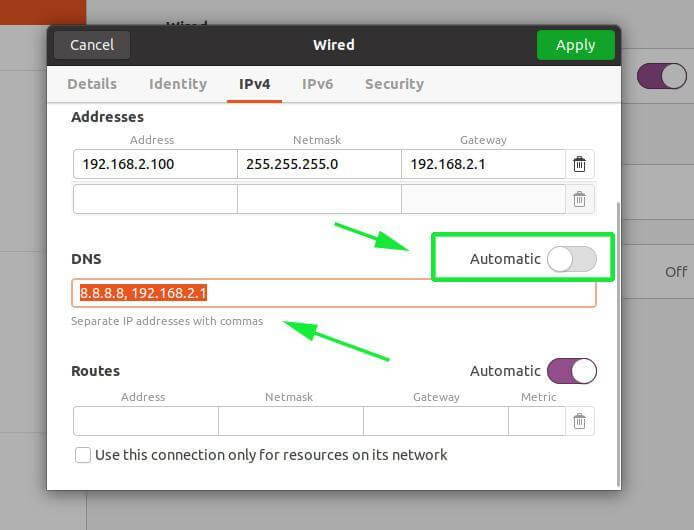
The DNS is also set to automatic. To manually configure the DNS, click on the toggle to turn off Automatic DNS. Then provide your preferred DNS entries separated by a comma as shown.
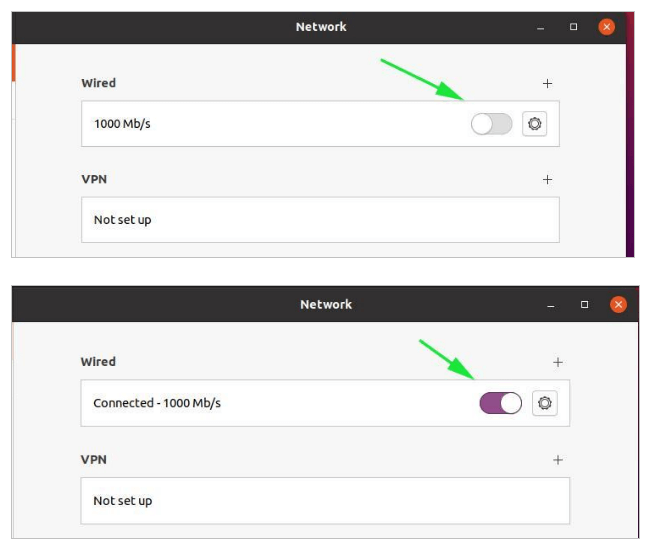
Once all is done, click on the ‘Apply’ button at the top right corner of the window. For the changes to apply, restart the network interface by clicking on the toggle to disable it and enable it again.
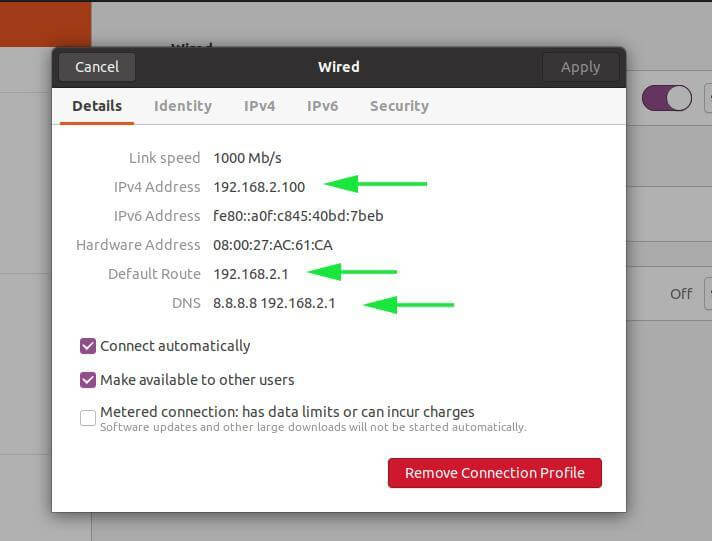
Once again, click on the gear icon to reveal the new IP configuration as shown.
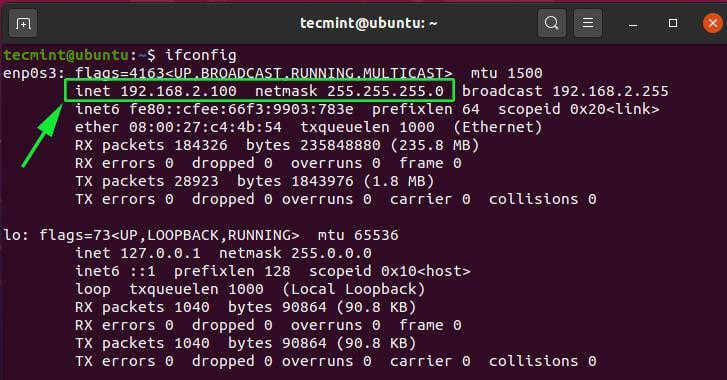
You can also confirm the IP address on the terminal by running the ifconfig or ip addr command.
$ ifconfig
OR
$ ip addr
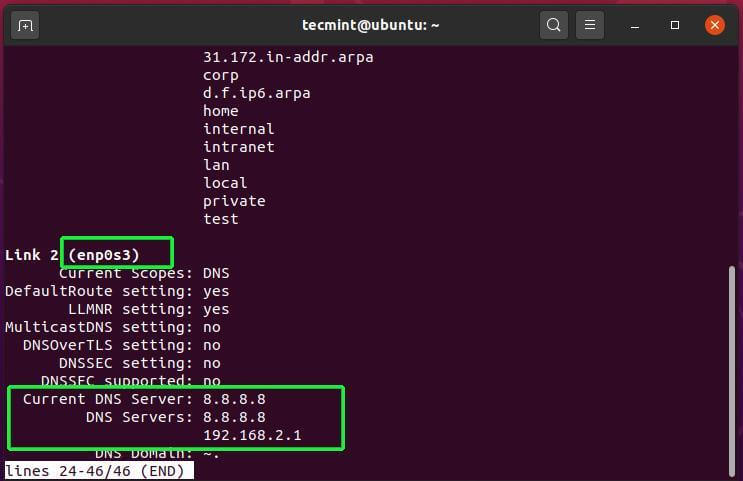
To confirm the DNS servers, run the command:
$ systemd-resolve --status
How to Set Static IP Address on Ubuntu Server Using Netplan
We have seen how we can configure a static IP address graphically on Ubuntu 20.04 desktop. The other option is configuring a static IP address on the terminal using Netplan.
Developed by Canonical, Netplan is a command-line utility used to configure networking on modern Ubuntu distributions. Netplan makes use of YAML files to configure network interfaces. You can configure an interface to acquire an IP dynamically using DHCP protocol or set a static IP.
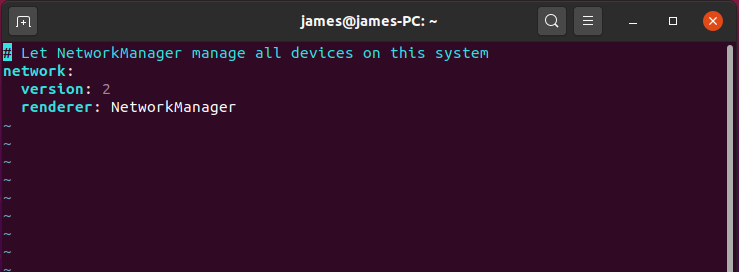
Open your terminal and head over to the /etc/netplan directory. You will find a YAML configuration file which you will use to configure the IP address.
In my case the YAML file is 01-network-manager-all.yaml with the default settings as shown.
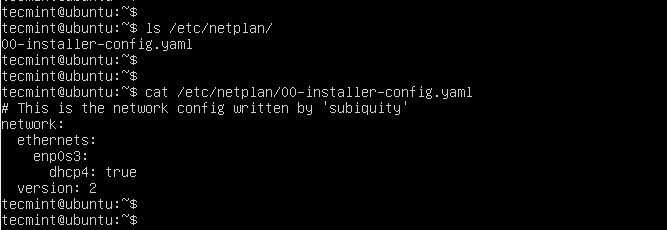
For the Ubuntu server, the YAML file is 00-installer-config.yaml and these are the default settings.
To configure a static IP, copy and paste the configuration below. Be mindful of the spacing in the YAML file.
network:
  version: 2
  ethernets:
     enp0s3:
        dhcp4: false
        addresses: [192.168.2.100/24]
        gateway4: 192.168.2.1
        nameservers:
          addresses: [8.8.8.8, 8.8.4.4]
Next, save the file and run the netplan command below to save the changes.
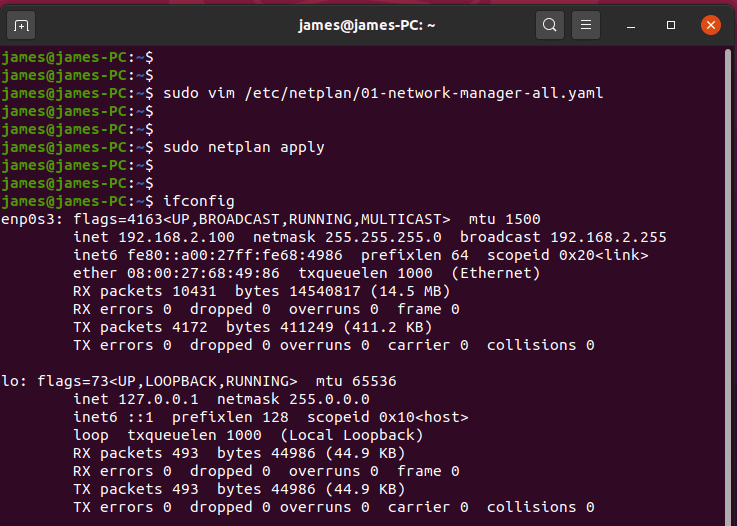
$ sudo netplan apply
You can thereafter confirm the IP address of your network interface using the ifconfig command.
$ ifconfig
This wraps up today’s article. We hope you are now in a position to configure a static IP address on your Ubuntu 20.04 desktop & server system.


DHCP is that once the DHCP lease time has lapsed, the IP address of a system changes to a different one, and this leads to a disconnection in case the system was used for a particular service such as a file server.
For this reason, you may want to set a static IP address so that it never changes even when the lease time is up.
Thanks for documenting this. However, after a reboot, I am left with the old IP address (DHCP). Guess there is another process that overrules the yaml file, but what??
Hey Pieter, that’s awkward. Ideally, the IP should not change since it’s a static IP. Did you try out both procedures. I’m just curious.
I had a static IP in the yaml file and this does not get an update if you adjust its IP via.
netplan ip a prior to gui adjustments
gui DHCP => ip DHCP
Gui static ip b => ip a
It seems that netplan is not updated via GUI adjustments
Enjoy the coffee ‘)
Hi,
Could this lead to a clash of IP addresses between two computers on the same network? Another computer (computer B) which gets its IP address dynamically comes online when the computer with the static IP (computer A) is offline.
The dhcp server could assign the IP to computer B. Subsequently, when computer A comes online and tries to join the network there would be an IP conflict and both computers could end up not being able to connect to network resources or perform other network operations.
In some routers, this can be managed by restricting the range of IP addresses that the router can dynamically assign. Many routers don’t have that option.
To avoid the potential of such conflicts, I assign static IP addresses on the dhcp server to computers on the network based on the MAC addresses of their NICs.
I would appreciate your thoughts on how to prevent IP conflicts when the network is made of some devices that have static in and others have dynamic IP addresses assigned to them. This scenario is more common today where network devices like smart phones, tablets, smart TVs, and media streaming devices connecting to the network.
Managing IP addresses by MAC addresses is a pain and it would be very helpful if there is an easier way to prevent IP conflicts.
Thanks
Hey Jura.
Your concern is very valid. To avoid a conflict in IP address assignment in a network, as you have just described, consider reserving the IP assigned to the server on the router. Say for example, if you want to assign Server A an IP of 172.16.0.100, simply login into your router and reserve the IP address. This prevents the IP from being made available to client PCs & other network devices via the DHCP protocol.
Ideally, before the static assignment, proper mapping of your network is advised so as to know which device is using which IP address. You can use nifty tools like Nmap to scan your network to get to know which IP addresses are in use to avoid assigning a duplicate IP statically on the server.
I hope this answers your question.
Wonderful post. Very simple and to the point. Thank you!!!! Keep it up!!!
Thank you very much Jaidev Shah. Keep it Tecmint.
Hi, why when we use the desktop method, the interfaces file does not get updated ? Where does the desktop tool write the information ?
That’s actually a very interesting question and I did not think about it before. I just configured a static IP on one of my Ubuntu boxes and used grep from /etc/ folder recursively to search for that IP. The IP address was written in:
/etc/NetworkManager/system-connections/Wired\ connection\ 1
So if you need to look where the desktop tool has written your settings, you can look at:
/etc/NetworkManager/system-connections/
Hey Marin, thanks for your contribution. I hadn’t actually seen it from that angle. Quite interesting I must say.
Great article just wondering about this part: “Remember to replace “enp0s3” with the name of your network adapter??? what do u mean by this? do you mean we should not change this name enp0s3 or changed with our network adapter?
Cheers
@Shapour,
Means, you should change “enp0s3” with your network adapter name for example, eth0 or eth1..
Sorry for my english, I would put a secondary IP in the same interface, like old versions (eth0 192.168.1.100… eth0:1 10.10.0.100) I know how to do it in the old versions, but in version 15.10, they have changed the commands. Can you help me?
Hello Nikon,
As the answer of this question is too long for the comment section, I would recommend you to submit your question to our Linuxsay discussion forum, where we will gladly provide more details:
http://linuxsay.com/
Where do the Nameserver numbers obtained? Elaborate on “Make sure to use your own settings depending on the network to which you are connected to.”
Can you please expand on this?
IMPORTANT NOTE: For the purpose of this tutorial, I will be using the following settings:
IP Address: 192.168.0.100
Netmask: 255.255.255.0
Gateway: 192.168.0.1
Nameserver: 8.8.8.8
Nameserver: 8.8.4.4
Make sure to use your own settings depending on the network to which you are connected to.
Where do you obtain the Nameserver numbers?
Hi Pat,
This depends on few things:
If your machine is connected to a router, you should see the settings in there.
If you are plugging your ISP’s internet cable directly to your computer (i.e no router, modem etc), you should use your ISP’s settings.
I want 1st IP by DHCP and 2nd static but, in Ubuntu 15.10 mi interface isn’t eth0 it is eno1 and if I put eno1:1 don’t works.
Actually the init script does exactly that – it calls systemctl. You can see it in the screenshot:
“restarting networking (via systemctl): networking service”
Both scripts do the same.
Why not use systemd to restart networking directly?
`systemctl restart network`