The DRBD (stands for Distributed Replicated Block Device) is a distributed, flexible and versatile replicated storage solution for Linux. It mirrors the content of block devices such as hard disks, partitions, logical volumes etc. between servers. It involves a copy of data on two storage devices, such that if one fails, the data on the other can be used.
You can think of it somewhat like a network RAID 1 configuration with the disks mirrored across servers. However, it operates in a very different way from RAID and even network RAID.
Originally, DRBD was mainly used in high availability (HA) computer clusters, however, starting with version 9, it can be used to deploy cloud storage solutions.
In this article, we will show how to install DRBD in CentOS and briefly demonstrate how to use it to replicate storage (partition) on two servers. This is the perfect article to get your started with using DRBD in Linux.
Testing Environment
For the purpose of this article, we are using two nodes cluster for this setup.
- Node1: 192.168.56.101 – tecmint.tecmint.lan
- Node2: 192.168.56.102 – server1.tecmint.lan
Step 1: Installing DRBD Packages
DRBD is implemented as a Linux kernel module. It precisely constitutes a driver for a virtual block device, so it’s established right near the bottom of a system’s I/O stack.
DRBD can be installed from the ELRepo or EPEL repositories. Let’s start by importing the ELRepo package signing key, and enable the repository as shown on both nodes.
# rpm --import https://www.elrepo.org/RPM-GPG-KEY-elrepo.org
# rpm -Uvh http://www.elrepo.org/elrepo-release-7.0-3.el7.elrepo.noarch.rpm
Then we can install the DRBD kernel module and utilities on both nodes by running:
# yum install -y kmod-drbd84 drbd84-utils
If you have SELinux enabled, you need to modify the policies to exempt DRBD processes from SELinux control.
# semanage permissive -a drbd_t
In addition, if your system has a firewall enabled (firewalld), you need to add the DRBD port 7789 in the firewall to allow synchronization of data between the two nodes.
Run these commands on the first node:
# firewall-cmd --permanent --add-rich-rule='rule family="ipv4"  source address="192.168.56.102" port port="7789" protocol="tcp" accept'
# firewall-cmd --reload
Then run these commands on second node:
# firewall-cmd --permanent --add-rich-rule='rule family="ipv4" source address="192.168.56.101" port port="7789" protocol="tcp" accept'
# firewall-cmd --reload
Step 2: Preparing Lower-level Storage
Now that we have DRBD installed on the two cluster nodes, we must prepare a roughly identically sized storage area on both nodes. This can be a hard drive partition (or a full physical hard drive), a software RAID device, an LVM Logical Volume or a any other block device type found on your system.
For the purpose of this article, we will create a dummy block device of size 2GB using the dd command.
# dd if=/dev/zero of=/dev/sdb1 bs=2024k count=1024
We will assume that this is an unused partition (/dev/sdb1) on a second block device (/dev/sdb) attached to both nodes.
Step 3: Configuring DRBD
DRBD’s main configuration file is located at /etc/drbd.conf and additional config files can be found in the /etc/drbd.d directory.
To replicate storage, we need to add the necessary configurations in the /etc/drbd.d/global_common.conf file which contains the global and common sections of the DRBD configuration and we can define resources in .res files.
Let’s make a backup of the original file on both nodes, then then open a new file for editing (use a text editor of your liking).
# mv /etc/drbd.d/global_common.conf /etc/drbd.d/global_common.conf.orig
# vim /etc/drbd.d/global_common.conf
Add the following lines in in both files:
global {
 usage-count  yes;
}
common {
 net {
  protocol C;
 }
}
Save the file, and then close the editor.
Let’s briefly shade more light on the line protocol C. DRBD supports three distinct replication modes (thus three degrees of replication synchronicity) which are:
- protocol A: Asynchronous replication protocol; it’s most often used in long distance replication scenarios.
- protocol B: Semi-synchronous replication protocol aka Memory synchronous protocol.
- protocol C: commonly used for nodes in short distanced networks; it’s by far, the most commonly used replication protocol in DRBD setups.
Important: The choice of replication protocol influences two factors of your deployment: protection and latency. And throughput, by contrast, is largely independent of the replication protocol selected.
Step 4: Adding a Resource
A resource is the collective term that refers to all aspects of a particular replicated data set. We will define our resource in a file called /etc/drbd.d/test.res.
Add the following content to the file, on both nodes (remember to replace the variables in the content with the actual values for your environment).
Take note of the hostnames, we need to specify the network hostname which can be obtained by running the command uname -n.
resource test {
        on tecmint.tecmint.lan {
 		device /dev/drbd0;
       		disk /dev/sdb1;
        		meta-disk internal;
                	address 192.168.56.101:7789;
        }
        on server1.tecmint.lan  {
		device /dev/drbd0;
        		disk /dev/sdb1;
        		meta-disk internal;
                	address 192.168.56.102:7789;
        }
}
}
where:
- on hostname: the on section states which host the enclosed configuration statements apply to.
- test: is the name of the new resource.
- device /dev/drbd0: specifies the new virtual block device managed by DRBD.
- disk /dev/sdb1: is the block device partition which is the backing device for the DRBD device.
- meta-disk: Defines where DRBD stores its metadata. Using Internal means that DRBD stores its meta data on the same physical lower-level device as the actual production data.
- address: specifies the IP address and port number of the respective node.
Also note that if the options have equal values on both hosts, you can specify them directly in the resource section.
For example the above configuration can be restructured to:
resource test {
	device /dev/drbd0;
	disk /dev/sdb1;
        	meta-disk internal;
        	on tecmint.tecmint.lan {
 		address 192.168.56.101:7789;
        	}
        	on server1.tecmint.lan  {
		address 192.168.56.102:7789;
        		}
}
Step 5: Initializing and Enabling Resource
To interact with DRBD, we will use the following administration tools which communicate with the kernel module in order to configure and administer DRBD resources:
- drbdadm: a high-level administration tool of the DRBD.
- drbdsetup: a lower-level administration tool for to attach DRBD devices with their backing block devices, to set up DRBD device pairs to mirror their backing block devices, and to inspect the configuration of running DRBD devices.
- Drbdmeta:is the meta data management tool.
After adding all the initial resource configurations, we must bring up the resource on both nodes.
# drbdadm create-md test
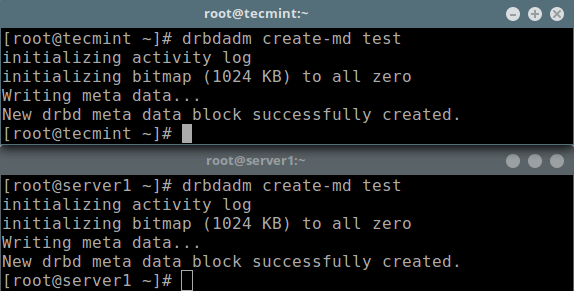
Next, we should enable the resource, which will attach the resource with its backing device, then it sets replication parameters, and connects the resource to its peer:
# drbdadm up test
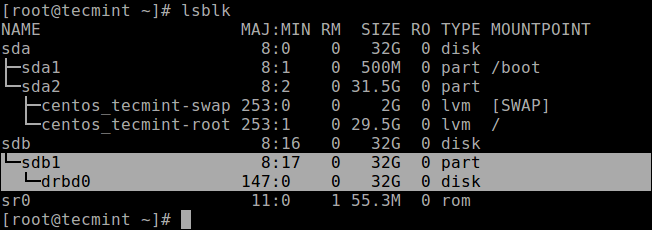
Now if you run the lsblk command, you will notice that the DRBD device/volume drbd0 is associated with the backing device /dev/sdb1:
# lsblk
To disable the resource, run:
# drbdadm down test
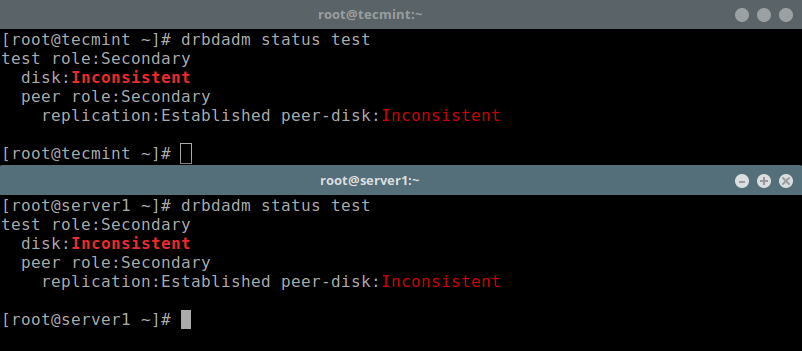
To check the resource status, run the following command (note that the Inconsistent/Inconsistent disk state is expected at this point):
# drbdadm status test
OR
# drbdsetup status test --verbose --statistics 	#for  a more detailed status
Step 6: Set Primary Resource/Source of Initial Device Synchronization
At this stage, DRBD is now ready for operation. We now need to tell it which node should be used as the source of the initial device synchronization.
Run the following command on only one node to start the initial full synchronization:
# drbdadm primary --force test
# drbdadm status test

Once the synchronization is complete, the status of both disks should be UpToDate.
Step 7: Testing DRBD Setup
Finally, we need to test if the DRBD device will work well for replicated data storage. Remember, we used an empty disk volume, therefore we must create a filesystem on the device, and mount it, to test if we can use it for replicated data storage.
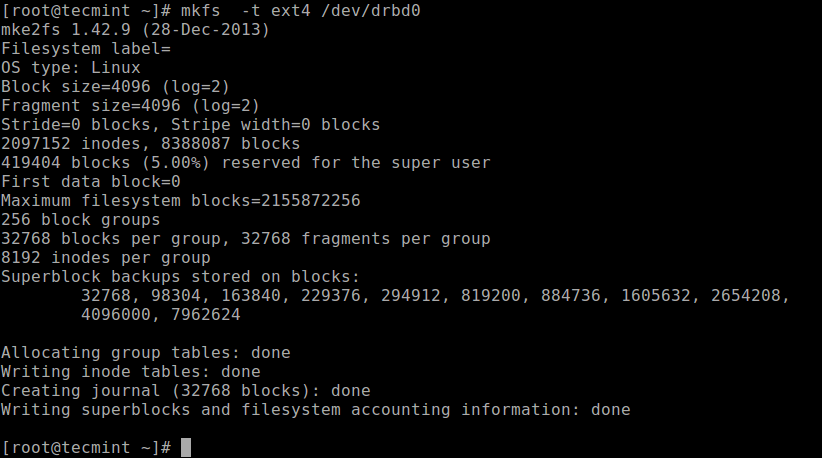
We can create a filesystem on the device with the following command, on the node where we started the initial full synchronization (which has the resource with primary role):
# mkfs -t ext4 /dev/drbd0
Then mount it as shown (you can give the mount point an appropriate name):
# mkdir -p /mnt/DRDB_PRI/
# mount /dev/drbd0 /mnt/DRDB_PRI/
Now copy or create some files in the above mount point and do a long listing using ls command:
# cd /mnt/DRDB_PRI/
# ls -l

Next, unmount the the device (ensure that the mount is not open, change directory after unmounting it to prevent any errors) and change the role of the node from primary to secondary:
# umount /mnt/DRDB_PRI/
# cd
# drbdadm secondary test
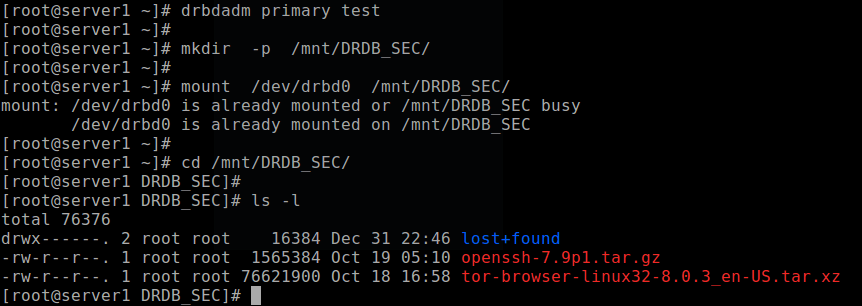
On the other node (which has the resource with a secondary role), make it primary, then mount the device on it and perform a long listing of the mount point. If the setup is working fine, all the files stored in the volume should be there:
# drbdadm primary test
# mkdir -p /mnt/DRDB_SEC/
# mount /dev/drbd0 /mnt/DRDB_SEC/
# cd /mnt/DRDB_SEC/
# ls  -l
For more information, see the man pages of the user space administration tools:
# man drbdadm
# man drbdsetup
# man drbdmeta
Reference: The DRBD User’s Guide.
Summary
DRBD is extremely flexible and versatile, which makes it a storage replication solution suitable for adding HA to just about any application. In this article, we have shown how to install DRBD in CentOS 7 and briefly demonstrated how to use it to replicate storage. Feel free to share your thoughts with us via the feedback form below.


Hi all,
We have configured the corosync/pacemaker cluster with 3 LV’s and 3 resources (our own application platform, MySQL and Nginx) and a virtual IP. Besides, we set up STONITH fencing; when the network connection dies, or a server runs in problems that server is powered down.
When we test the switching of the cluster from node 1 to node 2, we notice that MySQL has a tendency to always try to start on the node that is not active, and after a while stops when it doesn’t succeed. It s only that resource, the other don’t try it, and after it it does start on the active node. Did we do something with stickiness, or a preferred host for this MySQL resource?
Secondly, when a server powers down and the cluster is healthy and running on the active server, we boot up the second server. The first, active server remains active, but when the inactive server is up and the cluster status shows that both servers are back in the cluster config, the resources on the active host are stopped and restarted anyway.
Is this because the drbd setup now includes 2 nodes again and has to restart the resources? We would prefer the resources remain running when the second node is included but not promoted to active, as basically that should have no influence on the already active host.
I hope someone had this before and knows the magic trick ;)
Best regards, Theo
It is solved, it turned out that the
mysqldwas enabled, so it was started twice.The second issue was solved by increasing the time outs.
I finally got drbd to work. The sync will take a while but hopefully when done I can add some data and test. I want this to be a fail over KVM hypervisor. I’m not sure if it will work with an existing partition. I don’t believe it will. It should be a “fresh install” project.
Thanks again for the wonderful article.
@Eric
Great! An existing partition can work, if well configured as shown in the article. We simply considered a fresh setup for beginners. Thanks for the feedback.
I finally got replication to work. I had to wipe both drives before it would replicate properly. I had a server i moved all the vm’s over to to enable the replication process.
Now, to mount /var/lib/libvirt. I’ll keep you posted.
I just noticed you have 2 step 4’s;
Step 4: Adding a Resource and
Step 4: Initializing and Enabling Resource.
Which step 4 do I skip to?
Let me know.
@Eric,
That’s a mistake, corrected the numbers in the article, nothing to skip, follow everything..
No, it is not fixed. It wants to remove my existing partition in favor of the drbd partition. Basically overwrite it. It will be a weekend project to see if I can get it to work.
Just to be clear, do not change the global config? I removed it and put the original back but it still did not work.
I am open to suggestions.
source 900 GB
destination 898 GB
Is this the problem? 2 GB difference?
Here is my rep.res file:
resource rep {
        device /dev/drbd0;
        disk /dev/sdb1;
                meta-disk internal;
                on kvm01.digitaldatatechs.com { <--source
                address 192.168.254.252:7789;
                }
                on kvm03.digitaldatatechs.com  { <--destination
                address 192.168.256.240:7789;
                        }
}
Is this correct?
I know I’m doing something wrong but cannot figure out what. I zeroed out the drive on the destination server, but when I run the command
drbdadm create-md repI get this message. I’m not sure what’s going on but it wounds like it wants to do something to my source drive. Help??!!Exclusive open failed. Do it anyways?
[need to type ‘yes’ to confirm] yes
md_offset 984894926848
al_offset 984894894080
bm_offset 984864833536
Found LVM2 physical volume signature
961810432 kB data area apparently used
961782064 kB left usable by current configuration
Device size would be truncated, which
would corrupt data and result in
‘access beyond end of device’ errors.
You need to either
* use external meta data (recommended)
* shrink that filesystem first
* zero out the device (destroy the filesystem)
Operation refused.
Command ‘drbdmeta 0 v08 /dev/sdb1 internal create-md’ terminated with exit code 40
As Theo’s post implied, setting up drbd between two servers is only “part 1” on the way to high availability (which is surely the only reason you’d be replicating filestore with drbd).
You probably need a “part 2” (apologies if you’ve already done this), where you explain how to make the storage highly available on your network using a floating virtual IP. As Theo said, this is typically done with corosync/pacemaker, but it’s non-trivial.
The aim is to be able to shut down the primary server and have the secondary server take over the primary role (including the virtual IP) within seconds of detecting the original primary server leaving the cluster. I know from experience that Linux VMs (via iSCSI to clustered SANs) will go read-only on their filesystems if they lose their filestore on the network for 25 seconds or more, requiring them to be restarted and fsck’ed afterward.
Note that bringing back the original shutdown server into the cluster should only make it a secondary that syncs any changes during its downtime from the new primary server. There are commands you can run after that sync is completed to switch the server to become the primary node again, but I’d do that manually myself.
You may also need a “part 3” where fencing of nodes is considered – this is mainly to avoid “split-brain” where a primary node that drops out of the cluster still thinks it’s the primary and tries to write to the filestore when it shouldn’t. The STONITH method Theo mentioned involves forcibly powering off the faulty primary node immediately before another node takes over its primary duties.
This is a very informative article, like I have come to expect from Tecmint. I already have a function kvm host with vm’s that I use. I recently added a second host for replication. It looks like this will wipe the drives on both hosts.
Is there a way to replicate vm’s without destroying the drives? I want to replicate the vm’s for redundancy but do not want to lose them. I replicate with the Hyoer-V servers I have using kerberos and would like to do the same with Centos 7 KVM hosts.
Any help or guidance would be appreciated.
@Eric
This article assumes that you have not partitioned your disk, but if you have, then go straight to Step 4: Adding a resource. Simply add your existing partitions as described. It should be easy!
Hi, Eric. Did you fix it???
Aaron, it seems the drbd creates a partition over the existing partition. The existing partition cannot be formatted or used in any manner since it will be overwritten in favor of the drbd partition.
Then you format the drbd partition. From what I have researched, that is the only way it works. You cannot create a partition over an existing, in use partition. If I am wrong, I would love to be corrected if there is a way.
Please keep me posted.
Hi, Thanks for all your How-to and everything. I found a mistake in this page on the IP address.
https://www.tecmint.com/setup-drbd-storage-replication-on-centos-7/
Thanks.
@Ricardo,
Thanks, corrected the IP address in the article..