To introduce this tip, let’s sniff the HTTP traffic between a client machine and the Debian 8 server where we have made the innocent mistake to login using the database root user’s credentials in our last article at: Change and Secure Default PhpMyAdmin Login URL
As we mentioned in the previous tip, do not attempt to do this yet if you don’t want to expose your credentials. To begin sniffing traffic, we typed the following command and pressed Enter:
# tcpdump port http -l -A | egrep -i 'pass=|pwd=|log=|login=|user=|username=|pw=|passw=|passwd=|password=|pass:|user:|username:|password:|login:|pass |user ' --line-buffered -B20
It will not take us long to realize that the username and password have been sent over the wire in plain text format, as you can see in the truncated output of tcpdump in the image below.
Please note that we have hidden part of the root password with a blue mark over it:

To avoid this, let’s secure the login page with a certificate. To do this, install mod_ssl package on CentOS based distributions.
# yum install mod_ssl
Although we will use the Debian/Ubuntu path and names, the same procedure is valid for CentOS and RHEL if you replace the commands and paths below with the CentOS equivalents.
Create a directory to store the key and certificate:
# mkdir /etc/apache2/ssl    [On Debian/Ubuntu based systems]
# mkdir /etc/httpd/ssl      [On CentOS based systems]
Create the key and certificate:
----------- On Debian/Ubuntu based systems -----------
# openssl req -x509 -nodes -days 365 -newkey rsa:2048 -keyout /etc/apache2/ssl/apache.key -out /etc/apache2/ssl/apache.crt

----------- On CentOS based systems -----------
# openssl req -x509 -nodes -days 365 -newkey rsa:2048 -keyout /etc/httpd/ssl/apache.key -out /etc/httpd/ssl/apache.crt
Sample Output
........................+++
.....................................................+++
writing new private key to '/etc/httpd/ssl/apache.key'
-----
You are about to be asked to enter information that will be incorporated
into your certificate request.
What you are about to enter is what is called a Distinguished Name or a DN.
There are quite a few fields but you can leave some blank
For some fields there will be a default value,
If you enter '.', the field will be left blank.
-----
Country Name (2 letter code) [XX]:IN
State or Province Name (full name) []:Maharashtra
Locality Name (eg, city) [Default City]:Mumbai
Organization Name (eg, company) [Default Company Ltd]:TecMint
Organizational Unit Name (eg, section) []:TecMint
Common Name (eg, your name or your server's hostname) []:TecMint
Email Address []:[email protected]
Next, verify key and certificate.
# cd /etc/apache2/ssl/   [On Debian/Ubuntu based systems]
# cd /etc/httpd/ssl/     [On CentOS based systems]
# ls -l

total 8
-rw-r--r--. 1 root root 1424 Sep  7 15:19 apache.crt
-rw-r--r--. 1 root root 1704 Sep  7 15:19 apache.key
In Debian/Ubuntu, make sure that Apache is listening on port 443 for the default site (/etc/apache2/sites-available/000-default.conf) and add the 3 SSL-related lines inside the VirtualHost declaration:
SSLEngine on
SSLCertificateFile /etc/apache2/ssl/apache.crt
SSLCertificateKeyFile /etc/apache2/ssl/apache.key

In CentOS based distributions, tell Apache to listen on port 443 and look for the Listen directive in /etc/httpd/conf/httpd.conf and add the above lines below it.
SSLEngine on
SSLCertificateFile /etc/httpd/ssl/apache.crt
SSLCertificateKeyFile /etc/httpd/ssl/apache.key
Save changes, load the SSL Apache module on Debian/Ubuntu distributions (in CentOS this is loaded automatically when you installed mod_ssl earlier):
# a2enmod ssl
Force phpmyadmin to use SSL, make sure the following line is present in /etc/phpmyadmin/config.inc.php or /etc/phpMyAdmin/config.inc.php file:
$cfg['ForceSSL'] = true;
and restart the web server:
# systemctl restart apache2   [On Debian/Ubuntu based systems]
# systemctl restart httpd     [On Debian/Ubuntu based systems]
Next, launch your web browser and type https://<ip address>/my (learn how to change PhpMyAdmin login URL) as shown below.
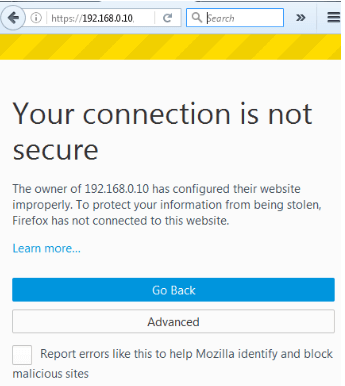
Important: Please note that it is only saying that the connection is not secure because we are using a self-signed certificate. Click on Advanced and confirm the security exception:
After confirming the security exception, and before login in, let’s start sniffing HTTP and HTTPS traffic:
# tcpdump port http or port https -l -A | egrep -i 'pass=|pwd=|log=|login=|user=|username=|pw=|passw=|passwd=|password=|pass:|user:|username:|password:|login:|pass |user ' --line-buffered -B20
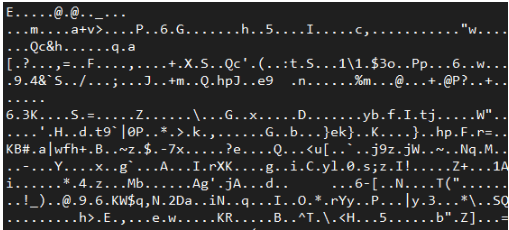
Then login using the same credentials as earlier. The traffic sniffer will only capture gibberish at best:
That’s it for now, in next article we will share you to restrict PhpMyAdmin access with username/password, till then stay tuned to Tecmint.




How to secure with client certificate only for the phpmyadmin page, not for the webserver can you suggest for that?
Can you please post an update on this for nginx?
Regarding to phpMyAdmin I also suggest hide server information (php version, mysql version) for better security:
$cfg[‘ShowServerInfo’] = false;
in config.inc.php file.
Great catch! Thank you for sharing that tip with us!