strongSwan is an open-source, cross-platform, full-featured, and widely-used IPsec-based VPN (Virtual Private Network) implementation that runs on Linux, FreeBSD, OS X, Windows, Android, and iOS. It is primarily a keying daemon that supports the Internet Key Exchange protocols (IKEv1 and IKEv2) to establish security associations (SA) between two peers.
This article describes how to set up site-to-site IPSec VPN gateways using strongSwan on Ubuntu and Debian servers. By site-to-site we mean each security gateway has a sub-net behind it. Besides, the peers will authenticate each other using a pre-shared key (PSK).
Testing Environment
Remember to replace the following IPs with your real-world IPs to configure your environment.
Site 1 Gateway (tecmint-devgateway)
OS 1: Debian or Ubuntu
Public IP: 10.20.20.1
Private IP: 192.168.0.101/24
Private Subnet: 192.168.0.0/24
Site 2 Gateway (tecmint-prodgateway)
OS 2: Debian or Ubuntu
Public IP:  10.20.20.3
Private IP: 10.0.2.15/24
Private Subnet: 10.0.2.0/24
Step 1: Enabling Kernel Packet Forwarding
1. First, you need to configure the kernel to enable packet forwarding by adding the appropriate system variables in /etc/sysctl.conf configuration file on both security gateways.
$ sudo vim /etc/sysctl.conf
Look for the following lines and uncomment them and set their values as shown (read comments in the file for more information).
net.ipv4.ip_forward = 1
net.ipv6.conf.all.forwarding = 1
net.ipv4.conf.all.accept_redirects = 0
net.ipv4.conf.all.send_redirects = 0
2. Next, load the new settings by running the following command.
$ sudo sysctl -p

3. If you have a UFW firewall service enabled, you need to add the following rules to the /etc/ufw/before.rules configuration file just before the filter rules in either security gateways.
Site 1 Gateway (tecmint-devgateway)
*nat
:POSTROUTING ACCEPT [0:0]
-A POSTROUTING -s 10.0.2.0/24  -d 192.168.0.0/24 -j MASQUERADE
COMMIT
Site 2 Gateway (tecmint-prodgateway)
*nat
:POSTROUTING ACCEPT [0:0]
-A POSTROUTING  -s 192.168.0.0/24 -d 10.0.2.0/24 -j MASQUERADE
COMMIT
4. Once firewall rules have been added, then apply the new changes by restarting UFW as shown.
$ sudo ufw disable
$ sudo ufw enable
Step 2: Installing strongSwan in Debian and Ubuntu
5. Update your package cache on both security gateways and install the strongswan package using the APT package manager.
$ sudo apt update
$ sudo apt install strongswan
6. Once the installation is complete, the installer script will start the strongswan service and enable it to automatically start at system boot. You can check its status and whether it is enabled using the following command.
$ sudo systemctl status strongswan.service
$ sudo systemctl is-enabled strongswan.service
Step 3: Configuring Security Gateways
7. Next, you need to configure the security gateways using the /etc/ipsec.conf configuration file.
Site 1 Gateway (tecmint-devgateway)
$ sudo cp /etc/ipsec.conf /etc/ipsec.conf.orig
$ sudo nano /etc/ipsec.conf
Copy and paste the following configuration in the file.
config setup
        charondebug="all"
        uniqueids=yes
conn devgateway-to-prodgateway
        type=tunnel
        auto=start
        keyexchange=ikev2
        authby=secret
        left=10.20.20.1
        leftsubnet=192.168.0.101/24
        right=10.20.20.3
        rightsubnet=10.0.2.15/24
        ike=aes256-sha1-modp1024!
        esp=aes256-sha1!
        aggressive=no
        keyingtries=%forever
        ikelifetime=28800s
        lifetime=3600s
        dpddelay=30s
        dpdtimeout=120s
        dpdaction=restart
Site 2 Gateway (tecmint-prodgateway)
$ sudo cp /etc/ipsec.conf /etc/ipsec.conf.orig
$ sudo nano /etc/ipsec.conf
Copy and paste the following configuration into the file.
config setup
        charondebug="all"
        uniqueids=yes
conn prodgateway-to-devgateway
        type=tunnel
        auto=start
        keyexchange=ikev2
        authby=secret
        left=10.20.20.3
        leftsubnet=10.0.2.15/24
        right=10.20.20.1
        rightsubnet=192.168.0.101/24
        ike=aes256-sha1-modp1024!
        esp=aes256-sha1!
        aggressive=no
        keyingtries=%forever
        ikelifetime=28800s
        lifetime=3600s
        dpddelay=30s
        dpdtimeout=120s
        dpdaction=restart
Here is the meaning of each configuration parameter:
- config setup – specifies general configuration information for IPSec which applies to all connections.
- charondebug – defines how much Charon debugging output should be logged.
- uniqueids – specifies whether a particular participant ID should be kept unique.
- conn prodgateway-to-devgateway – defines connection name.
- type – defines connection type.
- auto – how to handle connection when IPSec is started or restarted.
- keyexchange – defines the version of the IKE protocol to use.
- authby – defines how peers should authenticate each other.
- left – defines the IP address of the left participant’s public-network interface.
- leftsubnet – states the private subnet behind the left participant.
- right – specifies the IP address of the right participant’s public-network interface.
- rightsubnet – states the private subnet behind the left participant.
- ike – defines a list of IKE/ISAKMP SA encryption/authentication algorithms to be used. You can add a comma-separated list.
- esp – defines a list of ESP encryption/authentication algorithms to be used for the connection. You can add a comma-separated list.
- aggressive – states whether to use Aggressive or Main Mode.
- keyingtries – states the number of attempts that should be made to negotiate a connection.
- ikelifetime – states how long the keying channel of a connection should last before being renegotiated.
- lifetime – defines how long a particular instance of a connection should last, from successful negotiation to expiry.
- dpddelay – specifies the time interval with which R_U_THERE messages/INFORMATIONAL exchanges are sent to the peer.
- dpdtimeout – specifies the timeout interval, after which all connections to a peer are deleted in case of inactivity.
- dpdaction – defines how to use the Dead Peer Detection(DPD) protocol to manage the connection.
For more information about the above configuration parameters, read the ipsec.conf man page by running the command.
$ man ipsec.conf
Step 4: Configuring PSK for Peer-to-Peer Authentication
8. After configuring both security gateways, generate a secure PSK to be used by the peers using the following command.
$ head -c 24 /dev/urandom | base64

9. Next, add the PSK in the /etc/ipsec.secrets file on both gateways.
$ sudo vim /etc/ipsec.secrets
Copy and paste the following line.
------- Site 1 Gateway (tecmint-devgateway) -------

10.20.20.1 10.20.20.3 : PSK "qLGLTVQOfqvGLsWP75FEtLGtwN3Hu0ku6C5HItKo6ac="

------- Site 2 Gateway (tecmint-prodgateway) -------

10.20.20.3  10.20.20.1 : PSK "qLGLTVQOfqvGLsWP75FEtLGtwN3Hu0ku6C5HItKo6ac="
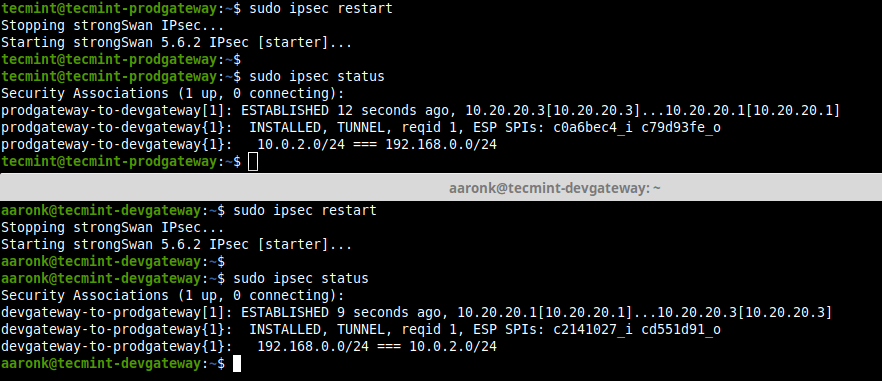
10. Restart the IPSec program and check its status to view connections.
$ sudo ipsec restart
$ sudo ipsec status

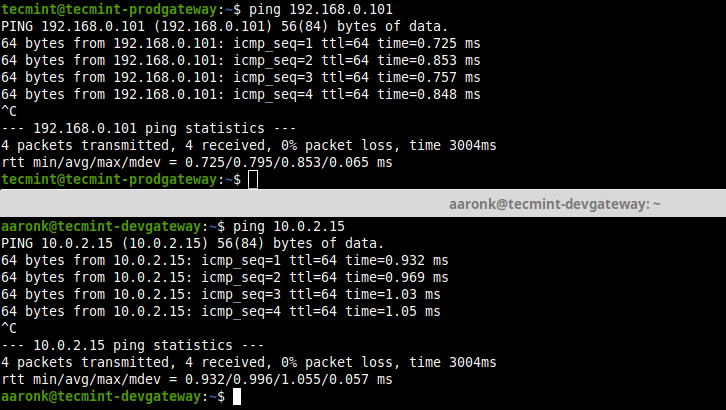
11. Finally, verify that you can access the private sub-nets from either security gateways by running a ping command.
$ ping 192.168.0.101
$ ping 10.0.2.15

12. Besides, you can stop and start IPSec as shown.
$ sudo ipsec stop
$ sudo ipsec start
13. To know more about IPSec commands to manually bring up connections and more, see the IPSec help page.
$ ipsec --help
That’s all! In this article, we have described how to set up a site-to-site IPSec VPN using strongSwan on Ubuntu and Debian servers, where both security gateways were configured to authenticate each other using a PSK. If you have any questions or thoughts to share, reach us via the feedback form below.


