A software repository (“repo” in short) is a central file storage location to keep and maintain software packages, from which users can retrieve packages and install them on their computers.
Repositories are often stored on servers on a network for example an internet, which can be accessed by multiple users. However, you can create and configure a local repository on your computer and access it as a single user or allow access to other machines on your LAN (Local Area Network).
One advantage of setting up a local repository is that you don’t need an internet connection to install software packages.
YUM (Yellowdog Updater Modified) is a widely used package management tool for RPM (RedHat Package Manager) based on Linux systems, which makes software installation easy on Red Hat/CentOS Linux.
In this article, we will explain how to set up a local YUM repository over HTTP (Nginx) web server on CentOS 7 VPS and also show you how to find and install software packages on client CentOS 7 machines.
Our Testing Environment
Yum HTTP Repository Server:	CentOS 7 [192.168.0.100]
Client Machine:		CentOS 7 [192.168.0.101]
Step 1: Install Nginx Web Server
1. First start by installing the Nginx HTTP server from the EPEL repository using the YUM package manager as follows.
# yum install epel-release
# yum install nginx
2. Once you have installed the Nginx web server, you can start it for the first time and enable it to start automatically at system boot.
# systemctl start nginx
# systemctl enable nginx
# systemctl status nginx
3. Next, you need to open port 80 and 443 to allow web traffic to Nginx service, update the system firewall rules to permit inbound packets on HTTP and HTTPS using the commands below.
# firewall-cmd --zone=public --permanent --add-service=http
# firewall-cmd --zone=public --permanent --add-service=https
# firewall-cmd --reload
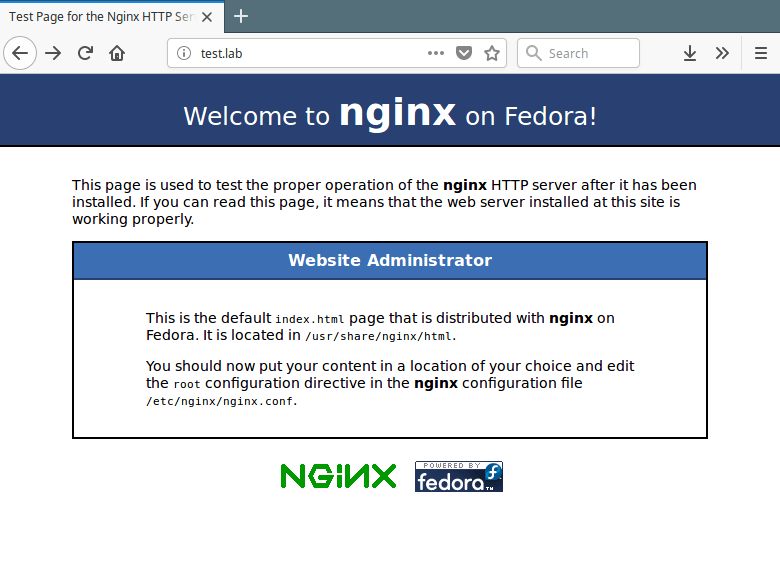
4. Now you can confirm that your Nginx server is up and running, using the following URL; if you see the default Nginx web page, all is well.
http://SERVER_DOMAIN_NAME_OR_IP

Step 2: Create a Yum Local Repository
5. In this step, you need to install the required packages for creating, configuring, and managing your local repository.
# yum install createrepo yum-utils
6. Next, create the necessary directories (yum repositories) that will store packages and any related information.
# mkdir -p /var/www/html/repos/{base,centosplus,extras,updates}
7. Then use the reposync tool to synchronize CentOS YUM repositories to the local directories as shown.
# reposync -g -l -d -m --repoid=base --newest-only --download-metadata --download_path=/var/www/html/repos/
# reposync -g -l -d -m --repoid=centosplus --newest-only --download-metadata --download_path=/var/www/html/repos/
# reposync -g -l -d -m --repoid=extras --newest-only --download-metadata --download_path=/var/www/html/repos/
# reposync -g -l -d -m --repoid=updates --newest-only --download-metadata --download_path=/var/www/html/repos/
Sample Output
Loaded plugins: fastestmirror, langpacks
Loading mirror speeds from cached hostfile
 * base: mirrors.fibergrid.in
 * epel: mirror.xeonbd.com
 * extras: mirrors.fibergrid.in
 * updates: mirrors.fibergrid.in
base/7/x86_64/group                                                    | 891 kB  00:00:02
No Presto metadata available for base
(1/9911): 389-ds-base-snmp-1.3.7.5-18.el7.x86_64.rpm                   | 163 kB  00:00:02
(2/9911): 389-ds-base-devel-1.3.7.5-18.el7.x86_64.rpm                  | 267 kB  00:00:02
(3/9911): ElectricFence-2.2.2-39.el7.i686.rpm                          |  35 kB  00:00:00
(4/9911): ElectricFence-2.2.2-39.el7.x86_64.rpm                        |  35 kB  00:00:00
(5/9911): 389-ds-base-libs-1.3.7.5-18.el7.x86_64.rpm                   | 695 kB  00:00:04
(6/9911): GConf2-devel-3.2.6-8.el7.i686.rpm                            | 110 kB  00:00:00
(7/9911): GConf2-devel-3.2.6-8.el7.x86_64.rpm                          | 110 kB  00:00:00
(8/9911): GConf2-3.2.6-8.el7.i686.rpm                                  | 1.0 MB  00:00:06
In the above commands, the option:
-g– enables removing of packages that fail GPG signature checking after downloading.-l– enables yum plugin support.-d– enables deleting of local packages no longer present in the repository.-m– enables downloading of comps.xml files.--repoid– specifies the repository ID.--newest-only– tell reposync to only pull the latest version of each package in the repos.--download-metadata– enables downloading all the non-default metadata.--download_path– specifies the path to download packages.
8. Next, check the contents of your local directories to ensure that all the packages have been synchronized locally.
# ls -l /var/www/html/repos/base/
# ls -l /var/www/html/repos/base/Packages/
# ls -l /var/www/html/repos/centosplus/
# ls -l /var/www/html/repos/centosplus/Packages/
# ls -l /var/www/html/repos/extras/
# ls -l /var/www/html/repos/extras/Packages/
# ls -l /var/www/html/repos/updates/
# ls -l /var/www/html/repos/updates/Packages/
9. Now create a new repodata for the local repositories by running the following commands, where the flag -g is used to update the package group information using the specified .xml file.
# createrepo -g comps.xml /var/www/html/repos/base/
# createrepo -g comps.xml /var/www/html/repos/centosplus/
# createrepo -g comps.xml /var/www/html/repos/extras/
# createrepo -g comps.xml /var/www/html/repos/updates/
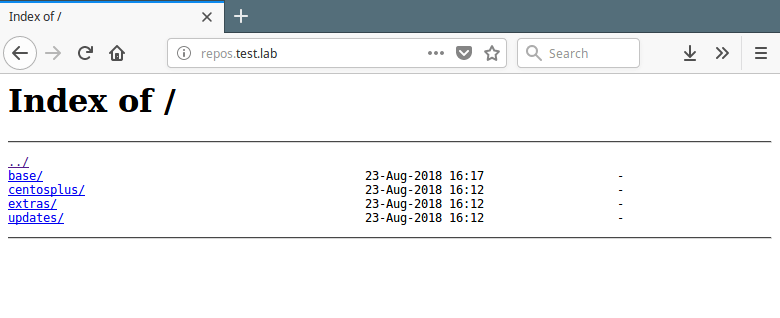
10. To enable viewing of repositories and packages in them, via a web browser, create an Nginx server block that points to the root of your repositories as shown.
# vim /etc/nginx/conf.d/repos.conf
Add the following configuration ot file repos.conf.
server {
        listen   80;
        server_name  repos.test.lab;	#change  test.lab to your real domain
        root   /var/www/html/repos;
        location / {
                index  index.php index.html index.htm;
                autoindex on;	#enable listing of directory index
        }
}
Save the file and close it.
11. Then restart your Nginx server and view the repositories from a web browser using the following URL.
http://repos.test.lab

Step 3: Create a Cron Job to Synchronize and Create Repositories
12. Next, add a cron job that will automatically synchronize your local repos with the official CentOS repos to grab the updates and security patches.
# vim /etc/cron.daily/update-localrepos
Add these commands in the script.
#!/bin/bash
##specify all local repositories in a single variable
LOCAL_REPOS=”base centosplus extras updates”
##a loop to update repos one at a time
for REPO in ${LOCAL_REPOS}; do
reposync -g -l -d -m --repoid=$REPO --newest-only --download-metadata --download_path=/var/www/html/repos/
createrepo -g comps.xml /var/www/html/repos/$REPO/
done
Save the script and close it and set the appropriate permissions on it.
# chmod 755 /etc/cron.daily/update-localrepos
Step 4: Setup Local Yum Repository on Client Machines
13. Now on your CentOS client machines, add your local repos to the YUM configuration.
# vim /etc/yum.repos.d/local-repos.repo
Copy and paste the configuration below in the file local-repos.repo (make changes where necessary).
[local-base]
name=CentOS Base
baseurl=http://repos.test.lab/base/
gpgcheck=0
enabled=1

[local-centosplus]
name=CentOS CentOSPlus
baseurl=http://repos.test.lab/centosplus/
gpgcheck=0
enabled=1

[local-extras]
name=CentOS Extras
baseurl=http://repos.test.lab/extras/
gpgcheck=0
enabled=1

[local-updates]
name=CentOS Updates
baseurl=http://repos.test.lab/updates/
gpgcheck=0
enabled=1
Save the file and start using your local YUM mirrors.
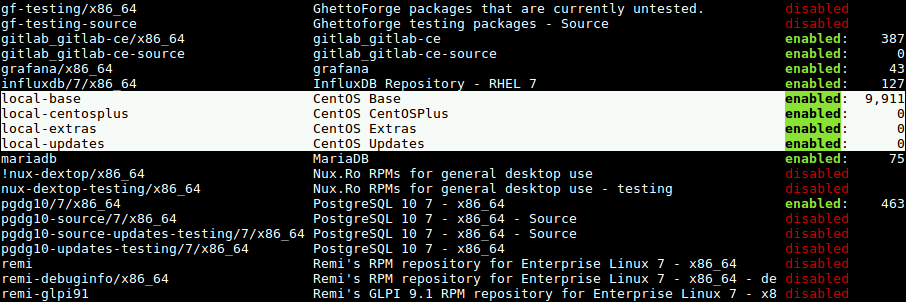
14. Next, run the following command to view your local repos in the list of available YUM repos, on the client machines.
#  yum repolist
OR
# yum repolist all

That’s all! In this article, we have explained how to set up a local YUM repository on CentOS 7. We hope that you found this guide useful. If you have any questions, or any other thoughts to share, use the comment form below.


Problem 1. yum repo responding with [Errno 14] HTTP Error 403 – Forbidden on the client when you run the yum repolist
Solution:
You need to disable SELinux or set it to permissive mode on the repo server.
# setenforce permissive
# getenforce //to verify it is set to permissive.
Problem 2.
# createrepo -g comps.xml /var/www/html/repos/centosplus/
Error: group file /var/www/html/repos/centosplus/comps.xml cannot be found.
solution: The problem was with the syntax of the command, so the correct version syntax is:
# createrepo /var/www/html/repos/centosplus/ -g comps.xml
Hi,
[mickael@clientrockylinux yum.repos.d]$ yum grouplist
Depot local Rocky Linux 9 BaseOS 46 MB/s | 1.6 MB 00:00
Depot local Rocky Linux 9 Extras 352 kB/s | 3.5 kB 00:00
Depot local Rocky Linux 9 Appstream 53 MB/s | 5.7 MB 00:00
Depot local Rocky Linux 9 Epel 64 MB/s | 8.2 MB 00:00
Error: No group data available for configured repositories.
Had a problem with nginx reporting ‘[Errno 14] HTTP Error 403 – Forbidden’ on the clients.
Confirmed all file access permissions correct.
Resolved by running:
and restarting nginx.
It’s an SELinux permissions problem.
Thank you!
Hi,
When I install some packages like nano، see an error. Please help me.
Last metadata expiration check: 0:04:37 ago on Sun 22 Nov 2020 11:33:51 AM +0330.
Error:
Problem: cannot install both ncurses-libs-5.9-14.20130511.el7_4.x86_64 and ncurses-libs-6.1-7.20180224.el8.x86_64
– package nano-2.3.1-10.el7.x86_64 requires libtinfo.so.5()(64bit), but none of the providers can be installed
– package nano-2.3.1-10.el7.x86_64 requires libncursesw.so.5()(64bit), but none of the providers can be installed
– package htop-2.2.0-6.el8.x86_64 requires libtinfo.so.6()(64bit), but none of the providers can be installed
– package htop-2.2.0-6.el8.x86_64 requires libncursesw.so.6()(64bit), but none of the providers can be installed
– conflicting requests
– problem with installed package htop-2.2.0-6.el8.x86_64
(try to add ‘–allowerasing’ to command line to replace conflicting packages or ‘–skip-broken’ to skip uninstallable packages or ‘–nobest’ to use not only best candidate packages)
Hello! is it possible to download packages?
reposync -g -l -d -m –repoid = base –newest-only –download-metadata –download_path = / var / www / html / repos / set sync to Centos 8 ??
when I install packages reposync -g -l -d -m –repoid = base –newest-only –download-metadata –download_path = / var / www / html / repos /
# reposync -g -l -d -m – repoid = centosplus –newest-only –download-metadata –download_path = / var / www / html / repos/ on Centos 8, I get an error Command line error: argument -d/–debuglevel: expected one argument.
@Abylai
Try to remove the -d option and run the command once again.
Hello,
My cron is not running with the above scripts mentioned. getting daily mail alerts as below.
/etc/cron.daily/update-localrepos: line 3: centosplus: command not foundplease suggest
try this..
#!/bin/bash ##specify all local repositories in a single variable LOCAL_REPOS='base centosplus extras updates' ##a loop to update repos one at a time for REPO in ${LOCAL_REPOS}; do reposync -g -l -d -m --repoid=$REPO --newest-only --download-metadata --download_path=/var/www/html/repos/ if [ $REPO = 'base' ] then createrepo -g comps.xml /var/www/html/repos/$REPO/ else createrepo /var/www/html/repos/$REPO/ fi doneHello,
Thank you, now it working fine.
Hi,
I am trying following step 9..
and i got massage like this..
can anyone help me?
thanks.
Use
-g comps.xmlonly with base repo, Use that after:Hi, Thanks for that post!
I have followed all steps, but finally, my local-base repo is enabled but appears a zero in the number of packages.
The output for
"yum repolist all"is:id del repositorio nombre del repositorio estado!local-base CentOS Base habilitado: 0
!local-centosplus CentOS CentOSPlus habilitado: 0
!local-extras CentOS Extras habilitado: 0
!local-updates CentOS Updates habilitado: 0
repolist: 0
Can anybody help me, please?
I have solved it moving all
.repofiles exceptlocal-repoto another directory, for example/home/repos.Hi,
My local repo is working fine EXCEPT when I go onto another server and run a ‘yum update‘ I get nothing because the RPM was originally installed from CentOS 7 repos and the repo name is ‘base‘.
Now my local repo is named ‘local-base‘ the update does not work. I assume the update looks at the package name AND repo name and then if a match it would allow an update (if required). How do I bulk-update all the packages on my server so that yum thinks the RPM was installed from my ‘local-base‘ repo?
By the way, I can install new packages from the local repo successfully.
Thanks
An update to my OP – it is not the repo name as I changed the local-repos.repo file to have a repo name of base and that did not list updates either. I can install new packages, reinstall packages, list available and installed packages. Everything other than update packages!!
I have no idea what the problem could be now. Any assistance gratefully received.
*SOLVED* The problem was that I had not enabled local-updates. Thanks to those who took the time to reply.
@Stephen,
I think you should enable your local-base repo by changing
enabled to 1option in the.repofile.That is not the problem as the repo is definitely enabled
Hi, how can I add the yum repository to the client server, as I am getting the “server not found” error when am trying to download the repos in the client server.
@jithendar
Make sure that you don’t have a firewall service running in the server blocking external requests from clients.
Check selinux as I had the same problem
Thanks for the article. Works good but how do you create a epel offline repo? I used the steps to add epel download and it works but the client errors out as the epel repo folder does not have repodata folder even though I have the switch
--download-metadata.Hi,
I can’t yum anything from client when i was config follow this article.
But when I
yum updateis failed:SELinux related by the looks, the following worked for me.
Hi
I’m try to execute this command
but it show me error like this:
@Ziad,
Have you created these necessary yum directories to store packages information?
Yes
Hi,
You create
Drop the “-g comps.xml“, ie: ” createrepo /var/www/html/repos/centosplus/“
Hi,
How much resources should we allocate for the repo server?
RAM/HDD/Swap, etc.
Thanks.
@Chris,
It’s depend on your requirements, but minimum 4GB RAM and 25GB seems enough for the repo…
Installed and configured nginx according to your guide. Changed the server name and restarted the vm, but when I try to go to the url I get error 403 forbidden.
At first I was getting the standard index.html screen saying nginx is installed but not setup. After renaming the index.html file I get the 403 error. I checked selinux thinking this may be the issue, but it doesn’t appear to be the problem. Any suggestions?
When copying and pasting the cron.daily script, make sure the quotation marks are pasted correctly. My daily script wasn’t running and I couldn’t see why until I ran it manually. It threw this error:
Turns out the quotation marks were smart-quotes, i.e. those ones browsers and some editors change normal quotes to.
Changed them to proper quotes, retested – now all good.
@Chris
Thanks for sharing a word of caution with the readers.
Hello I have a problem, when I run the command “yum repolist” I have This and I had tried to install Firefox to test the local repository but it doesn’t worked..
Loaded add-ons: fastestmirrorbase | 3.6 kB 00:00
extras | 3.4 kB 00:00
http://172.16.1.2/base/repodata/repomd.xml: [Errno 14] HTTP Error 404 - Not Found
Try another mirror.
http://172.16.1.2/base/repodata/repomd.xml: [Errno 14] HTTP Error 404 - Not Found
Try another mirror.
http://172.16.1.2/centosplus/repodata/repomd.xml: [Errno 14] HTTP Error 404 - Not Found
Try another mirror.
http://172.16.1.2/extras/repodata/repomd.xml: [Errno 14] HTTP Error 404 - Not Found
Try another mirror.
http://172.16.1.2/updates/repodata/repomd.xml: [Errno 14] HTTP Error 404 - Not Found
Try another mirror.
updates / 7 / x86_64 | 3.4 kB 00:00
deposit ID deposit name status
base / 7 / x86_64 CentOS-7 - Base 10 019
extras / 7 / x86_64 CentOS-7 - Extras 382
local-base CentOS Base 0
local-centosplus CentOS CentOSPlus 0
local-extras CentOS Extras 0
local-updates CentOS Updates 0
updates / 7 / x86_64 CentOS-7 - Updates 1 459
repolist: 11,860
@Amara
Check out this solution: https://www.centos.org/forums/viewtopic.php?t=61184
How to use this for AltArch mirroring?
@Pat
Yes, in Step 2, you need to create AltArch local repositories instead of YUM local repositories.
I followed the tutorial and when groupfile failed, I used touch command to have a comps.xml file however i keep getting Failed to add groups file for repository: local-extras – comps file is empty/damaged
I corrected the “update-localrepos” file to “Synchronize and Create Repositories” as below:
#!/bin/bash
##specify all local repositories in a single variable
LOCAL_REPOS='base centosplus extras updates'
##a loop to update repos one at a time
for REPO in ${LOCAL_REPOS}; do
reposync -g -l -d -m --repoid=$REPO --newest-only --download-metadata --download_path=/var/www/html/repos/

if [ $REPO = 'base' ]
then
createrepo -g comps.xml /var/www/html/repos/$REPO/
else
createrepo /var/www/html/repos/$REPO/
fi
done
@Seyed
We are glad that you have shared this.
I am having the same problem. When I run createrepo -g comps.xml /var/www/html/repos/base it works fine. When I try run on the other directories it gives me Error: groupfile /var/www/html/repos/centosplus/comps.xml cannot be found.
The comps.xml file only exists in the base and when I try to pull it from the other repos, nothing happens.
Any help would be much appreciated.
I got the same thing. I ran
sudo touch comps.xmlin each directory and createrepo wrote to the files just fine.Hi, I followed the whole procedure of creating a local yum repository and added it to the client machine. But after running the yum repolist command on the client machine it gives me errors and show 0 packages for the local base:
I found that nginx couldn’t read the repo folders. This is apparently an SELinux thing. The following commands resolved the issue:
@Tony,
Thanks for sharing the tip with our readers..:)
Thanks for your share, I have do it by your solution step by step, but when I run the following command.
In my Nginx root directory /usr/share/nginx/html, I run the following command.
It`s done by no problem,finally, I run this command in a client centos7 pc:
The 172.16.1.91 is the repos server,how to fix this problem?
@virgilhsu
Did you add the local repo config on the client machine as shown? If yes, did you use the correct URL for all the repos? Is your client able to connect to the server, you can check using ping command.
just touch the comps.xml file, worked for me.
Hi, this isn’t solution. You are created only empty file.
This procedure isn’t correctly:
only base contains comps.xml
This is correctly procedure:
I find solution on https://www.centos.org/forums/viewtopic.php?t=61184
@LivingLegend
Thanks for sharing, we’ll look at it.
Which in turn leads to problems with the updater cron script
because it is called with
-g comps.xmlfor each repo, not really sure what is the right way here.Additionally i also need to host centos6 rpms on the same server but did not yet look into that.
Hi @spacerat
Did you ever setup a server with both CentOS 6 and 7 repos?
Thanks,