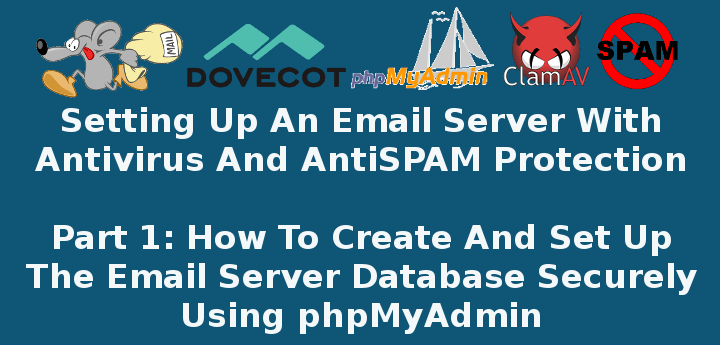
In this 3-article series we will discuss how to set up a Postfix mail server with antivirus and spam protection in a CentOS 7 box. Please note these instructions also works on other distributions such as RHEL/Fedora and Debian/Ubuntu.
Our plan consists in storing email accounts and aliases in a MariaDB database which is for our convenience, will be managed through phpMyAdmin.
If you choose to not install phpMyAdmin, or are dealing with a CLI-only server, we will also provide the equivalent code to create the database tables that will be used throughout this series.
Since keeping a mail server up and running is one of the essentials tasks that are usually assigned to system administrators and engineers, we will also provide a few tips to efficiently run this critical service in a production environment.
Create A and MX Records for Domain in DNS
Before proceeding further, there are a few prerequisites that must be met:
1. You will need a valid domain registered through a domain registrar. In this series we will use www.linuxnewz.com, which was registered through GoDaddy.
2. Such domain must be pointed to the external IP of your VPS or cloud hosting provider. If you are self-hosting your mail server, you can use the service offered by FreeDNS (requires registration).
In any event, you have to set up A and MX records for your domain as well (you can learn more about MX records in this FAQ from Google).
Once added, you can look them up using an online tool such as MxToolbox or ViewDNS to ensure they are properly set up.
Important: Please note that it may take a while (1-2 days) until the DNS records are propagated and your domain is available. In the meanwhile, you can access your VPS through its IP address to perform the tasks indicated below.
3. Configure the FQDN (Fully Qualified Domain Name) of your VPS:
# hostnamectl set-hostname yourhostname
to set the system hostname, then edit /etc/hosts as follows (replace AAA.BBB.CCC.DDD, yourhostname, and yourdomain with the public IP of your server, your hostname, and your registered domain):
AAA.BBB.CCC.DDD yourhostname.yourdomain.com yourhostname
where yourhostname is the system hostname that was set previously using hostnamectl command.
Installing Required Software Packages
4. To install required software packages such as Apache, Postfix, Dovecot, MariaDB, PhpMyAdmin, SpamAssassin, ClamAV, etc, you need to enable the EPEL repository:
# yum install epel-release
5. Once you have followed the above steps, install the necessary packages:
In CentOS based Systems:
# yum update && yum install httpd httpd-devel postfix dovecot dovecot-mysql spamassassin clamav clamav-scanner clamav-scanner-systemd clamav-data clamav-update mariadb mariadb-server php phpMyAdmin
In Debian and derivatives:
# aptitude update && aptitude install apache2 postfix dovecot-core dovecot-imapd dovecot-pop3d dovecot-lmtpd dovecot-mysql spamassassin clamav clamav-daemon clamav-base mariadb-client mariadb-server php5 phpMyAdmin
6. Start and enable the web and database servers:
In CentOS based Systems:
# systemctl enable httpd mariadb
# systemctl start httpd mariadb
In Debian and derivatives:
# systemctl enable apache2 mariadb
# systemctl start apache2 mariadb
When the installation is complete and the above service are enabled and running, we will start off by setting up the database and tables to store information about Postfix mail accounts.
Creating Postfix Mail Accounts Database
For simplicity, we will use phpMyAdmin, a tool intended to handle the administration of MySQL / MariaDB databases through a web interface, to create and manage the email database.
However, in order to log on to and use this tool, we need to follow these steps:
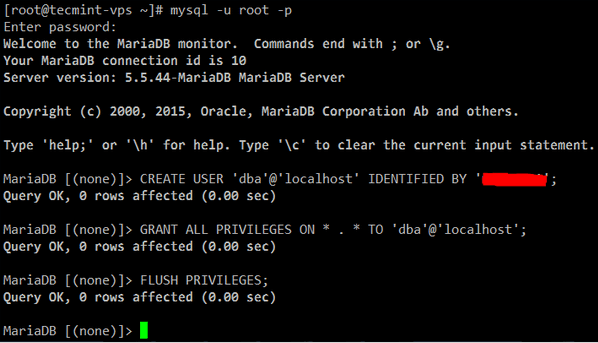
7. Enable the MariaDB account (you can do this by running the mysql_secure_installation utility from the command line, assigning a password for user root, and setting the default settings proposed by the tool EXCEPT “Disallow root login remotely?“:

or otherwise create a new database user:
MariaDB [(none)]> CREATE USER 'dba'@'localhost' IDENTIFIED BY 'YourPasswordHere';
MariaDB [(none)]> GRANT ALL PRIVILEGES ON * . * TO 'dba'@'localhost';
MariaDB [(none)]> FLUSH PRIVILEGES;
Secure Apache with a Certificate
8. Since we will be using a web application to manage the email server database, we need to take the necessary precautions to protect connections to the server. Otherwise, our phpMyAdmin credentials will travel in plain text over the wire.
To set up Transport Layer Security (TLS) in your server, follow the steps outlined in Part 8 of the RHCE series: Implementing HTTPS through TLS using Network Security Service (NSS) for Apache before proceeding further.
Note: if you do not have access to the server’s console you will need to find another way to generate the necessary entropy during the key creation. In that case, you may want to consider installing rng-tools and running rngd -r /dev/urandom.
Configure and Secure PhpMyAdmin
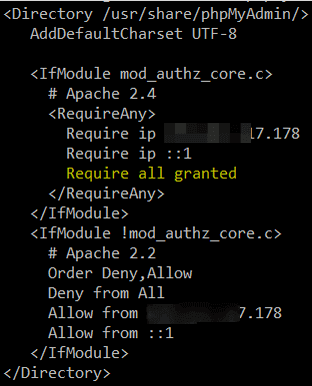
9. In /etc/httpd/conf.d/phpMyAdmin.conf (CentOS) or /etc/phpmyadmin/apache.conf (Debian and derivatives), locate all the occurrences of the following lines and make sure they point to the public IP of your server:
Require ip AAA.BBB.CCC.DDD
Allow from AAA.BBB.CCC.DDD
Additionally, disable the default aliases and create a new one to access your phpMyAdmin login page. This will help to secure the site against bots and external attackers who target www.yourdomain.com/phpmyadmin or www.yourdomain.com/phpMyAdmin.
#Alias /phpMyAdmin /usr/share/phpMyAdmin
#Alias /phpmyadmin /usr/share/phpMyAdmin
Alias /managedb /usr/share/phpMyAdmin
Also, add following line inside <IfModule mod_authz_core.c>:
Require all granted
Create Apache VirtualHost for Domain
10. Make sure your domain is added to the enabled sites. Create /etc/httpd/sites-available/linuxnewz.com.conf (CentOS) or /etc/apache2/sites-available/linuxnewz.com (Debian) with the following contents (make sure the DocumentRoot, sites-available, and sites-enabled directories exist):
<VirtualHost *:80>
    ServerName www.linuxnewz.com
    ServerAlias linuxnewz.com
    DocumentRoot /var/www/linuxnewz.com/public_html
    ErrorLog /var/www/linuxnewz.com/error.log
    CustomLog /var/www/linuxnewz.com/requests.log combined
    Options Indexes FollowSymLinks
</VirtualHost>
and the symbolic link:
On CentOS:
# ln -s /etc/httpd/sites-available/linuxnewz.com.conf /etc/httpd/sites-enabled/linuxnewz.com.conf
On Debian:
# a2ensite linuxnewz.com
and you’re done.
Setup Postfix Email Database
11. Now you can open your phpMyAdmin interface at https://www.yourdomain.com/managedb (note that managedb is the alias that we set up earlier for the phpMyAdmin data directory).
If that does not work (which can be caused by a delay in the propagation or lack of configuration of DNS records) for the time being you can try using your server’s public IP address instead of www.yourdomain.com:
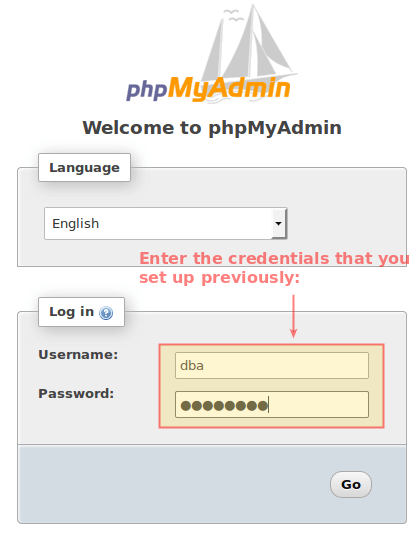
In any event, after you log on to phpMyAdmin you will see the following interface. Click New in the left section:

Enter a name for the database (EmailServer_db in this case, no need to select a Collation) and click Create:

12. On the next screen, choose a name for the first table (where we will store the domains this mail server will manage.
Please note that even when in this series we will only manage one domain, you can add more later) and the number of fields you want in it, then click Go. You will be prompted to name and configure those two fields, where you may safely proceed as indicated in the following images:
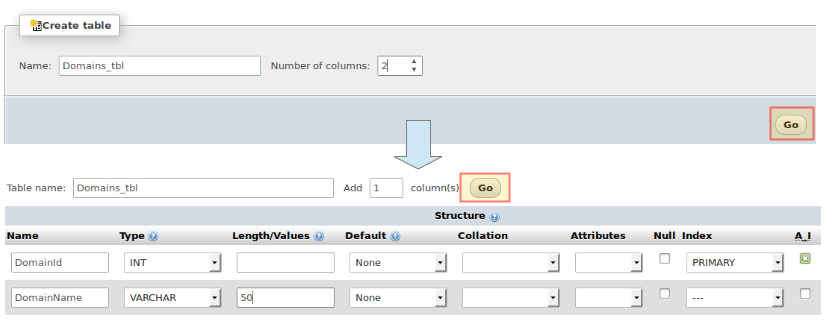
When you choose PRIMARY under Index for DomainId, accept the default values and click Go:
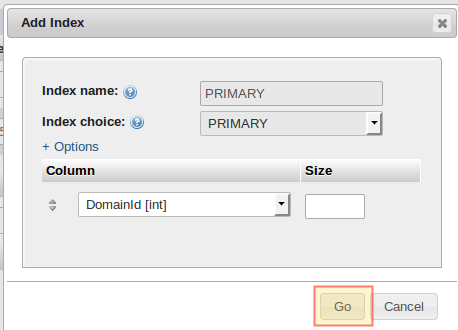
Alternatively, you can click Preview SQL to see the code under the hood:
CREATE TABLE `EmailServer_db`.`Domains_tbl` ( `DomainId` INT NOT NULL AUTO_INCREMENT , `DomainName` VARCHAR(50) NOT NULL , PRIMARY KEY (`DomainId`)) ENGINE = InnoDB;

When you’re ready, click Save to confirm changes. You will then be able to click New under EmailServer_db to continue creating tables:

13. Now follow these steps to create the rest of the tables. Click on the SQL tab and enter the indicated code for each database object.
Note that in this case we chose to create the table using a SQL query because of the relationships that must be established between different tables:
Users_tbl
CREATE TABLE `Users_tbl` (
    `UserId` INT NOT NULL AUTO_INCREMENT,
    `DomainId` INT NOT NULL,
    `password` VARCHAR(100) NOT NULL,
    `Email` VARCHAR(100) NOT NULL,
    PRIMARY KEY (`UserId`),
    UNIQUE KEY `Email` (`Email`),
    FOREIGN KEY (DomainId) REFERENCES Domains_tbl(DomainId) ON DELETE CASCADE
) ENGINE = InnoDB;
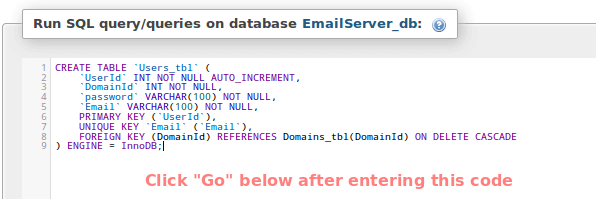
You should get a confirmation message (if not, phpMyAdmin will prompt for syntax errors):

Alias_tbl
CREATE TABLE `Alias_tbl` (
    `AliasId` INT NOT NULL AUTO_INCREMENT,
    `DomainId` INT NOT NULL,
    `Source` varchar(100) NOT NULL,
    `Destination` varchar(100) NOT NULL,
    PRIMARY KEY (`AliasId`),
    FOREIGN KEY (DomainId) REFERENCES Domains_tbl(DomainId) ON DELETE CASCADE
) ENGINE = InnoDB;
(Click Go at the bottom to proceed with the creation of the table).
Up to this point, you should have the following database structure:
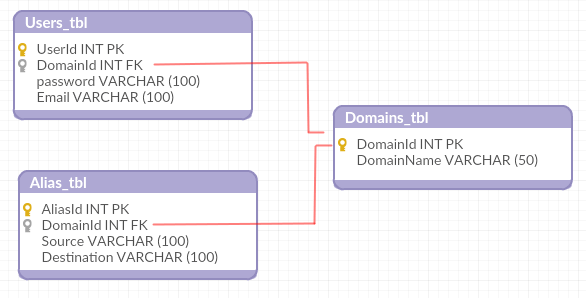
Which means you’re ready to start adding some records in the next section.
Creating a Postfix Domain, Users and Aliases
14. We will now insert the following records into the three tables. The passwords for [email protected] and [email protected] will be encrypted and the INSERT INTO Users_tbl statement.
Also, please note that the emails sent to [email protected] will be redirected to [email protected]:
INSERT INTO Domains_tbl (DomainName) VALUES ('linuxnewz.com');
INSERT INTO Users_tbl (DomainId, password, Email) VALUES (1, ENCRYPT('PasswordForFirstEmailAccount', CONCAT('$6$', SUBSTRING(SHA(RAND()), -16))), '[email protected]');
INSERT INTO Users_tbl (DomainId, password, Email) VALUES (1, ENCRYPT('PasswordForSecondEmailAccount', CONCAT('$6$', SUBSTRING(SHA(RAND()), -16))), '[email protected]');
INSERT INTO Alias_tbl (DomainId, Source, Destination) VALUES (1, '[email protected]', '[email protected]');
Having added our domain, two user accounts, and an email alias we are ready to continue setting up our email server in the next article of this series, where we will configure Dovecot and Postfix.
Summary
In this article we have listed the packages required to install an Postfix email server in a CentOS 7 VPS, and explained how to manage the underlying database using phpMyAdmin.
In the next two articles we will review the configuration of the two programs that will take care of the email distribution for our domain (Part 2) and show you how to add protection against spam and viruses (Part 3) for your server.
Until then, feel free to contact us using the form below if you have any questions or comments.


