With the release of RHEL 8, you get to experience what the real product will be like and test some of its functionalities. If you are eager to test RHEL 8 you can signup for free and download RHEL 8.
You can review our RHEL 8 installation tutorials on the links below.
To easily understand this, I will be using two servers:
- 192.168.20.100 (kerrigan) – server from which I will be connecting
- 192.168.20.170 (tecmint) – my RHEL 8 system
In this tutorial, you are going to learn how to set up passwordless SSH login on your RHEL 8 install using ssh keys. Make sure the Open-ssh server should already installed on your system, but in case it is not, you can install it by issuing the following yum command:
# yum install openssh-server
Step 1: Generate SSH Key on 192.168.20.100 (kerrigan)
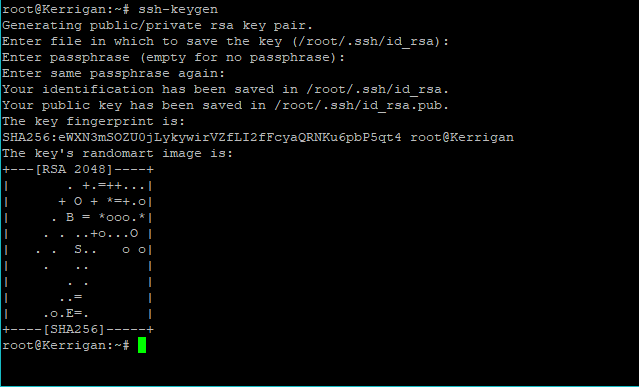
On the system, from where you will be connecting to your RHEL 8 system, generate a new ssh key pair. This can be done by using the following command:
# ssh-keygen
You can configure a meaningful name for the file or just leave it to the default one. When asked for a passphrase, simply press “enter” and leave the password empty.

Step 2: Copy SSH Key to 192.168.20.170 (tecmint)
Copying the key is a simple task that can be completed by using the ssh-copy-id command as shown.
# ssh-copy-id -i ~/.ssh/id_rsa.pub user@remote-server
When prompted for the remote user’s password, simply enter it. This will create the “.ssh” directory if missing and the authorized_keys file with appropriate permissions.

Step 2: Test SSH Passwordless Login from 192.168.20.100
Now that we have the key copied to our remote server, we can test the connection. You should not be asked for a password:
# ssh -i ~/.ssh/id_rsa user@remote-server

In this tutorial, you learned how to SSH to your RHEL 8 system using a passwordless ssh key. I hope the process was easy. If you have any questions, please post them in the comment section below.


Ravi, thank you will try that.
So I have used this method for a previous Beowulf Cluster (Ubuntu 16.04). I wanted to switch to Scientific Linux. I have successfully completed the steps and gotten the passwordless connections. HOWEVER: the connection via port 22 gets ‘refused’ and I have no idea how to bring these back to life without starting all over. Can you help?
@Brian,
Please open the port 22 on the Firewall to allow remote SSH connections on Port.