If you use Linux or manage remote servers (like cloud servers on AWS, DigitalOcean, or even local machines on your network), you probably connect to them using a command like this:
ssh [email protected] -p 2222
Let’s break that down so it’s super clear:
ssh: This is the command to start a secure connection to another machine.ravi: This is the username you’re logging in with on the remote server.192.168.1.50: This is the IP address of the server (kind of like its phone number).-p 2222: This tells SSH to connect on port 2222 (the server might not be using the default port 22).
Now, this one-liner might look short at first, but typing it every single day – and doing it for multiple servers – quickly gets frustrating.
Here’s what it actually feels like over time:
- You have to remember the IP address of each server (easy to forget!).
- You must type or copy-paste the correct port number.
- If you’re using SSH keys, you might also need to add
-i /path/to/key.pemto the command. - You do this again and again for multiple servers, maybe even dozens every day.
Let’s say you manage three servers:
ssh [email protected] -p 2200
ssh [email protected] -p 2222
ssh [email protected] -i ~/.ssh/dev-key.pem
Now imagine typing all that manually several times a day. That’s not just annoying, it’s error-prone too. One wrong IP or port, and you’ll waste time troubleshooting.
The Goal: Use a Simple Shortcut Instead
Wouldn’t it be amazing if you could just type something short and easy like:
ssh server1
OR
ssh devbox
and instantly connect to the correct server, with all the details (IP, port, username, key) already filled in for you?
- No need to remember the IP
- No need to retype the port
- No need to add SSH key paths
- Just one simple nickname to connect
In this easy-to-follow guide, I’ll show you how to auto-complete SSH commands like a pro so you don’t have to keep typing long, boring commands again and again.
How to Set Up SSH Shortcuts in Linux
To create SSH shortcuts, you need to create or open the ~/.ssh/config file inside your home directory.
nano ~/.ssh/config
Now that the file is open, let’s create your first SSH shortcut.
Host server1
  HostName 192.168.122.74
  User ravi
  Port 2222
Let’s break down each line:
Host– This is the nickname you’ll use in your terminal (you can name it anything!).HostName– The IP address or domain name of your remote server.User– The username you use to log in to that server.Port– The SSH port number (default is 22, use it only if your server uses a custom port).
Press Ctrl + X, then Y, and hit Enter to save and exit the file.
Now, instead of typing the long SSH command, just run:
ssh server1
That’s it – you’re connected to your server!
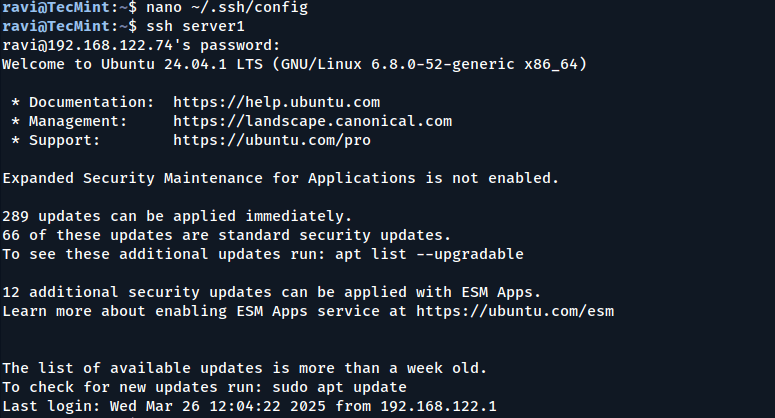
The shortcut uses all the details you saved in the config file (username, IP, port), so you don’t have to remember or type them every time.
Want to Add More Servers?
You can repeat the same process and add more servers like this:
Host aws-server
  HostName 3.115.120.100
  User ec2-user
  Port 22
  IdentityFile ~/.ssh/aws.pem

Host dev-machine
  HostName 10.0.0.101
  User ubuntu
Each block starts with a unique Host name and contains the details of that particular server.
Then just connect like this:
ssh aws-server
ssh dev-machine
How to Set Up Passwordless SSH Login Using SSH Keys
Up to this point, we’ve learned how to set up shortcuts for SSH commands using the ~/.ssh/config file, but we still have to type the password every time.
To avoid this, we need to set up passwordless authentication using SSH keys, which are a more secure and faster way to log in to remote servers without using a password.
They work like a lock and key:
- Private Key (your personal key): stays on your local computer.
- Public Key (your ID): goes on the server. It tells the server, “Hey, if someone has the matching private key, let them in!”.
Generate a New SSH Key Pair (If You Don’t Have One)
If you see a file like id_rsa or id_ed25519 in your .ssh directory, that means you already have an SSH key pair. If not, you can generate a new SSH key pair using the following command.
ssh-keygen -t rsa -b 4096 -C "[email protected]"
Now your SSH key is created in ~/.ssh/id_rsa (your private key) and ~/.ssh/id_rsa.pub (your public key).

Next, copy the public key to your server; here you’ll be asked for the password one last time.
ssh-copy-id -i ~/.ssh/id_rsa.pub [email protected]
Now open your /.ssh/config file and add IdentityFile with the path to your private key file.
Host server1
  HostName 192.168.122.74
  User ravi
  Port 2222
  IdentityFile ~/.ssh/id_rsa
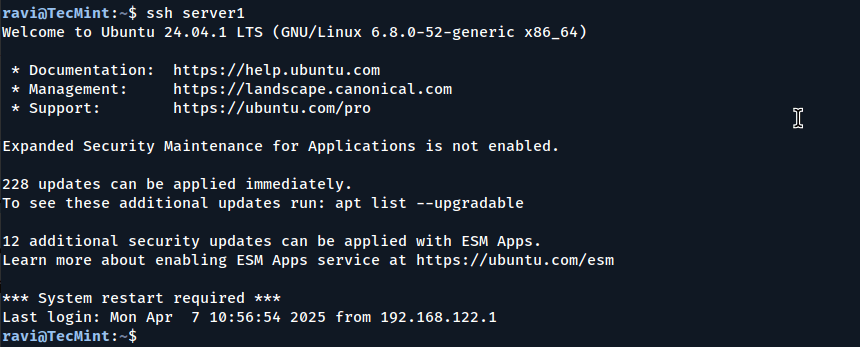
Next time, when you try to SSH, it will automatically use your private key and log you in without asking for a password.
ssh server1
Bonus: Tab-Completion for SSH Hosts
You can enable tab-completion for your SSH nicknames in your ~/.bashrc file.
nano ~/.bashrc
Add this line at the end:
complete -o default -o nospace -F _ssh ssh
Save and run:
source ~/.bashrc
Now type ssh and press TAB, which will show all the hostnames you added in the config.
Final Thoughts
Using an SSH config file is one of the simplest but most powerful tricks for anyone working with servers, as it saves time, reduces mistakes, and helps you improve your SSH workflow.
Want to take it further? Read our articles:


Very nice tutorial!
Have you ever tried using aliases? A single word can achieve what you’re doing with multiple repeated commands. You don’t have to type ‘ssh‘ every time. I have a bunch of aliases in my
.bash_aliasesfile in my home directory.@John,
Thanks! And yeah, aliases are a total game-changer — saves so much time.
I use a few for common stuff, but sounds like you’ve got a solid setup! Might steal that
`.bash_aliases`idea and level mine up a bit.