SSH banner warnings are necessary when companies or organizations want to display a stern warning to discourage unauthorized parties from accessing a server.
These warnings are displayed just before the password prompt so that unauthorized users who are about to log in are made aware of the consequences of doing so. Typically, these warnings are legal ramifications that unauthorized users can suffer should they decide to proceed with accessing the server.
Be advised that a banner warning is by no means a way of preventing unauthorized users from logging in. The warning banner is simply a warning meant to deter unauthorized parties from logging in. If you want to block unauthorized users from logging in, then additional SSH configurations are required.
[ You might also like: How to Secure and Harden OpenSSH Server ]
That said, let’s check out how you can set a custom SSH warning banner.
Step 1: Configure SSH Warning Banner
To get started, access the /etc/ssh/sshd_config SSH configuration file using your preferred text editor. Here, we are using the vim text editor.
$ sudo vim /etc/ssh/sshd_config
Locate the Banner none directive as indicated. Here we need to specify the path to the file that will contain the SSH custom warning.

Uncomment it and specify a custom file where you will define your custom warning banner. In our case, this will be the /etc/mybanner file.
Banner /etc/mybanner

Save the changes and exit the file.
Step 2: Create SSH Warning Banner
The next step is to create the file in which we shall define the custom banner. This is the /etc/mybanner file that we specified in our previous step.
$ sudo vim /etc/mybanner
Paste the banner shown. Feel free to edit it to your preference.
------------------------------------------------------------
------------------------------------------------------------

Authorized access only!

If you are not authorized to access or use this system, disconnect now!

------------------------------------------------------------
------------------------------------------------------------
Save and exit the file.
To apply the changes, restart the SSH service:
$ sudo systemctl restart sshd
Step 3: Testing SSH Warning Banner
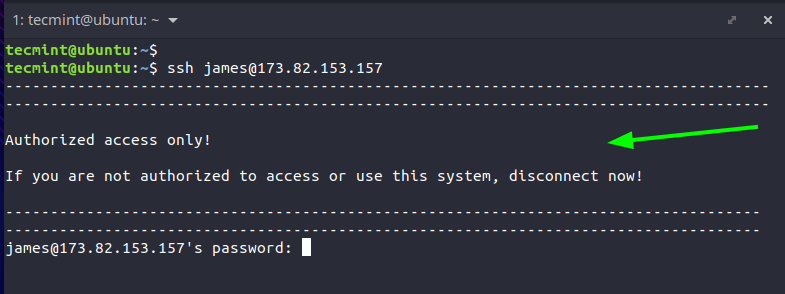
To test out our banner, we will try logging in to the remote server. As you can see, the warning banner is displayed just before the password prompt discouraging unauthorized users from logging in.
$ ssh user@remote-server-ip
Step 4: Setting a MOTD Banner
If you wish to set a MOTD (Message Of The Day) banner right after login, edit the /etc/motd file.
$ sudo vim /etc/motd
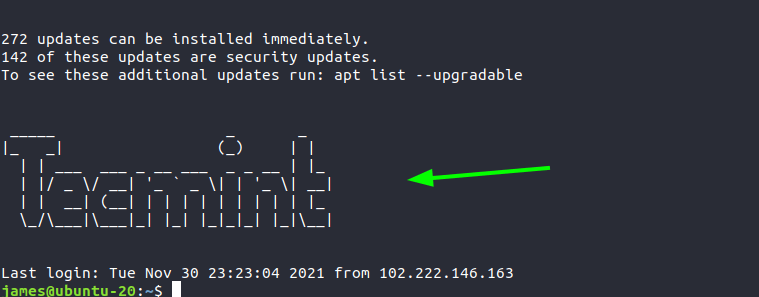
Then specify your MOTD message. For our case, we have created custom ASCII art.
 _____                   _       _
 |_   _|                 (_)     | |
   | | ___  ___ _ __ ___  _ _ __ | |_
   | |/ _ \/ __| '_ ` _ \| | '_ \| __|
   | |  __/ (__| | | | | | | | | | |_
   \_/\___|\___|_| |_| |_|_|_| |_|\__|
Save and, once again, restart the SSH service.
$ sudo systemctl restart sshd
The MOTD is displayed right after you log in as illustrated below.
And that’s it. We hope you can now set your custom SSH warning banner on your server to warn unauthorized users from accessing the system.


