Periodically new devices and technology coming out and it’s important to keep our Linux system kernel up-to-date if we want to get the most of out it.
Moreover, updating the system kernel will allow us to take advantage of new kernel functions, and also it helps us to protect ourselves from vulnerabilities that have been found in earlier versions.
Ready to update your kernel on Ubuntu and Debian or one of their derivatives such as Linux Mint? If so, keep reading!
Step 1: Check Installed Kernel Version
To find the current version of the installed kernel on our system we can do:
uname -sr
The following shows the output of the above command in a Ubuntu 24.04 server:
Linux 6.8.0-52-generic
Step 2: Upgrading Kernel in Ubuntu Server
To upgrade the kernel in Ubuntu, go to http://kernel.ubuntu.com/~kernel-ppa/mainline/ and choose the desired version (Kernel 6.13.4 is the latest at the time of writing) from the list by clicking on it.
Next, download the .deb files for your system architecture using the wget command.
wget https://kernel.ubuntu.com/mainline/v6.13/amd64/linux-headers-6.13.0-061300-generic_6.13.0-061300.202501302155_amd64.deb
wget https://kernel.ubuntu.com/mainline/v6.13/amd64/linux-headers-6.13.0-061300_6.13.0-061300.202501302155_all.deb
wget https://kernel.ubuntu.com/mainline/v6.13/amd64/linux-image-unsigned-6.13.0-061300-generic_6.13.0-061300.202501302155_amd64.deb
wget https://kernel.ubuntu.com/mainline/v6.13/amd64/linux-modules-6.13.0-061300-generic_6.13.0-061300.202501302155_amd64.deb
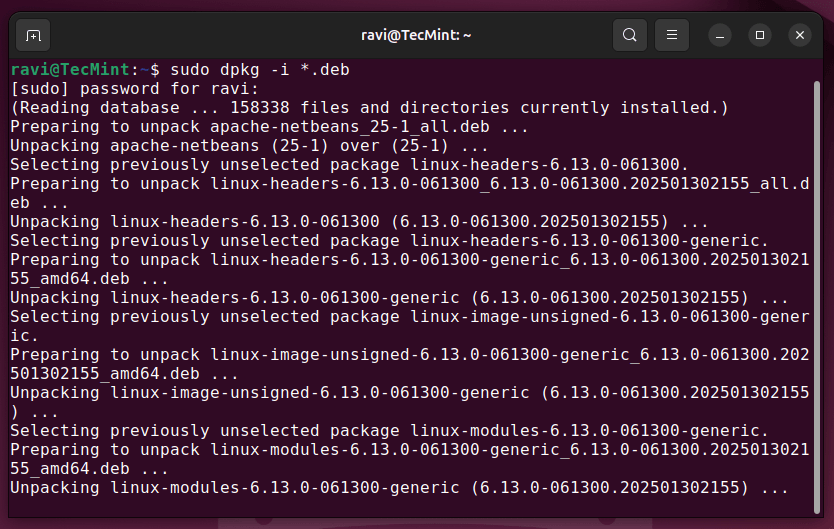
Once you’ve downloaded all the above kernel files, now install them using the dpkg package manager, which will install all downloaded .deb files at once.
sudo dpkg -i *.deb
Once the installation is complete, update the GRUB bootloader and reboot your machine to apply changes.
sudo update-grub
sudo reboot
Once your system restarts, check if the new kernel is active.
uname -sr
You should see 6.13.4 or a similar version number, confirming that the installation was successful.

You are now using a much more recent kernel version than the one installed by default with Ubuntu.
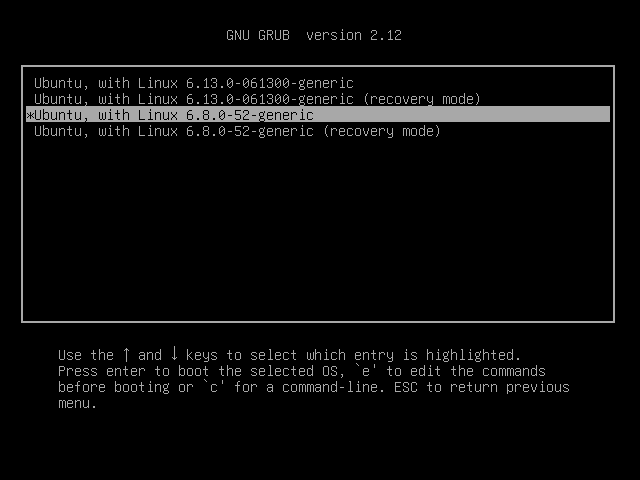
How to Boot into the Old Kernel (If Needed)
If the new kernel causes issues, you can boot into the previous version:
- Restart your system and hold the
Shiftkey (or pressEsc) during boot to access the GRUB menu. - Go to “Advanced options for Ubuntu“.
- Select your previous kernel version and press
Enter.
Once you boot into the old kernel, you can remove the new one if needed.
How to Remove Kernel 6.13.4 (If Needed)
If the new kernel is causing problems and you want to uninstall it, run.
sudo apt remove --purge linux-headers-6.13.0-061300 linux-image-unsigned-6.13.0-061300-generic linux-modules-6.13.0-061300-generic
Then, update GRUB again.
sudo update-grub
Finally, reboot your system.
sudo reboot
Summary
In this article, we’ve shown how to easily upgrade the Linux kernel on the Ubuntu system. There is yet another procedure that we haven’t shown here as it requires compiling the kernel from the source, which is not recommended on production Linux systems.
If you’re still interested in compiling the kernel as a learning experience, you will get the instructions on how to do it on the Kernel Newbies page.
As always, feel free to use the form below if you have any questions or comments about this article.


You may want to include information about how to enable secure boot when you do this.
@Matt,
Good point!
Enabling Secure Boot while installing a custom kernel can prevent boot issues and enhance security. To do this, you’ll need to sign the kernel modules with a Machine Owner Key (MOK) and enroll it using
mokutil.There is problems with amd64/…5.11.17(and above)….generic and dependence libc6.
https://answers.launchpad.net/umkl/+question/696873
It works for me.
To install the latest kernel in Ubuntu with Kernel Update Utility as shown.
Disable access control with the following command:
This looks very dangerous. You add untrusted repository and then install software which can be tampered with.
“On Ubuntu or one of their derivatives such as Debian”
I believe you meant “on Ubuntu or related systems such as Debian…”
If you feel you must specify the exact relationship, Ubuntu is a derivative of Debian GNU/Linux, not the other way around.
@Ben,
Sorry that was a mistake, corrected in the write up..
Thanks for this amazing walking through article, Unfortunately it can’t be installed in my system due to the missing some dependencies.
Whats my choices?
I am using the terminal because I am running into graphics card’s driver issue which required me to install the latest kernel.
After downloading, when installing getting this error…..
linux-image-unsigned-4.19.0-041900-generic depends on linux-modules-4.19.0-041900-generic; however:
Package linux-modules-4.19.0-041900-generic is not installed.
dpkg: error processing package linux-image-unsigned-4.19.0-041900-generic (–install):
dependency problems – leaving unconfigured
Errors were encountered while processing:
linux-image-unsigned-4.19.0-041900-generic
Same exact error here, using Linux Mint MATE v.19 which is up to date as of this morning, dec.02, 2018… so I’ll wget that module package if I find it. No idea….
OK i tried posting a comment about this earlier, but anyway I have it working indeed, simply by adding a line for the modules package in just the same way the headers & image are printed above. At the moment, it seems that this line has been omitted upon some update to reflect the latest kernel.
Anyway for some reason, the process failed when I downloaded the package with firefox, saying it wasn’t a deb-formatted package, or something. I had even tried changing the ownership to
root:root. Anyway just copying the link address by visiting [http://kernel.ubuntu.com/~kernel-ppa/mainline/v4.19/] and using sudo for wget, which ought not to be necessary, worked just fine.For the record, the kernel upgrade on my mint-MATE 19 laptop was necessary because even the 4.15 or so kernel that came with the mint download left the track pad unrecognized, unusable, dead.
Using an external mouse occasionally is OK, but making that *mandatory* seemed worth this absurd little effort. It’s a 200-dollar laptop Lenovo 330-15igm. I’ve put in an ssd, and it all works now thanks to some help from TecMint :) Thanks
James, thanks for the post on this because I had to do the exact same thing to fix mine.
I got the same error as yours when I tried installing. I would also like to add that this fixed my driver issues with Ryzen and I now have 1920 x1080 resolution. xandr kept failing when I was trying to manually add my resolution.
Updating the kernel is actually what fixed all of my resolution issues. I am using the Ryzen 2200 GPU for anyone interested in fixing the same issue (I was getting the “failed to get size of gamma for output” when using –newmode for xrandr).
Here is exactly what I ran to get this to work (I am pretty sure these links are only for AMD so if you have intel you have to go to the website and select the ones for your system https://kernel.ubuntu.com/~kernel-ppa/mainline/v4.19/.
It seems the article is missing the modules install (You need the Linux headers, Linux image unsigned, and the modules file). This article actually has you install the headers twice which isn’t right. I would still like to say thank you to the person who wrote this blog and many others, it has helped me out more than you could imagine.
Hopefully this helps someone else out! Enjoy!!!
Josh
or you can use ukuu
@abdou,
Ukuu for desktop users, what about Ubuntu server?
Easy, ukuu work also in terminal.
Might be a minor thing, but Ubuntu is a Debian derivative, not the other way around.
What is the linux-modules-*.deb file for?
@Greg,
This file is used to load and unload modules into the kernel upon demand.
Kernel version 4.12.x is released …
wget kernel.ubuntu.com/~kernel-ppa/mainline/v4.12/linux-headers-4.12.0-041200_4.12.0-041200.201707022031_all.deb
wget kernel.ubuntu.com/~kernel-ppa/mainline/v4.12/linux-headers-4.12.0-041200-generic_4.12.0-041200.201707022031_amd64.deb
wget kernel.ubuntu.com/~kernel-ppa/mainline/v4.12/linux-image-4.12.0-041200-generic_4.12.0-041200.201707022031_amd64.deb
sudo dpkg -i *.deb
@Yogesh,
Thanks for update, we’ve updated the article with latest Linux Kernel version.
Thanks for this great tutorial.
I updated the kernel easily, but Kubuntu 16.04 is telling me to download the 4.4.xx kernel, how to stop that?
Hi Muaad,
I did not test this in Kubuntu, but in theory it should work. Can you post a screenshot of this message and indicate the step where it appears?
Thanks.
Thanks for coming back to me, as it turns out I had my packages mixed up, a bit of house keeping and everything went back to normal!
install UKUU it will install and version kernel from the list in the program, easy and simple, enjoy