If you do not wish to do a fresh Linux Mint 22 Wilma installation, you can simply upgrade from an earlier version.
In this article, we will walk you through the steps to upgrade Linux Mint 21.3 (the latest minor version of the 21.x version) to Linux Mint 22.
Before you proceed, note that this is a major upgrade and it is bound to take several hours. Besides, after initiating the upgrade process, the upgrade tool will require your current Linux Mint installation to be up to date (you will have to install updates where necessary) and to prepare system snapshots as well.
So, do not rush, kindly do not take shortcuts that may negatively affect the whole upgrade process. Now let’s get started!
Step 1: Install mintupgrade Tool
First, open a terminal, run the following commands to refresh your apt-cache, and install the mintupgrade upgrade tool:
sudo apt update
sudo apt install mintupgrade
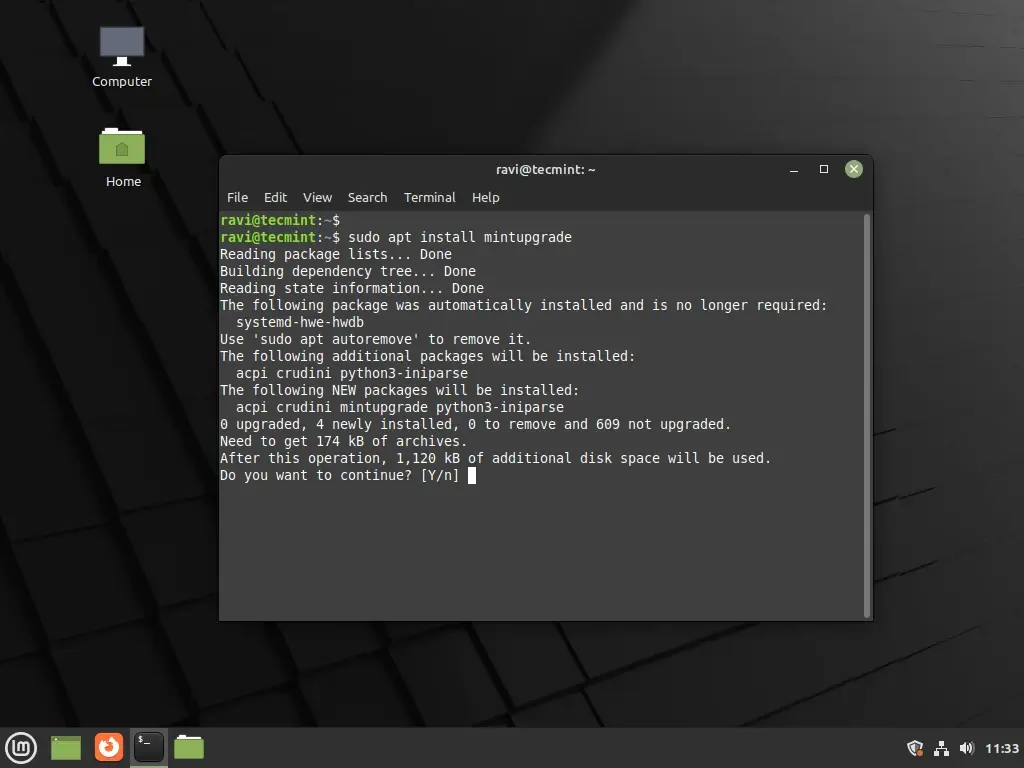
In case you fail to find mintupgrade in the repositories, you need to switch to the default Linux Mint mirror and refresh the apt-cache.
First, you’ll need to edit your sources list to use the default Linux Mint mirrors.
sudo nano /etc/apt/sources.list.d/official-package-repositories.list
Replace any custom or specific mirrors with the default Linux Mint mirrors, which typically look like this:
deb http://packages.linuxmint.com vanessa main upstream import backport #id:linuxmint_main
deb http://archive.ubuntu.com/ubuntu jammy main restricted universe multiverse
deb http://archive.ubuntu.com/ubuntu jammy-updates main restricted universe multiverse
deb http://archive.ubuntu.com/ubuntu jammy-backports main restricted universe multiverse
deb http://security.ubuntu.com/ubuntu/ jammy-security main restricted universe multiverse
Now, refresh the apt-cache to update the package list.
sudo apt-get update
After refreshing the apt-cache, you should be able to find and install mintupgrade.
sudo apt-get install mintupgrade
Step 2: Upgrading to Linux Mint 22
Now type the following command to launch the mintupgrade upgrade tool:
sudo mintupgrade
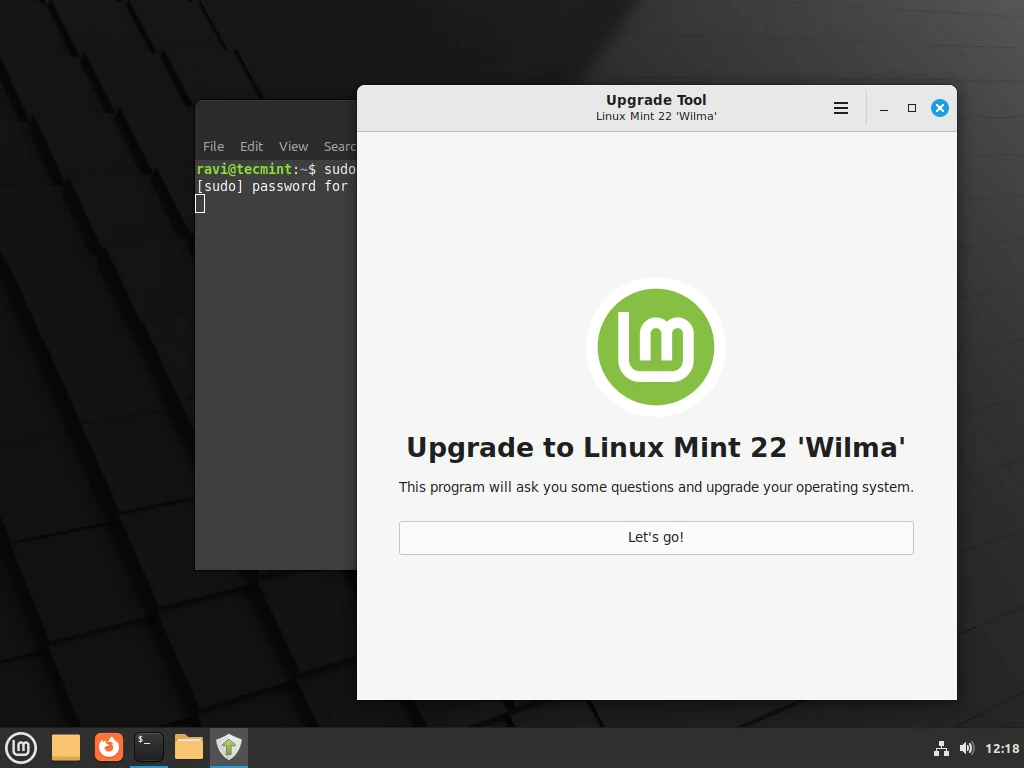
Once launched, as phase one in the whole upgrade process, the upgrade tool will perform several tests to prepare the system for the upgrade. One test is checking if your computer is connected to a power source.
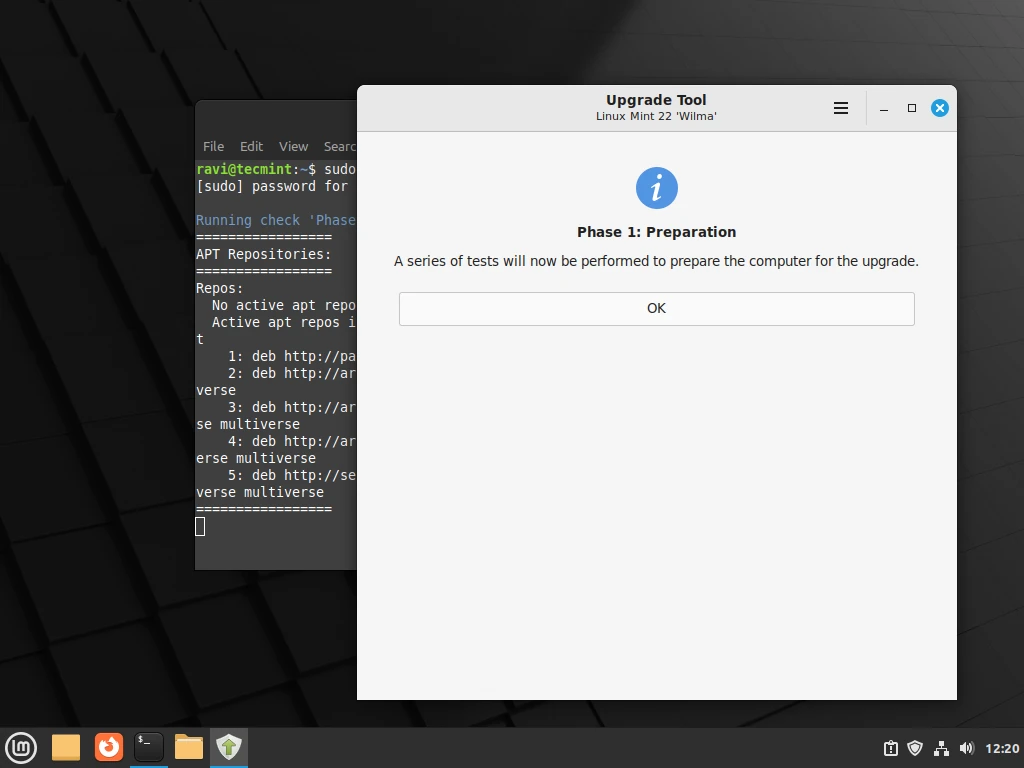
If all the tests are fine, the upgrade tool will run the apt update in the background to fetch the latest version of the package list from configured software repositories, you can see the details from the terminal.
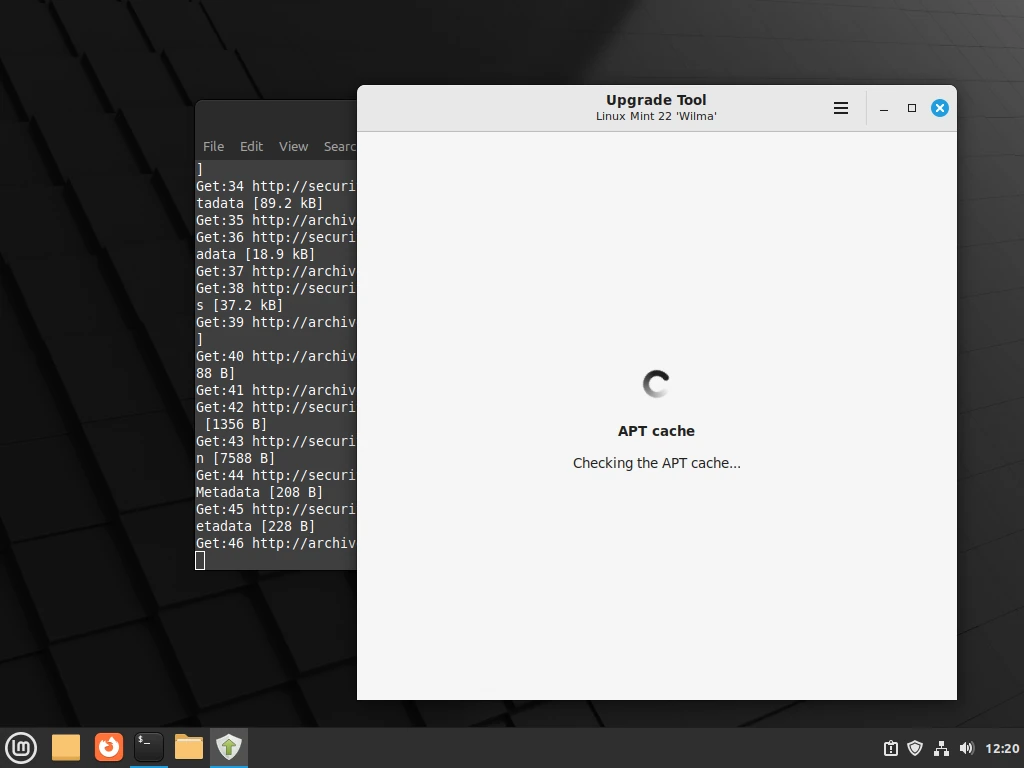
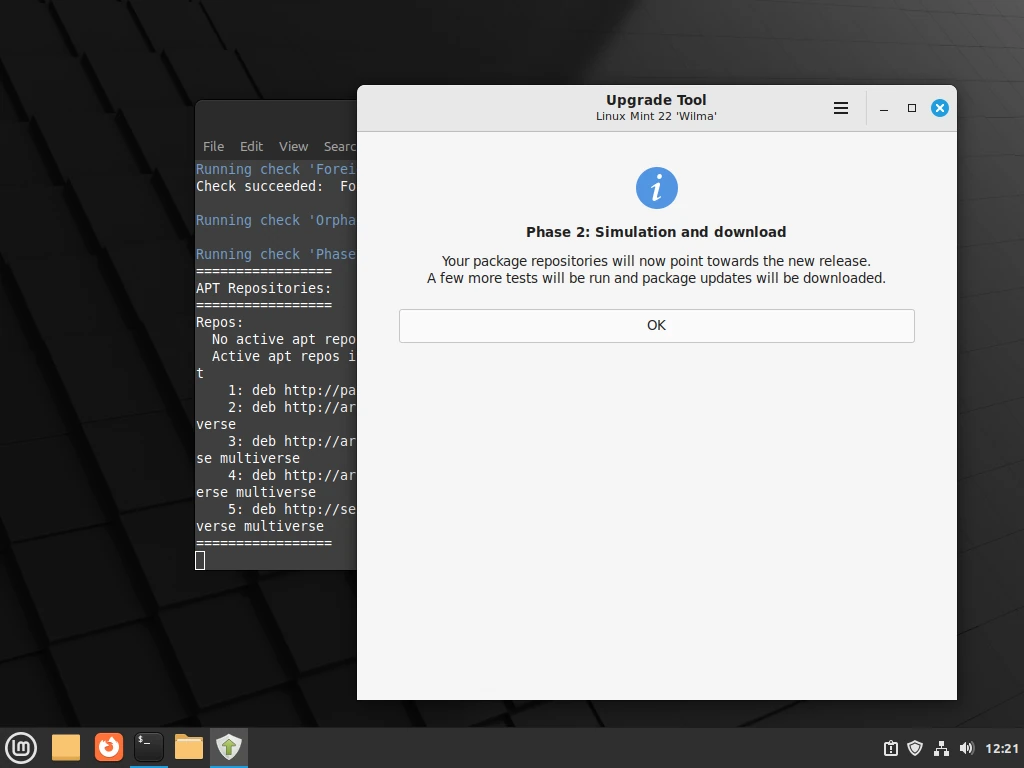
In the second phase, the upgrade tool will perform more tests and the package updates will be downloaded.
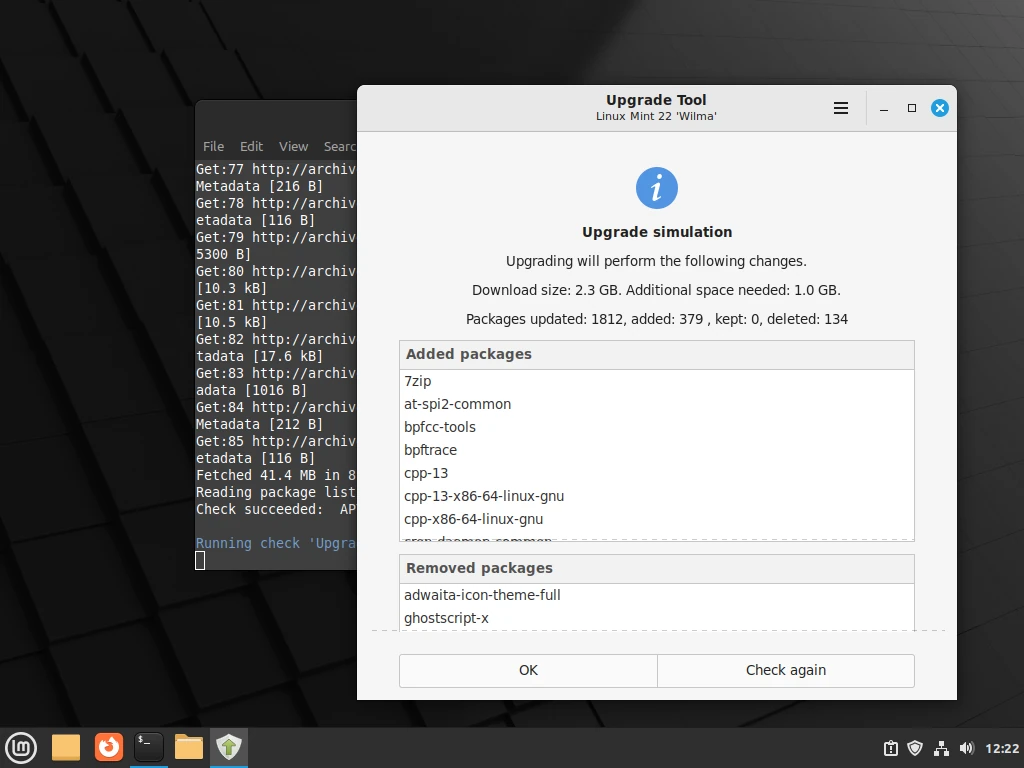
Once the simulation is complete, the system will display all the changes to be applied: packages to be updated, those added, those that are kept as well as those that are deleted.
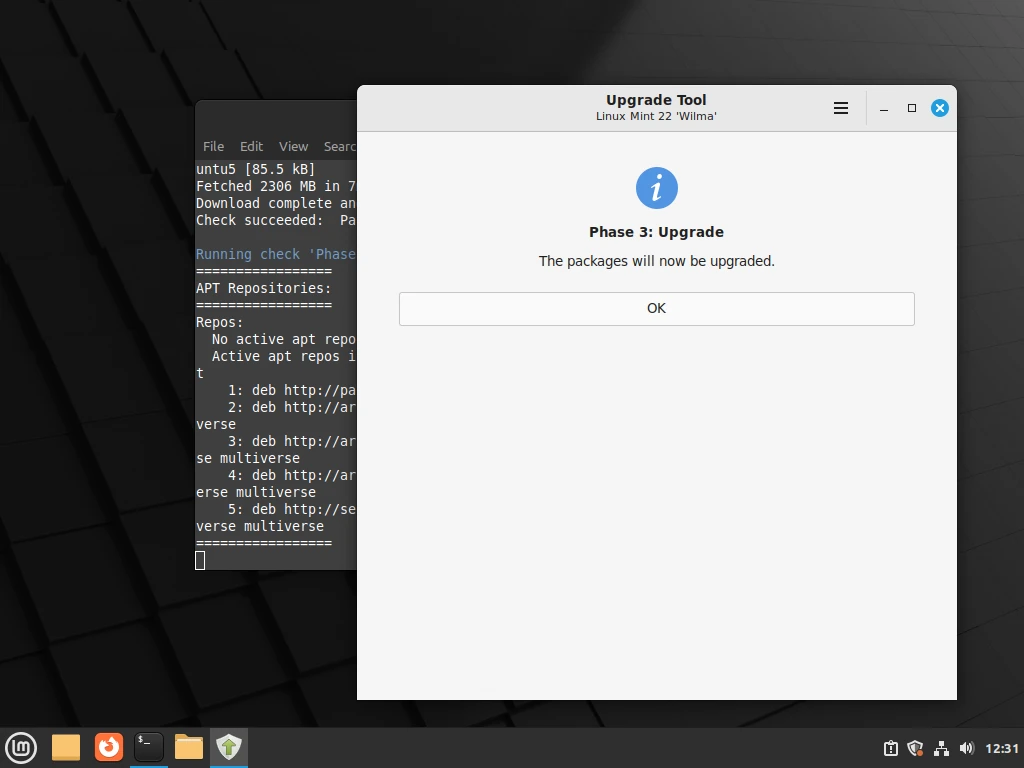
Once all the updates have been downloaded, the last phase is to install them – the actual system upgrade. Click Ok to start the upgrade of packages.
When the upgrade process is complete and successful, you need to uninstall the mintupgrade tool and reboot your computer with these commands:
sudo apt remove mintupgrade
sudo reboot
After rebooting, you should see the new Linux Mint 22 “Wilma” welcome screen.
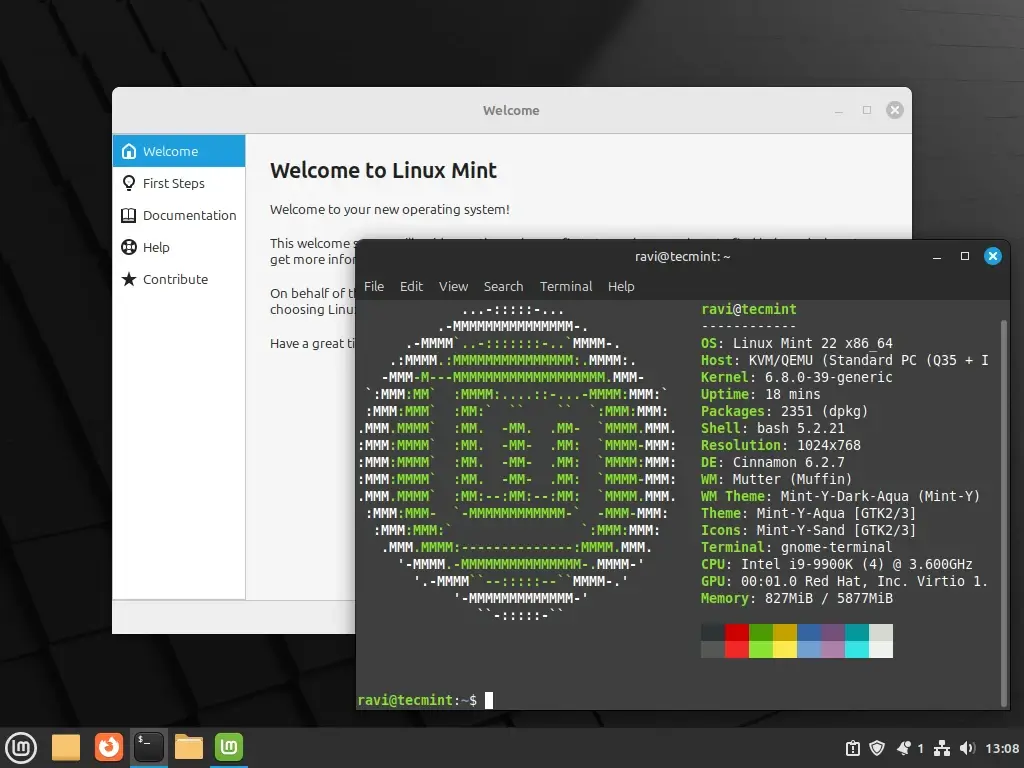
That’s it! We hope the upgrade process went smoothly for you and that now you have Linux Mint 22, Wilma, on your computer. You can seek help if you have questions or if you encounter any challenges with the upgrade, via the feedback form below.



Can I leave the mintupgrade tool for future upgrades or it is a must to remove it?
@QuinD,
You can leave the mintupgrade tool for future upgrades, as it’s not strictly necessary to remove it. However, if you’re concerned about system resources or want to keep your system clean, you may choose to uninstall it after completing your upgrades.
Hi,
After upgrading to Linux Mint 22, additional new software such as BIOS repair, Matrix, etc., was not installed.
@rakesh,
You can try using the Software Manager or Synaptic Package Manager to search for and install ‘BIOS repair,’ ‘Matrix,’ and any other missing software.
okay, thank you so much!
Thanks, mate!
These instructions worked perfectly!
Much obliged!
This was one way I tried at first. However out of all the ways folks have mentioned, none work on my machine. I have Linux Mint Cinnamon 20.3 installed. Your way normally fails at the end with a PPA error.
Thanks!
@Larry,
Regarding the PPA error you mentioned, this might occur if the PPA (Personal Package Archive) you’re trying to add doesn’t support your specific Linux Mint version or architecture.
Hi, I am getting the following error please suggest any option.
Please don’t run this command as root or with elevated privileges.
Hello there!
My only concern is in regard if all the applications already installed remain with the upgrade or if I have to reinstall them again one by one…
@Rob,
No, the upgrade will automatically install all application upgrades…
If so, I’ll consider it one of these days to change. Currently, I’m happy with 20.3 and wouldn’t like to lose what I have already. Thanks for your reply!
I am sorry to say that step one already fails:
sudo apt-get install mintupgradereturns ‘no such package available‘.What now?
@Hajo,
In Update Manager, try to install pending updates and see…
I had the same issue because I was on “Uma” instead of “Una“. So 20.2 but only 20.3 has the mintupgrade package available. So, first, run “sudo mint-release-upgrade” to go to 20.3, and then, you’ll be able to install mintupgrade and run it to go to Mint 21.
Question: I downloaded the Linux Mint 21 ISO. Can I update my Linux Mint 20.3 manually with that or do I have to use the update online tool only?
@Steve,
Please follow the given instructions in this article to upgrade to Linux Mint 21 from Linux Mint 20.3.
I’m running an intel i5 processor with 16 MBs of RAM with download speeds of 65 MBs/sec and was able to do the upgrade in about 20 minutes, it didn’t take long at all and went smoothly. Like another user’s comment, the drivers for my printer were also removed so I will have to reinstall which is a bit of a pain because it took me a while to find the right drivers the first time around, but other than that was fast and painless.
Had to finally do an upgrade on a rather minimal system – Your recipe worked nicely. Thank You very much!
@DS
We are glad that this worked perfectly for you. Thanks for the useful feedback.
Thank you for this!
@Tom
Welcome, thanks for the feedback.
thanks, very smooth process, all done
@Neil
Thanks for the feedback.
Got the RED X shield the other day and can’t update or upgrade. Have searched and tried may suggestions but will not update nor upgrade. Any suggestions? Thank you
I reached the end of the upgrade from 17.3 to 18 but the upgrade ended on: Download complete and in download only mode.
Do I need to type anything else to finish or just exit the Terminal?
@Brian
Answer y (for yes) to the question, “do you want to continue?”, to proceed to the installation of downloaded packages.
from mint 17.3 to 18 ok
@John
Thanks for the feedback.
+ Checking your Linux Mint codename…
+ Checking your Linux Mint edition…
————————————————
!! ERROR: Your edition of Linux Mint is ‘KDE’. It cannot be upgraded to Linux Mint 18 ‘Sarah’.
!! Exiting.
————————————————
@humberto
Did you read the requirements carefully?
A pain free upgrade, thanks for the pointers.
@Alan G
Welcome, we are glad this worked for you. Many thanks for the feedback.
Our new concern now is how will move from 18 to 19. Inside the revision I use standard update but for main revision I use reformat and install all automatically using teejee Aptik Migration Utility.
@Bernard
Once Linux Mint 19 is out(stable version), we will definitely prepare an article about how to upgrade from 18 or a another previous version to it. Thanks for the feedback.
Initializing machine ID from D-Bus machine ID.
Adding the “systemd-journal” group (GID 127) …
Finished.
An immediate password change is required (forced by root)
chfn: PAM: The authentication token is no longer valid; new is required
adduser: “/ usr / bin / chfn -f systemd Time Synchronization systemd-timesync” returned the error code 1. Completing.
dpkg: systemd package processing error (–configure):
the subprocess installed post-installation script returned the error code 1
Errors occurred while processing:
systemd
E: Sub-process / usr / bin / dpkg returned an error code (1)
————————————————
!! ERROR: Failed to upgrade some of the packages. Please review the error message, use APT to fix the situation and try again.
!! Exiting.
————————————————
apt-get: relocation error: /usr/lib/i386-linux-gnu/libapt-pkg.so.5.0: symbol _ZNKSt7__cxx1112basic_stringIcSt11char_traitsIcESaIcEE7compareERKS4_, version GLIBCXX_3.4.21 not defined in file libstdc ++. so.6 with link time reference
tiger @ asusik ~ $ mintupgrade upgrade
Traceback (most recent call last):
File “/ usr / bin / mintupgrade”, line 3, in
import sys, os, apt
File “/usr/lib/python3/dist-packages/apt/__init__.py”, line 23, in
apt_pkg import
ImportError: /usr/lib/i386-linux-gnu/libapt-pkg.so.5.0: symbol _ZNKSt7__cxx1112basic_stringIcSt11char_traitsIcESaIcEE7compareERKS4_, version GLIBCXX_3.4.21 not defined in file libstdc ++. So.6 with link time reference
So, instead of beauty and simple guide, upgrade process fail.
Bad. Very bad.
@tiger
So bad, hope you backep up your files before performing the upgrade. Try to find out more why the upgrade failed, from the Linux Mint forum.
It does not work but is it an error in your lines to install mintupgrade rather than mintupdate?
sudo apt install mintupgrade
gives: E: Unable to locate package mintupgrade
@Marc
Note that the upgrade tool only upgrades Linux Mint 17.3 Cinnamon, MATE or Xfce edition. In case you are running Linux Mint 17, 17.1 or 17.2, you first need to upgrade to Linux Mint 17.3 using the Update Manager.
For more information, go to: https://forums.linuxmint.com/viewtopic.php?t=234823
Wish I had never upgraded. Wake-up from Suspend no longer works on fairly recent hardware. Yes, I tried updating the kernel and driver’s. Nothing helps. Disappointing.
@Frustrated
Sure, sometimes upgrades do not go well as normally expected. You can try contacting the Linux Mint developers for help or try the users forum: https://forums.linuxmint.com/
Will this work with Mint with the Mate desktop? I realize I may have to switch it back to Mate from Cinnamon after the upgrade – not ideal, but OK.
@Bob
When you look at the requirements, it lists Linux Mint 17.3 Cinnamon or MATE editions only. So this method should definitely work for Mate desktop.
Thanks for this. Just upgraded two computers from Linux Mint 17.1 to 18.3. Took awhile, but both were clean upgrades.
@PC
Am glad to know about this, many thanks for writing back to us.
can a direct upgrade from 17.3 cinnamon to mint 18.3 be made ?
Hi Donald,
If you have partitioned the disk as given in my earlier post, then you can upgrade from any version to any version. However, you will need to re-install your additional software and setup. But you need to do this from an installation medium, not as a system upgrade automatically.
Best of luck with this, and do post about your experience.
In case you haven’t made a separate system partition, then it is worth the effort setting it up in this manner to make it as future proof as possible.
@donald
Yes, you can directly upgrade from 17.3 cinnamon to mint 18.x.
Hi Aaron,
Thanks for your tutorial. It seems to have worked for most of those who have posted.
While looking for a way to upgrade from 17.3 to 18.1, but all posts in various blogs and sites point to the advantages of a clean install. Hence I wanted to share my experience with this, because the way I have set up the system, means for me, a clean install is not a big problem – the only issue is that I need to download the additional software once again (Virtualbox, Google Chrome / Earth etc).
Perhaps there are lots of posts elsewhere, and I’m repeating what is given elsewhere, but here is what I did. Mine is a Windows 10 Machine, and I dual-boot it. Having been doing this for the last eight or nine years, without any problems
Here are the steps I used.
1. Shrink the C drive to 100 or 125 GB – This will be Windows system and software only partition.
2. Create a D drive of say 100 GB – NTFS format for Windows use.
3. Create a 30 GB partition – quick-format to fat32 (fat 32 makes it easy to identify) ( ROOT Partition
\)4. Create a SWAP of twice the RAM
5. The rest of the disk went to the home partition – quick-format to fat32.( HOME partition
\home)6. While booting up and installing from the Mint (or Ubuntu) CD, I used the option of “Something else” when setting up the partitions.
7. Use the 30 GB partition as
"\"that is, root. Check the box that says format. Format to EXT48. Use the “twice the RAM” partition as ” swap area” . There is no box that says format.
9. Use the rest of the partition designated as home that is
"\home"Check the box that says format. Format to EXT410. Now continue the Install process with the usual options like username, password etc.
Voila!! you have a wonderfully setup computer. There is no mixing up of any of the OS-es on the hard disk, and The biggest advantage I had was the possibility of a clean install and upgrade at any time. In fact, I did this to change over from Ubuntu 12.10 to Linux Mint at the time. Simply didn’t want Unity
Now whenever I want to upgrade or change the distro, All I got to do is (a) Repeat the step Nos 7 and 8 above, including the option to format. The MOST important thing here is NOT to check the box to format the \home partition, but to USE as \home.
Make sure that you give the same (existing) username and password. Once again, make sure that the checkbox to format this partition is NOT checked.
I have done this quite a few times for friends and family. The Mozilla bookmarks, add-ons, history, everything stays intact. Even the desktop shortcuts and the background do not change.
In fact, just to try it out, I once changed from Ubuntu to Fedora, and had absolutely not problems with any of the files. After a bit, I settled in to Linux Mint in the same manner.
Of course, the biggest disclaimer / caution as always – Please backup your data, just in case something does indeed go wrong.
If you are planning to the entire disk to install Linux (that is, without Windows, no dual boot) even then, you should follow steps no 6, 7, 8 and 9. Since there is no Windows partition to worry about, the partitioning can be just three partitions – Root (30GB) Swap (twice the RAM) and Home.. This way, when you upgrade / change the distro whatever, you need to only format the ” \ ” (root) partition, and keep the username the same.
Hope someone finds this useful.
@Yash
This is wonderful and well explained, many thanks for sharing this. We also hope someone finds it useful.
Thanks for your words of appreciation, Aaron. I have taken a few screenshots of the process, I’m not sure how to insert these into the post. Will be happy to share them with you if you can put them up sequentially.
Regards
@Yash
We would so much appreciate that, but unfortunately screen shots can not be added in the comments here. Thanks for writing back.
This looks really simple to follow but being a little bit cautious (and not massively knowledgeable about Linux in general), will an upgrade work for me as I’m using LM 17.3 dual booting with Windows 10, will Grub etc… be ok with this?
Also, I’m using the KDE desktop, will the upgrade automatically give me the 18 KDE desktop?
sorry if questions are a bit Donkey!
thanks in advance
@ade
It will work, however, make sure you perform a backup before upgrading.
Thanks Aaron for the reassurance, already backed up to my NAS using “REDO Recovery and Backup“, will give it a go later and report back, got 2 dual boot pcs and 1 USB to do so should be interesting :-)
that went well then, got as far as “mintupgrade check“, I get “ERROR: Your edition of Linux Mint is ‘KDE’. It cannot be upgraded to Linux Mint 18 ‘Sarah’ – I guess that’s the end of that then?
@ade
This guide is intended for Linux Mint 18 ‘Sarah’ – Cinnamon(default desktop environment). The KDE edition isn’t upgradable (Linux Mint 18 KDE uses a new and different desktop called Plasma).
Try to fresh install Linux Mint 18 KDE.
thanks Aaron, I like Linux Mint when it’s all up and running but cannot believe how hard even the simplest task seems to be!
Apparently, even if you get Linux Mint 18 on a bootable USB, you’re still restricted to only 4GB persistence, why/who on earth thinks this stuff up? think it’s time to look for a far less restrictive distro, thanks anyway
thanks for your help with this Aaron but decided to bite the bullet and install Ubuntu 18.04 and really like!
Thank you so much. Much easier to follow than the official instructions.
@Amit
Ooh, really, many thanks for the kind words of appreciation and following us.
Me too. Perfect tutorial/process.
Dell Mini 9 still chugging a long. (Like molasses in winter, but still working fine)
@Jason
Thanks for the feedback.
From 17/3 to 18 with no problems.
Thank You
:)
@youandtag
Welcome, thanks for following us.
Did upgrade 17/3 to 18/1 without problems. Thanks for easy to follow instruction / I as an 77+ years old was able to install upgrade,
@Armin
Welcome, that is so wonderful and above all, many thanks for following us.
it works. thank you very much
@MelisaFilm
Welcome, and thanks for the feedback.
I’m not sure I’m an a$$. You said, “It helps to you to asses …”. It is unclear whether you tried to say, “It helps you asses …”, or whether you meant to say, “It helps you to assess …”
Rgds,
Thank you for taking the time to put together a bullet proof upgrade path. I have a few machines and it has been a very pleasant experience and the best part is it just works!
Thanks again!
Thank you, it was a long process but it works.
nice article
small typo at step 6
Command: mintuprade upgrade should be : mintupgrade upgrade
@Raf,
Thanks for findings, corrected the command in the article..
Thanks.
You don’t use ‘sudo’ with ‘mintupgrade’, the instructions are wrong in this regard. Just drop ‘sudo’ and you’ll be fine.
@twoteatothirtytwo
Thanks for the helpful and quick feedback.
stuck at 5th step. asking ‘”Please don’t run this command as root or with elevated privileges’.
@Maddy
Run the mintupgrade command without including sudo, that should help solve the problem.
When I run the command
$ sudo mintupgradedownload the terminal sends me “please don’t run this command as root or with elevated privileges.” Who can I fix this problem? I opened and closed the terminal, but I still have the same problem.@Daniel
Just run mintupgrade without sudo, it should solve the problem.
Nice tutorial.. work 100%
@Rofi
Good to know that it worked for you. Thanks for the feedback.
Just one typo to start it, several people didn’t notice and getting file not found since they copy and pasted it. I’ll pass it along to them.
$ sudo mintuprade upgrade
@Nick
The original instructions provided by Linux Mint developers actually have no sudo command, we simply added it as a usual thing to do. However, thanks for pointing it out.
So how about editing your error in spelling? “mintuprade” ? Its been some time and that’s still showing. But anyways thanks for your tutorial, it helped a lot.
@Rob,
We’ve corrected in the article and remove sudo in the beginning of mintuprade command, could you clear your browser cache and see updated one..
If I do the upgrade if the data in my previous Linux to be lost or deleted..
@Hudza,
Upgrading doesn’t loose or delete any data, but its mandatory to take any important data before doing a upgrade, just for a safety measure..
@hudz
You may not loose data during an upgrade, however, performing a backup of vital data is recommended before doing any upgrade, you never know how your system may be altered and whether the upgrade will go successfully.
Thanks Aaron, I’ve tried and successful
@Dimas
Welcome, delighted to know that your upgrade process worked after following this guide. Many thanks for getting back to us.
Thank you Aaron, this worked great for me. As noted, I had to remove “sudo” from the last couple of commands (it complained, but clearly said it should be run without sudo, so that’s what I did) but other than that it ran very smoothly.
Probably took about half an hour in my VM, thanks again!
@Luke
Welcome, and above all, thanks for your kind words of appreciation and the positive feedback about your experience.
Didn’t work for me.
I tried on a clone of my laptop, failed at a step complaining about virtualbox retried, followed new instructions then I had to reboot at some point and doesn’t reboot, followed instructions about dpkg, never finish. May laptop has been updated from 15 to 16 to 17 during years, probably I will have stay with 17.3 for an year or so before doing a full reinstall.
Any way, best advice, before doing it, do a disk clone ant try it on the clone first, it will save you time and frustration. All you need is a bigger HD Assume sda is original hd and sdb will be the clone:
dd if=/dev/sda of=/dev/sdb bs=100M conv=notrunc
@JB68
Thanks so much for the feedback and your vital advice.
It should be pointed out that the correct command at step no.4 should not be
$ sudo mintupgrade check
but simply
$ mintupgrade check
@bin bash
Thanks for the feedback, you are absolutely correct there. We shall correct that in the write up.
@Bin,
Yes, you were correct it should be without sudo, as suggested corrected in the writeup..
Thank you.
I used a clean installation. And use aptik… really work perfectly for my ubuntu 14 to 16 and now for mint 17.3 to 18. Aptik is a worderfull tools for backup applications, settings and tuned distribution
@Bernard Puga
Many thanks for sharing this info with us. I know many users have learnt from your experience and will probably use aptik in the future.
Before I used Mint I did an upgrade and after I was unable to boot up. I want to do a back up of my home directory but am unsure on how to proceed. Is there any guide to do a back-up and clean install and then restore user data?
I am a newbie with Linux.
@Philip Sheedy
You can use the Aptik tool as mentioned by @Bernard Puga above. There are also several other tools you can use for backup. But here are some guides that would be a good starting point:
https://www.tecmint.com/redo-backup-and-recovery-tool-to-backup-and-restore-linux-systems/
https://www.tecmint.com/aptik-a-tool-to-backuprestore-your-favourite-ppas-and-apps-in-ubuntu/
Dear dgr-Crenshaw & Aaron, thanks for the inputs. I thought something was wrong with my system!
I too want to know from dgr-Crenshaw, how was the installation via upgrade?
@Jamini
I also had the same feeling, but not until i rebooted my system and was able to see the Linux Mint desktop and do a few check ups. That was when i knew that my upgrade was actually successful.
But above all, thanks for the feedback.
The
mintupgradecommand kept yelling at me not tosudountil I got to the final step@dgr-Crenshaw
Actually, that is what i also encountered, but the sudo command was used simply because this was an administrative task as usual. But when you run it without with sudo, it stilll will ask you for a password.
But thanks for getting back to us and importantly, how did your upgrade process go?
The process went smoothly. It took a while and the last step required a lot of “yes” responses but when it was done, it was done. Didn’t even require a restart. Kudos to Clem and team for such a great distro and to you for the clear and accurate guide.
@dgr-Crenshaw
Many thanks once again, i happened to encounter the same required “yes” responses.
The process took a while — lots and lots of required “yes” responses but went smooth as silk. Kudos to Clem and team for such a great distro and upgrade tool. And kudos to you for this complete and accurate article.