In this article, we will see how to set up remote development in visual studio code via the remote-ssh plugin. For developers, it is indeed an important task to choose proper IDE/IDLE editors with batteries included.
Vscode is one of such tools that comes with a nice set of packages that makes our life easy and improves the productivity of the developers. If you have not yet configured vscode take a look at our VScode installation article on setting up vscode in Linux.
For testing purposes, my Visual Studio Code is running on Linux Mint 20 and I am trying to connect with CentOS 7 running on my VirtualBox.
Install Remote-SSH in VSCode Editor
Go to the package manager and search for the “Remote SSH” package, which is owned by Microsoft. Click the Install icon to install the package.
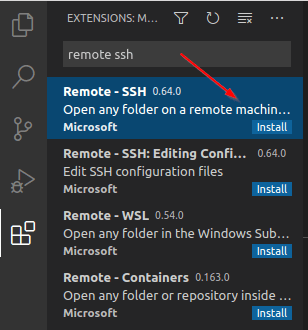
An additional package, “Remote-SSH Edit config” will be automatically installed along with this package.

Look at the bottom to the left where you will have a remote-status bar. Using this bar you can open frequently used remote ssh options.
Configure SSH Connection in VSCode Editor
There are two ways we can configure our SSH connectivity.
- Password-based authentication.
- SSH key-based authentication.
It is recommended to use SSH key-based authentication as it is more secure and removes the overhead of typing passwords all the time. Press F1 or CTRL+SHIFT+P and type remote-ssh. It will show a list of all options. Go ahead and select Add New SSH Host.
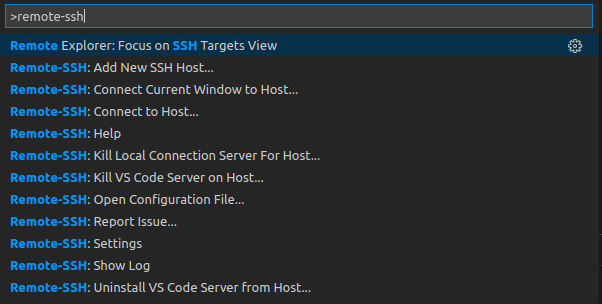
Now it will prompt you to enter the SSH connection string as you do it in the Linux terminal.
ssh user-name@ip/fqdn

In the next step, you will be prompted with the configuration file location where you want to store connection information. select the location which suits you and press enter.

It is recommended to create a custom configuration file by choosing “settings” and enter the custom file location. You can also add the “remote.SSH.configFile” parameter to the settings.json file and update the custom configuration location.
{
    "remote.SSH.configFile": "path-to-file"
}
Below are the parameters stored in the config file as part of the previous steps. You can go ahead and configure this file straight away instead of doing it through vscode.
Host xxx.com
    User USERNAME
    HostName FQDN/IP
    IdentityFile "SSH KEY LOCATION"
Connect to Remote SSH Server via Password in VSCode
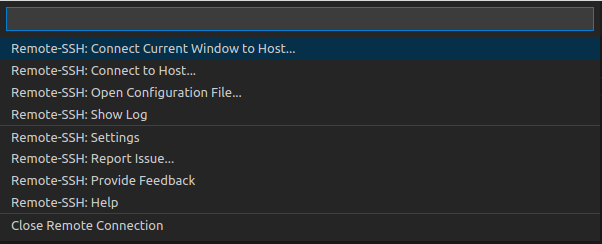
Now let’s connect to the remote host by hitting F1 or CTRL + SHIFT + P –> REMOTE-SSH –> CONNECT TO HOST –> CHOOSE HOST IP.
It will now prompt you to verify fingerprint since this is the first time connecting with a remote machine.

Once you press “Continue” it will now ask you to enter a password. Once you enter the password it will successfully connect to the remote SSH machine.

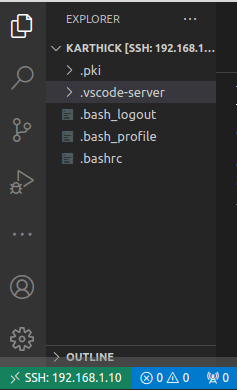
Now vscode is connected to a remote machine.
Set Up SSH Key Based Authentication on VSCode
To enable SSH key-based authentication, generate ssh public and private key pairs using the below command.
ssh-keygen -t rsa -b 4096
ssh-copy-id -i ~/.ssh/id_rsa.pub username@host
Now login to the host manually to see if key-based authentication works fine. Open your VScode remote SSH configuration file and add the below parameter. This parameter identifies your private key file and tells vscode to use key-based authentication instead of password-based authentication.
IdentityFile ~/ssh/id_rsa
Vscode supports autosuggestion for the configuration files. Check the below image, when I type am typing “IdentifyFile” vscode automatically suggests me the parameter.
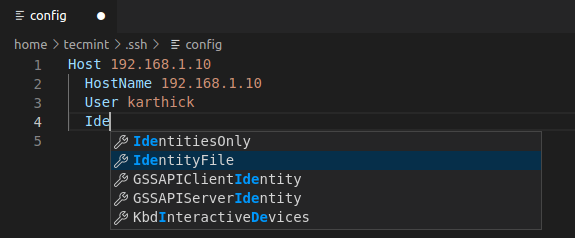
Once again connect with your host by following the same procedure as we did in previous steps. This time you will not be prompted for a password. If you have any problem in establishing a remote connection you can check the logs.
To open logs, Press F1 or CTRL + SHIFT + P –> REMOTE-SSH –> Show Log.

To close the active connection choose “close remote connection” by hittings F1 or CTRL + SHIFT + P –> REMOTE-SSH –> Close Remote Connection or simply close vscode which will disconnect the session.
That’s it for this article. If there is any valuable feedback kindly share it in the comment section. Your feedback is what is driving us on a path to deliver better content to our readers.

