Brief: In this guide, we will discuss some of the practical examples of the egrep command. After following this guide, users will be able to perform text searching more efficiently in Linux.
Have you ever been frustrated because you are unable to find the required information in the logs? Extracting the required information from a large data set is a complex and time-consuming task.
Things become really challenging if the operating system doesn’t provide the right tools and here comes Linux to rescue you. Linux provides various text-filtering utilities such as awk, sed, cut, etc.
However, egrep is one of the most powerful and commonly used utilities for text processing in Linux, and we going to discuss some examples of the egrep command.
The egrep command in Linux is recognized by the family of the grep command, which is used for searching and matching a particular pattern in files. It works similarly to grep -E (grep Extended regex), but it mostly searches a particular file or even lines to line or prints the line in the given file.
The syntax of the egrep command is as follows:
$ egrep [OPTIONS] PATTERNS [FILES]
Let’s create a sample text file with the following contents to use an example:
$ cat sample.txt

Here, we can see that the text file is ready. Now let’s discuss a few common examples that can be used on a daily basis.
1. How to Find a Pattern in a Single File
Let’s start with a simple pattern-matching example, where we can use the below command to search for a string professional in a sample.txt file:
$ egrep professionals sample.txt

Here, we can see that the command prints the line which contains the specified pattern.
2. How to Highlight Matched Patterns in File
We can make the output more informative by highlighting the matched pattern. To achieve this, we can use the --color option of the egrep command. For example, the below command will highlight the text professionals in red color:
$ egrep --color=auto professionals sample.txt

Here, we can see that the same output is more informative as compared to the previous one. Also, we can easily identify that the word professionals is repeated two times.
On most Linux systems the above setting is enabled by default using the following alias:
$ alias egrep='egrep –color=auto'
3. How to Find a Pattern in Multiple Files
The egrep command accepts multiple files as an argument, which allows us to search for a particular pattern in multiple files. Let’s understand this with an example.
First, create a copy of the sample.txt file:
$ cp sample.txt sample-copy.txt
Now, search the pattern professionals in both files:
$ egrep professionals sample.txt sample-copy.txt

In the above example, we can see the file name in the output, which represents the matched line from that file.
4. How to Count Matching Lines in File
Sometimes we just need to find out whether or not the pattern is present in the file. If yes then in how many lines its present? In such cases, we can use the -c option of the command.
For example, the below command will show 1 as an output because the word professionals is present in only one line.
$ egrep -c professionals sample.txt

1
5. How to Print Only Matched Lines in File
In the previous example, we saw that the -c option doesn’t count the number of occurrences of the pattern. For example, the word professionals appears two times in the same line but the -c option treats it as a single match only.
In such cases, we can use the -o option of the command to print the matched pattern only. For example, the below command will show the word professionals on two separate lines:
$ egrep -o professionals sample.txt
Now, let’s count the lines using the wc command:
$ egrep -o professionals sample.txt | wc -l

In the above example, we have used the combination of egrep and wc commands to count the number of occurrences of the particular pattern.
6. How to Find a Pattern by Ignoring Case
By default, egrep performs pattern matching in a case-sensitive way. It means words – we, We, wE, and WE are treated as different words. However, we can enforce the case-insensitive search using the -i option.
For example, in the below command pattern match will succeed for the text we and We:
$ egrep -i we sample.txt

7. How to Exclude Partially Matched Patterns
In the previous example, we saw that the egrep command performs a partial match. For example, when we searched for the text we then pattern matching succeeded for other texts as well. Such as web, website, and were.
To overcome this limitation, we can the -w option, which enforces the whole word matching.
$ egrep -w we sample.txt

8. How to Invert Pattern Matching in File
So far, we used the egrep command to print the lines in which the given pattern is present. However, sometimes we want to perform the operation in an opposite way.
For example, we may want to print the lines in which the given pattern is not present. We can achieve this with the help of the -v option:
$ egrep -v we sample.txt

Here, we can see that the command prints all the line which doesn’t contain the text we.
9. How to Find the Line Number of the Pattern
We can use the -n option of the command to enable line numbering, which shows the line number in the output when pattern matching succeeds. This simple trick makes the output more meaningful.
$ egrep -n professionals sample.txt

In the above output, we can see that the word professionals is present in the 5th line.
10. How to Perform Pattern Matching in Quiet Mode
In quiet mode, the egrep command doesn’t print the matched pattern. So we have to use the return value of the command to identify whether or not pattern matching succeeded.
We can use the -q option of the command to enable the quiet mode, which comes in handy while writing shell scripts.
$ egrep -q professionals sample.txt
$ egrep -q non-existing-pattern sample.txt

In this example, the zero return value indicates the presence of the pattern whereas the non-zero value indicates the absence of the pattern.
11. How to Display Lines Before the Pattern Match
Sometimes, it makes sense to show a few lines around the matched pattern. For such scenarios, we can use the -B option of the command, which displays N lines before the matched pattern.
For example, the below command will print the line for which the pattern match succeeds as well as 2 lines before it.
$ egrep -B 2 -n professionals sample.txt

In this example, we have used the -n option to display line numbers.
12. How to Display Lines After the Pattern Match
In a similar way, we can use the -A option of the command to display lines after the pattern match. For example, the below command will print the line for which the pattern match succeeds as well as the next 2 lines.
$ egrep -A 2 -n professionals sample.txt

13. How to Display Lines Around the Pattern Match
In addition to this, the egrep command supports the -C option which combines the functionality of the options -A and -B, which displays the lines before and after the matched pattern.
$ egrep -C 2 -n professionals sample.txt

14. How to Find a Pattern in Multiple Files Recursively
As discussed previously, we can perform pattern matching on multiple files. However, the situation becomes tricky when files are present under multiple sub-directories and we pass all of them as command arguments.
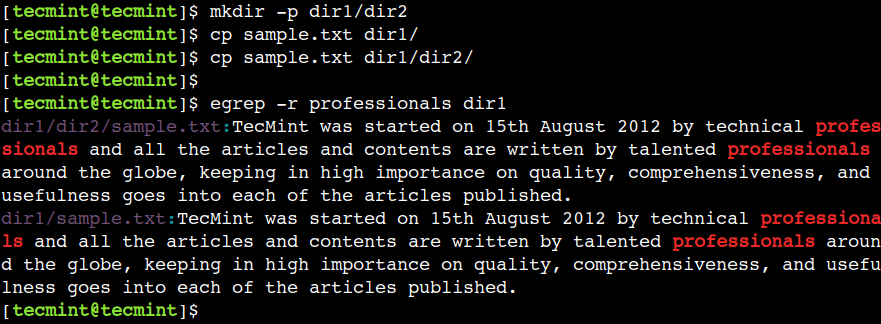
In such cases, we can perform pattern matching in a recursive way using the -r option as shown in the following example.
First, create 2 sub-directories and copy the sample.txt file into them:
$ mkdir -p dir1/dir2
$ cp sample.txt dir1/
$ cp sample.txt dir1/dir2/
Now, let’s perform the search operation in a recursive way:
$ egrep -r professionals dir1

In the above example, we can see that the pattern match succeeded for the dir1/dir2/sample.txt and dir1/sample.txt files.
15. How to Match a Single Character Using Regular Expressions
We can use a dot (.) character to match any single character except for the end of the line. For example, the below regular expression matches the text har, hat, and has:
$ egrep "ha." sample.txt

16. How to Match Zero or More Occurrences of Character
We can use the asterisk (*) to match zero or more occurrences of the previous character. For example, the below regular expression matches text which contains a string we followed by zero or more occurrences of the character b.
$ egrep "web*" sample.txt

17. How to Match One or More Occurrences of the Previous Character
We can use the plus (+) to match one or more occurrences of the previous character. For example, the below regular expression matches the text which contains the string we followed by at least one occurrence of the character b.
$ egrep "web+" sample.txt

Here, we can see that pattern matching doesn’t succeed for the words – we and were, due absence of the character b.
18. How to Match the Start of the Line
We can use the caret (^) to represent the start of the line. For example, the below regular expression prints the lines that start with the text We:
$ egrep "^We" sample.txt

19. How to Match the End of the Line
We can use the dollar ($) to represent the end of the line. For example, the below regular expression prints the lines that end with the text e.:
$ egrep "e.$" sample.txt

20. How to Remove Empty Lines in File
We can use the caret (^) immediately followed by the dollar ($) to represent the empty line. Let’s use this in a regular expression to remove empty lines:
$ egrep -n -v "^$" sample.txt

In the above output, we can see that line numbers 2, 4, 6, 8, and 10 are not displayed as they are empty.
Conclusion
In this article, we discussed some useful examples of the egrep commands. One can use these examples in day-to-day life to improve productivity.
Do you know of any other best example of the egrep command in Linux? Let us know your views in the comments below.


Your use of lines longer than the screen width in the sample.txt file is confusing.
“The below command will highlight the text professionals in red color:
$ egrep –color=auto professionals sample.txt”
That command WILL NOT highlight the matched pattern in RED. It will highlight the color that the variable “color” is set to which may or may not be RED.
In Example #14, shouldn’t you specify each directory or use a wild card? As written, the command will match the pattern only in the dir1 file(s).
@dragonmouth,
By default, the command uses red color for highlighting. However, we can control the behavior using the
GREP_COLORenvironment variables. For example, to use the yellow color, we can assign value 33 to theGREP_COLORenvironment variable:$ export GREP_COLOR=33
Please refer to https://www.tecmint.com/customize-bash-colors-terminal-prompt-linux/ to know more about colors in bash.
In example 14, the pattern match will succeed for all the files that are present under the dir1 as well as its subdirectories. For example, in the output, we can see that the pattern match succeeded for the file dir1/dir2/sample.txt.