The first article in this XenServer 7 Series covered how to install/upgrade a single XenServer host. Most XenServer installs are likely to be in a pool of many XenServer hosts.
This article will cover the process of an entire XenServer pool upgrade. The final component will cover some house keeping with the guests running on the XenServer hosts.
System Requirements
- XenServer 7 ISO : XenServer-7.0.0-main.iso
Before moving further, I suggest you to check out these two sections System Requirements and Author Suggested Additions in our first article of Xen Server 7 at:
DISCLAIMER
The purpose of this article is to walk through a XenServer pool upgrade. There are number ways to do the upgrading process and the ‘correct’ solution for any specific install will be strongly dependent on the organization.
Citrix has a very detailed document that should be reviewed before the upgrade process is started: xenserver-7-0-installation-guide.pdf
XenServer Pool Upgrade
Undoubtedly most XenServer installs are likely part of a pool of XenServers. This complicates the upgrade process a little bit. While the option to manually go to each server and upgrade each one is an option, Citrix has a much easier way to do this through the use of a Rolling Pool upgrade through the newest version of XenCenter or through the 'xe' command line tool.
According to Citrix’s documentation a pool upgrade can be performed on any version of XenServer 6.x or higher to version 7. If a XenServer host is running a version older than 6.x, then the host needs to follow the appropriate upgrade path to XenServer 6.2 and then can be upgraded to XenServer 7.0.
In order to do the Rolling Pool upgrade, the newest version of XenCenter needs to be downloaded from Citrix. The download can be located here: XenServer-7.0.1-XenCenterSetup.exe
As mentioned in the XenServer 6.5 series, XenCenter is still a Windows only utility. The pool upgrade can be done via the CLI as well for those who may not have access to a Windows machine to run XenCenter.
This article will detail out both methods (XenCenter and CLI with the xe utility).
NOTE – Before doing a pool upgrade, two things should be noted. The rolling pool upgrade should not be done with boot from SAN setups and Integrated StorageLink has been removed from XenServer versions 6.5 and higher.
Regardless of which method is used, XenCenter or CLI, the first step is to disable pool high availability, stop all non-essential guest virtual machines, ensure that XenServer hosts have enough memory to support the guests that need to continue running during the upgrade (ie. not over-provisioned), hosts also need enough hard drive space for XenServer 7, ensure that the cd/dvd drives for all guests are empty, and it is strongly encouraged that a backup of the current pool state be done.
Let’s begin the process.
Pool Upgrade from the CLI
1. Make sure that you have read the prior 5 paragraphs as they outline some very important information to the upgrade process! It is also highly recommended that users read the installation guide located here: xenserver-7-0-installation-guide.pdf, The instructions and warnings for upgrading start on page 24.
2. The actual first technological step is to back up the pool status with the 'xe' tool. Using a SSH connection to the Xen pool master host, the following ‘xe’ command can be run.
# xe pool-dump-database file-name="Xen Pool.db"
With the database backed up copy the file off the master host to ensure a copy is available in the event that the upgrade fails. The following command will copy the file Xen Pool.db from the remote XenServer identified by <XenServer_ip> and place the file in the current user’s Downloads folder.
# scp 'root@<XenServer_ip>:~/”Xen pool.db”' ~/Downloads/
3. Once the pool database has been backed up, the master needs to have all guests migrated to other hosts in the pool and then the master needs to be disabled with the following ‘xe’ commands:
# xe host-evacuate host=<hostname of master>
# xe host-disable host=<hostname of master>
Now the host needs to be rebooted from the XenServer 7 installation media locally. At this point the upgrade follows many of the same parts as single host upgrade earlier in this article.
Make absolutely certain that UPGRADE is chosen when moving through the installer steps! For clarity’s sake, at this point, steps 1-6 and then 15-19 in the “XenServer 7 – Fresh Install” article should be accomplished at this stage.
The installation process takes about 12 minutes so navigate to https://www.tecmint.com to read another article while waiting for the install to finish. Once the install is complete, reboot the master and remove the installation media.
4. As the master is rebooting make sure that it doesn’t display any errors and that it boots up to the XenServer console screen. This is a good indication of a successful upgrade but things aren’t done yet. SSH back into the master system and verify that it is indeed running the new version of XenServer with either of the following commands:
# cat /etc/redhat-release
# uname -a

5. Success! This pool master has now been upgraded. At this point, move any guests to this host as needed and proceed to the next XenServer host by repeating step three except replacing the hostname of the next host to upgrade.
# xe host-evacute host=<hostname of pool slave>
# xe host-disable host=<hostname of pool slave>
6. Continue steps 3 through 5 for the remaining slaves in the pool.
7. At this point it is CRUCIAL to apply one more update. Citrix released a patch to address issues were data loss and corruption were possible under certain circumstances.
PLEASE APPLY THIS PATCH NOW! This patch requires the XenServer hosts to be rebooted as well. Instructions for accomplishing this through XenCenter are located later in this article.
To accomplish this through the CLI of a XenServer host, download the patch and issue the following ‘xe’ commands:
# wget -c http://support.citrix.com/supportkc/filedownload?uri=/filedownload/CTX214305/XS70E004.zip
# unzip XS70E004.zip
# xe patch-upload file-name=XS70E004.xsupdate
# xe patch-apply uuid=<UUID_from_above_command>
# xe patch-pool-apply uuid=<UUID_from_above_command> - only applies to a XenServer pool and must be run from the pool master
8. Once all of the hosts in the pool have been updated, the guests will need to have XenServer Guest Tools updated. Steps to accomplish this are at the end of this article.
Pool Upgrade from XenCenter
For those who have access to a Windows machine to run XenCenter, a Rolling Pool upgrade can be accomplished through the XenCenter application.
The benefit of using XenCenter is many of the tasks and checks that needed to be done manually in the prior instructions, will now be handled automatically by XenCenter.
The rolling pool upgrade wizard in XenCenter has two modes; manual and automatic. In manual mode, the installer for XenServer 7 must be placed into each individual XenServer host at the time it is being upgraded (ie. a bootable usb or cd).
When using the automatic mode, the wizard will use files located on some sort of a network file share such as HTTP, NFS, or FTP server. To use this method, the installation files from the XenServer install iso must be unpacked on the appropriate networked file server and made accessible to the XenServer hosts.
This guide won’t detail out the process of setting up an HTTP server but it will walk through the process of extracting the ISO contents to allow for an automatic upgrade.
Extracting XenServer Install Files to HTTP Server
This section will assume that the user has a functioning HTTP server with a web root set to ‘/var/www/html‘. This section will also assume that the XenServer 7 iso file has been downloaded and resides in the web root folder.
The first step to setting up the install files for this article is to mount the iso, so the installer files can be placed into the webroot. The second step is to create a folder for the installer files and then copy the files into that folder.
All of the steps can be accomplished as follows:
# mount XenServer-7.0.0-main.iso /mnt
# mkdir /var/www/html/xenserver
# cp -a /mnt/. /var/www/html/xenserver
At this point, navigating to the server’s IP address and the xenserver folder, the installation materials should display in browser.
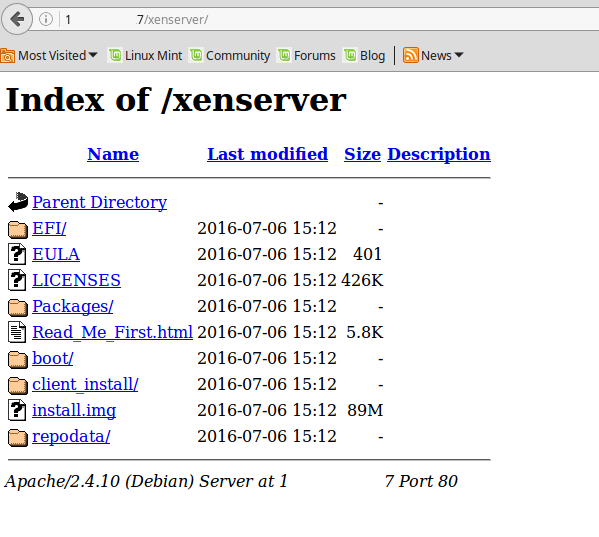
Rolling Pool Upgrade with XenCenter
1. The first step is to re-read the paragraphs underneath the XenServer Pool Upgrade heading earlier in this document! This is extremely important as those paragraphs will detail out specifics about the upgrade to help the transition from older versions of XenServer.
2. The first technological step is to back up the current state of the pool by using an ‘xe’ command from the pool master. Using a SSH connection or XenCenter console to the Xen pool master host, the following ‘xe’ command can be run.
# xe pool-dump-database file-name="Xen Pool.db"
With the database backed up, it is strongly suggested that a copy be made off of the master so in the event of a failed upgrade, the master/pool can be reverted back to the original state.
3. Ensure that the newest version of XenCenter is installed. The download link is as follows: XenServer-7.0.1-XenCenterSetup.exe.
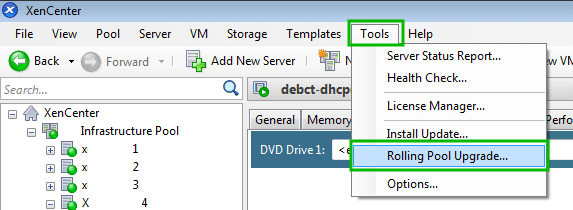
4. Once the pool database has been saved and the newest version of XenCenter installed, the pool upgrade can begin. Open up XenCenter and connect to the pool that needs the new version of XenServer. Once connected connected to the pool master, navigate to the ‘Tools’ menu and select ‘Rolling Pool Upgrade…’.
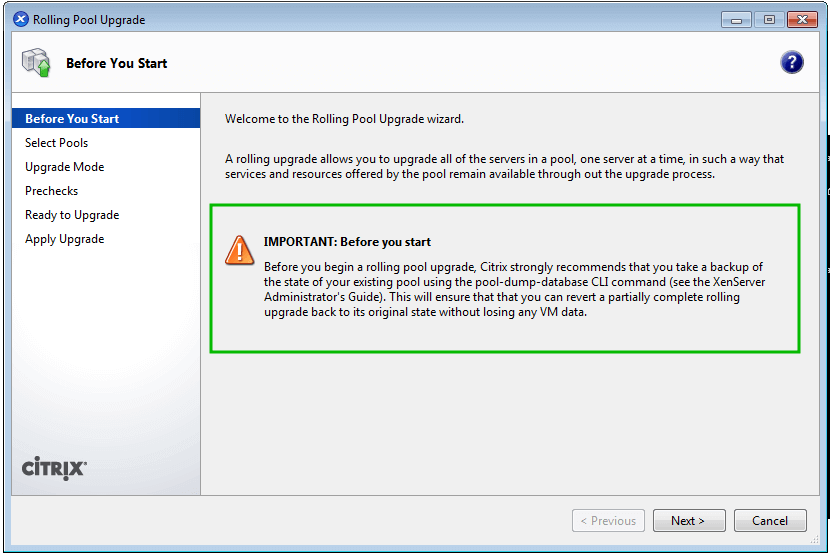
5. Be sure to read the warnings on the first prompt. The step that is mentioned here is the pool database back up that was accomplished in step one of the “Rolling Pool Upgrade with XenCenter” section of this article.
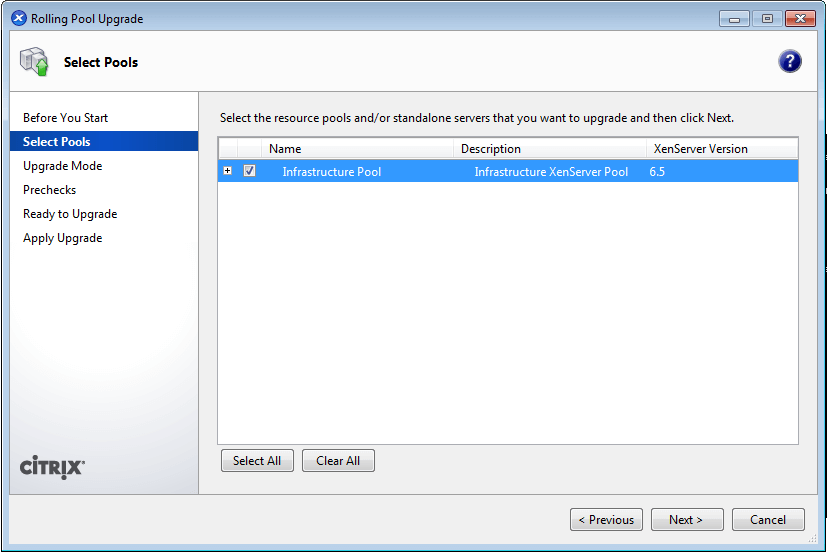
6. The next screen will prompt the user to select the pools that they wish to upgrade. Every pool that XenCenter is connected to can be selected. For simplicity’s sake, a small test pool has been used in this documentation.
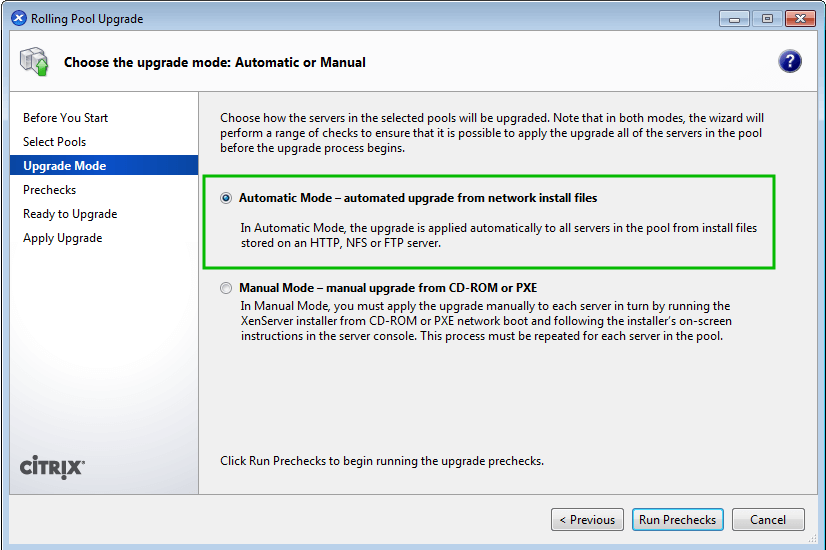
7. The next step allows the user to select either ‘Automatic‘ or ‘Manual‘ modes. Again this article is walking through the automatic method and assumes an HTTP server is available and has the XenServer ISO contents extracted in a folder called ‘xenserver’ on that HTTP server.
8. At this point XenCenter will run through a series of checks to ensure that all hosts have the appropriate patches/hotfixes and will check to ensure that the upgrade is likely to succeed.
Depending on the environment this is likely to be the step in which problems are experienced. Two issues were encountered but the author at this point. Resolutions were found and hopefully these will help others.
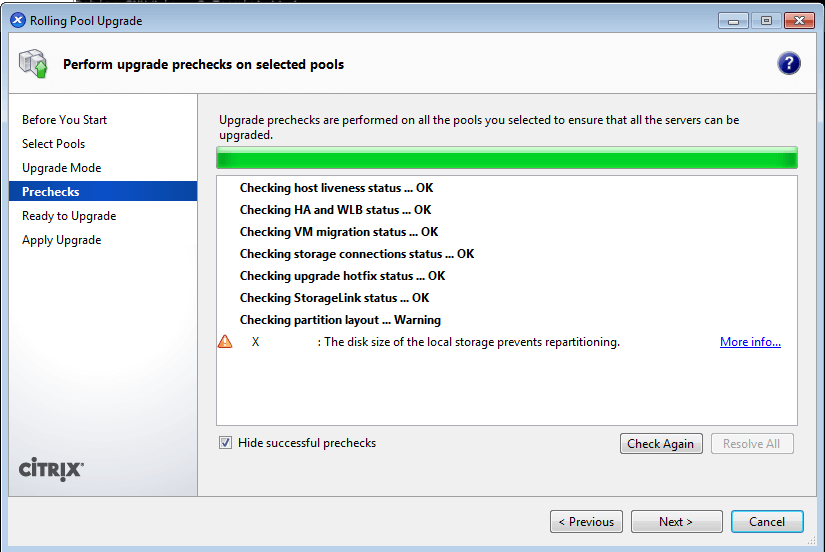
The first issue experienced was the need for two patches to be applied to the XenServer hosts. XenCenter will accomplish this if the user decides to do so however as the author and others have experienced, this step doesn’t always complete properly and may prevent the next step from working properly.
If XenCenter claims that all patches are applied but the user receives “Invalid URL to Installer Files” on the next screen, the author was able to successfully get the error to go away by rebooting the master XenServer.
To read more about the issue, view the Citrix discussion at the following URL: XenServer 7 Invalid URL to Installer Files.
The other issue experienced at this point was a warning from XenCenter about a local VM being stored on the master XenServer host. This local VM would prevent the XenServer installer from re-partitioning the hosts with the new GPT partition scheme.
After much searching, it was noticed that a pool meta data backup was being stored on the master host’s local storage. Once this was moved to another location, the installer ceased to see any issues.
9. Once the pre-checks were out of the way, the installer will prompt for the location of the installation files. This article is utilizing an HTTP server to serve out the installation files to the XenServer hosts and as such the installer needs to be informed about the location of these files.
In the boxes, provide the necessary server path information as well as the credentials necessary to connect and then press the ‘Test’ button to make sure XenCenter can access the files. If the green check mark is displayed, then the installation media has been located and is usable.
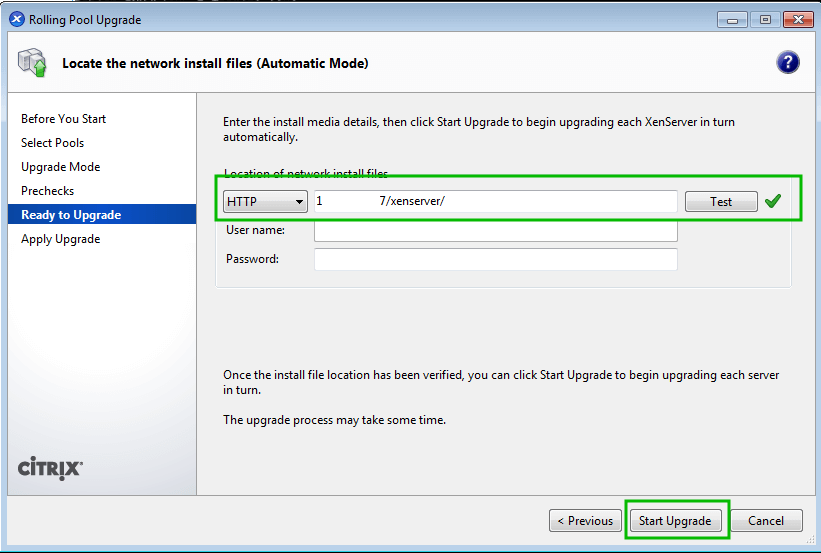
10. Once everything is ready to go, click the ‘Start Upgrade‘ button. This will begin the process starting with the pool master.
NOTE – Make sure that the management network for the XenServer hosts has DHCP. When the installer reboots the hosts, it will attempt to obtain an IP address via DHCP.
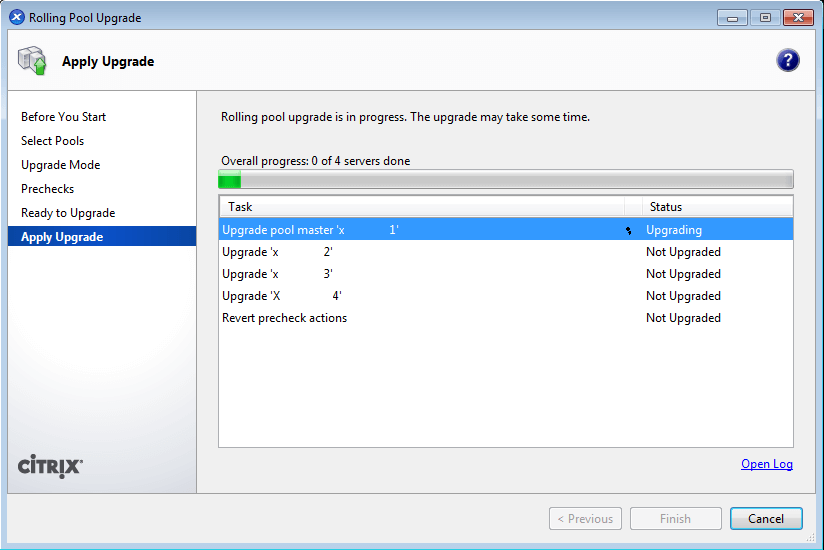
11. At this point, it would be wise to start eating lunch or follow up on other tasks. This process will take a while. If access to a local monitor or KVM system is available on the XenServer hosts, the administrator can watch the installation process and see if everything is moving along as it should.
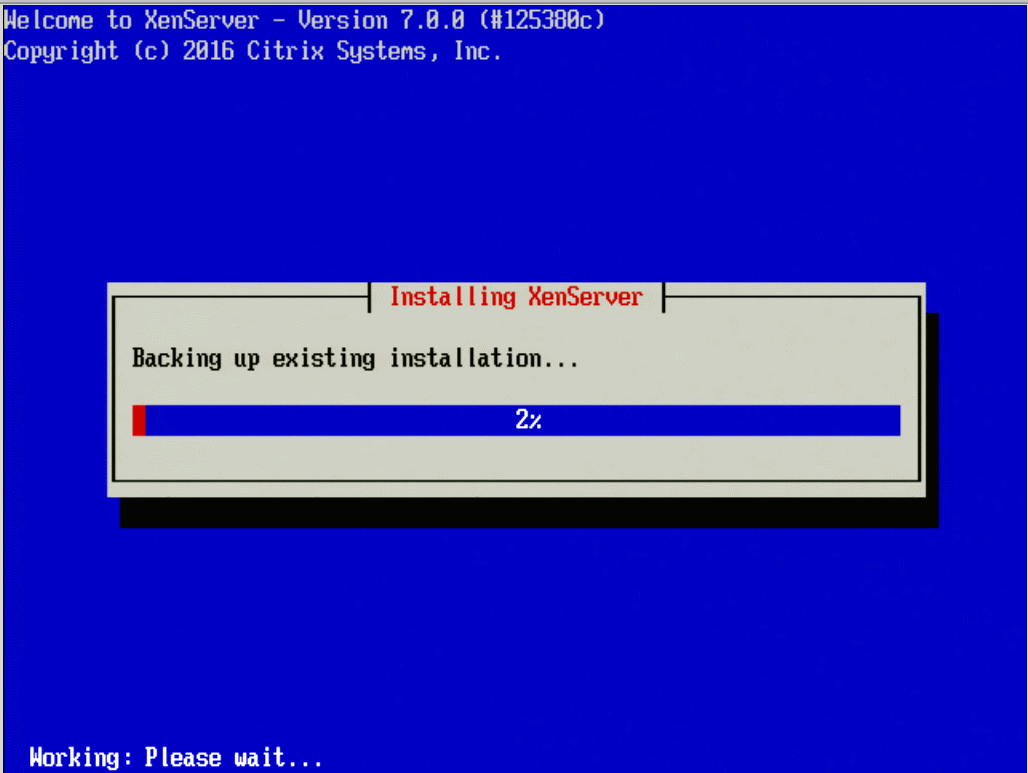
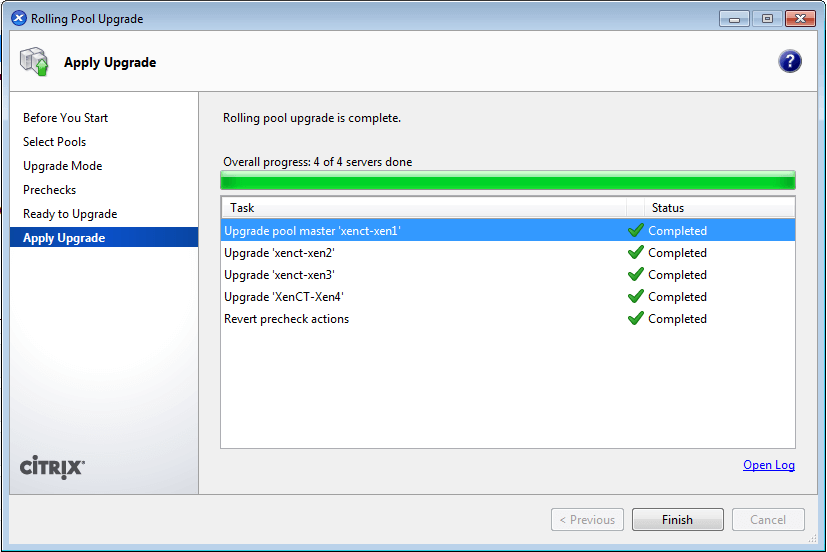
12. The installation process on this four host test cluster took approximately two hours to complete. Once the installation is complete, be sure to upgrade guest tools on all of the guests in the pool.
Also be sure to verify that the pool has been completely upgraded by looking at the pool’s ‘General‘ tab in XenCenter or by manually connecting to each XenServer host.

Some follow up tasks may be necessary at this point as well. The author experienced a few issues with the virtual interfaces on some of the guests when trying to start the guests after the pool upgrade.
As it turned out some of the network configurations for the pool didn’t translate through the install process. The servers all had 4 physical interfaces (PIFs) and on two of the servers one pair of the PIFs ceased to activate upon boot-up.
This caused a substantial amount of grief but thankfully other’s had experienced similar issues and a solution was easy to come by. The servers in question were Dell Power Edge 2950’s with integrated Broadcom BCM5708 NICs.
All that was needed was to revert the systems back to XenServer 6.5 and then apply the update from Dell’s website. The author strongly suggests ensuring that all firmware updates have been applied to any systems that will be upgraded to the newer XenServer release to help prevent issues.
To read more about this topic, please review the topic on Citrix’s discussion page: XenServer 7 Upgrade No Onboard Network.
The original issue before upgrading firmware on the BCM5708 NICs
Note the firmware version as well as the out of order PIF assignment.
# interface-rename -l

The corrected firmware and PIF re-assignment using interface-rename utility
Note the firmware has been updated and the PIF order is correct as well.
# interface-rename -l

13. At this point, all the XenServer hosts should be available and back in the proper pool configuration. At this point it is CRUCIAL to apply one more update. Citrix released a patch to address issues were data loss and corruption were possible under certain circumstances. PLEASE APPLY THIS PATCH NOW!
Applying XenServer 7 Critical Patch XS70E004
Just as required in the fresh install article, a pool upgrade is also going to require this critical XenServer 7 patch to be applied to the pool to ensure data integrity.
For applying patch follow step 20 to step 26 in fresh XenServer 7 this guide here: Applying XenServer 7 Critical Patch.
This concludes the process of updating/installing XenServer to hosts. At this point, storage repositories and virtual machines should be re-imported, configured, and tested.
The next section will cover the final task of updating XenServer guest tools on the virtual guests.
Updating XenServer Guest-Tools
1. The final follow up task is to ensure that guests can be restarted as well as ensure that they have the newest guest utilities installed. This can be easily accomplished by following the next couple of steps.
2. The first step is to attach the guest-tools ISO to the DVD drive of one of the virtual guests.

3. Once XenServer attaches the guest-tools.iso to the guest, ensure that the guest recognizes the new disk. This example will walk through a Debian guest and the installation of the tools.
In the output below, the guest utilities disk was mapped as ‘xvdd’.
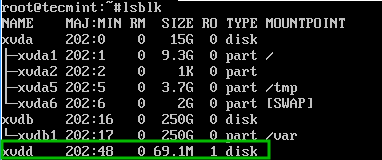
4. This device can be quickly mounted using the mount utility as follows:
# mount /dev/xvdd /mnt

5. Once the device has been mounted, dpkg can be used to install the new guest-tools as follows:
# dpkg -i /mnt/Linux/xe-guest-utilities_7.0.0-24_all.deb

6. During the installation, the proper files will be installed and the xe daemon will be restarted on the systems behalf.
To confirm through XenCenter that the update was successful, go to the ‘General‘ tab for the guest machine and look for the property labeled ‘Virtualization State:’.
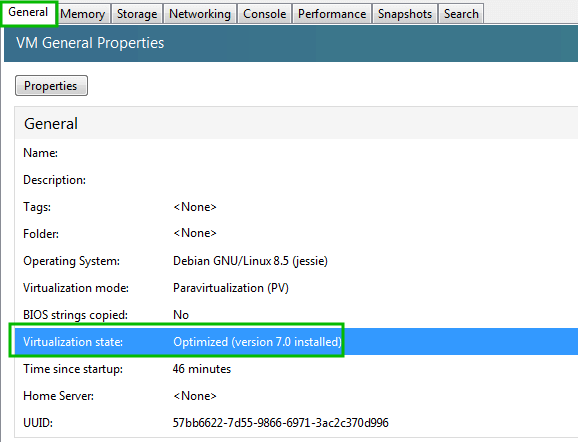
Whoo… If you’ve survived this long, hopefully XenServer 7 is installed, patched, and guests are updated as well! If you have any questions or issues, please post in the comments below and we’ll provide help as soon as possible.


Minor typo “xe host-evacute host=….” should read “xe host-evacuate host=“.
@Criggie,
Thanks for notifying, corrected in the article..
An easy way to install the firmware updates on the Dell servers is to download the firmware update bootable ISO from the following page. Saves you from having to revert back to Xen 6.5 :-)
http://www.dell.com/Support/Article/ca/en/cabsdt1/SLN296511