In the third part of this series, the configuration of networking in XenServer will be discussed. Networking in XenServer is often a little difficult to grasp at first but is actually quite simple. The first task before configuration is to step back and understand all of the new terminology used by XenServer in reference to networking.
Update: In May 2016, Citrix released the new version of the XenServer 7 platform. For installation follow: Fresh Installation of XenServer 7.

Read Also:
Installing and Configuring XenServer – Part 1
Installing XenServer Important Patches – Part 2
XenServer, as a virtualization platform, introduces virtual interfaces for the guests that have to be mapped to physical interfaces or networks on the actual physical network that the XenServer itself is connected. This mapping is what often leads to confusion. So let’s take a look at these new terms and how they allow guests to interact with the actual physical network that is connected to the XenServer.
XenServer introduces three new terms when it comes to networking. The first of which is generally the easiest to understand as it is simply a variant of the traditional Network Interface Card (NIC). In XenServer, the actual physical NICs of a system are often referenced as Physical Interfaces or its acronym of ‘PIF‘.
The second term that XenServer will use is what is known as a Virtual Interface or more commonly its acronym of ‘VIF‘. These Virtual Interfaces represent the Network Interface Cards that will be attached to the guests (virtual machines) running on the XenServer.
The third term that is often used when talking about XenServer networking is the Xen Bridge whose acronym will vary but typically will be represented as ‘xenbr0‘. These bridges are created at the time of the XenServer install and one is created per each PIF (Physical Interface) that is found during the installation. These bridges are used to allow VIF (Virtual Interfaces) to communicate through PIF (Physical Interfaces).
Now that the terminology is out of the way, there are some special caveats when working with virtual interfaces. Since the virtual interfaces will be used to connect guests to networks, it is important to understand what is needed from these interfaces. One caveat that will cause individuals lots of grief is when a guest needs connectivity to two real networks from a XenServer.
In order to accomplish this task the virtual machine (guest) will need to have 2 VIFs (virtual interfaces) connected to it so that each can be on the appropriate network. This will require some manipulation of the guest’s routing table as well to ensure that guests communicate out the proper interfaces.
Another caveat with virtual interfaces is that each one needs its own Media Access Control address or MAC address. XenServer can automatically assign a randomly generated MAC address or an administrator can manually assign them as well.
The last couple of paragraphs have greatly condensed a lot of the networking concepts within XenServer. Sometimes reading isn’t nearly as easy to comprehend as seeing drawings or actually configuring.
Below is a diagram that attempts to cover the concepts introduced before the actual configuration of XenServer networking.
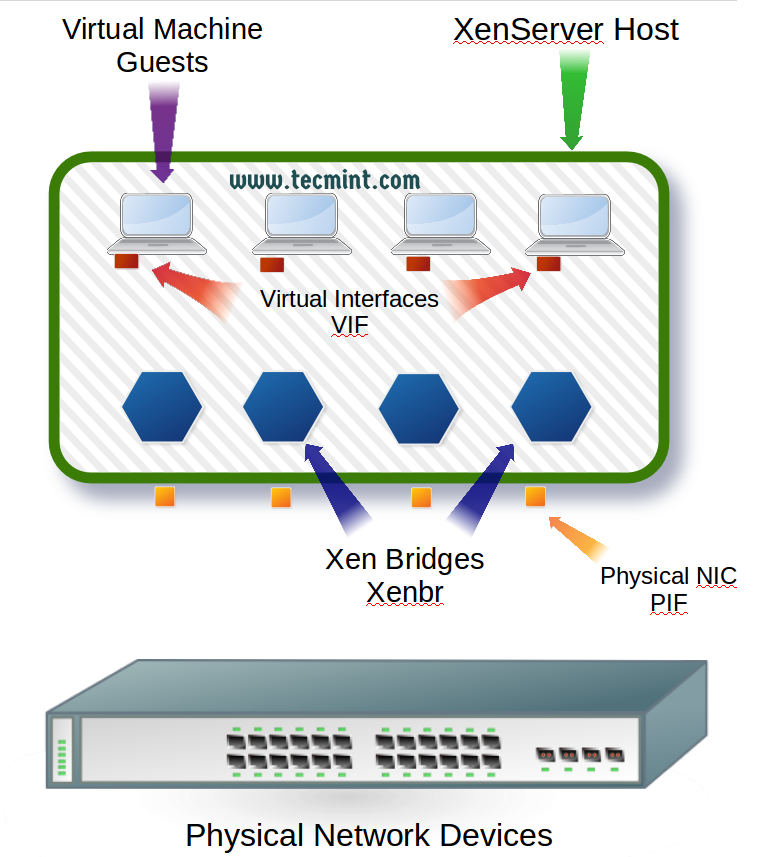
Figure 1 introduces the major terms involved in XenServer networking. Now that the terminology is out of the way, it is time to begin configuring the physical interfaces to allow the XenServer host and guests connectivity.
XenServer typically requires an interface for management traffic and an interface for guest traffic, however, this guide will be showing how to setup bonds for redundancy as well as link aggregation.
As a result this guide will assume the following about the physical wiring of the XenServer host:
- The server has four total PIFs (Physical Interfaces).
- The first two PIF interfaces are wired to a switch and will be aggregated via LACP (guide will cover this on the XenServer side but LACP requires the switch side be configured as well).
- The remaining two PIF interfaces are wired to a switch and are on the same network and will be used for management traffic as well as storage traffic.
- Remaining PIF interfaces will be setup in an active/failover setup.



Thanks, Rob:
Can you recommend some way of identifying the UUID of the XenServer host’s Primary Management Interface (PMI) from the command-line?
TIA,
Eric Pretorious
Portland, Oregon
Eric,
Sure! xe pif-list management=true host-name-label= or if you want only the UUID only you can run the following command: xe pif-list management=true host-name-label= | head -1 | awk -F ‘: ‘ ‘{print $2}’
xe pif-list management=true host-name-label=
Output:
uuid ( RO) : 2ba82249-cc18-8525-3a3a-289890665e08
Device ( RO): eth0
currently-attached ( RO): true
VLAN ( RO): -1
network-uuid ( RO): 5798e0f4-d84a-ae3e-c090-709f70a016ac
xe pif-list management=true host-name-label= | head -1 | awk -F ‘: ‘ ‘{print $2}’
Output:
2ba82249-cc18-8525-3a3a-289890665e08
Thanks!
Nicely documented !!
Abhinav,
Thank you very much and hope it provided you will some useful information.