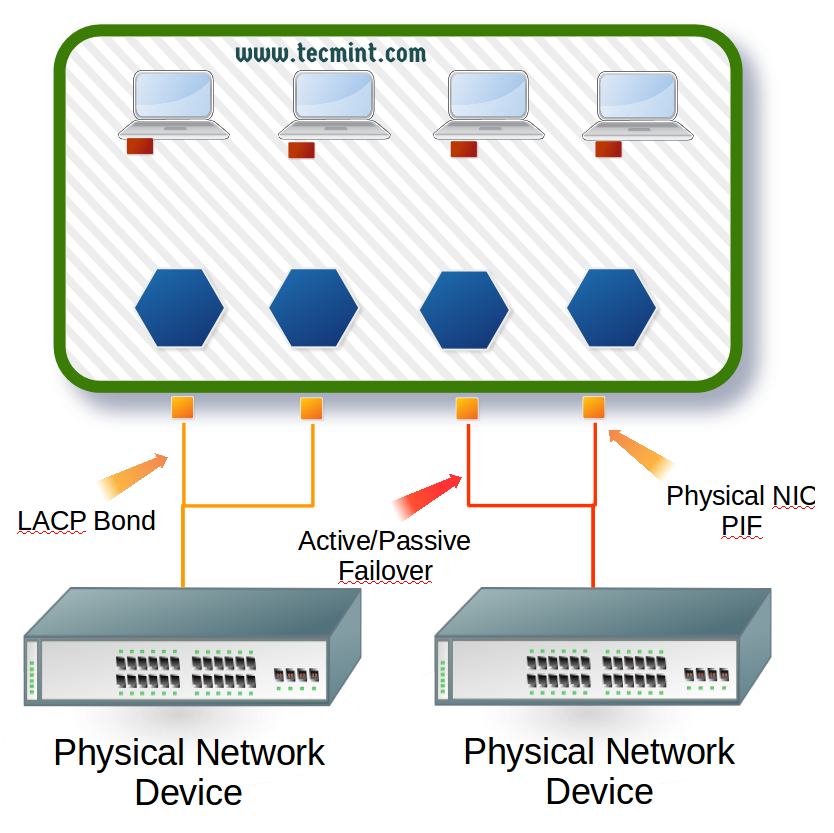
Figure 2 to below details out the wiring for this particular XenServer. Realize that there are many ways to setup XenServer networking. The configuration is dependent upon the organization and the role of the XenServer. The solution here was chosen as it allows for some common configurations on a XenServer to be discussed.
Now that all of the conceptualization is complete, let’s begin the actual configuration process.
This guide assumes that all configuration will be done using the XenServer CLI. Normally the management interface is configured during XenServer installation but this guide will assume that nothing is configured other than XenServer being installed.
Step 1: Obtain Information about XenServer Physical Interfaces
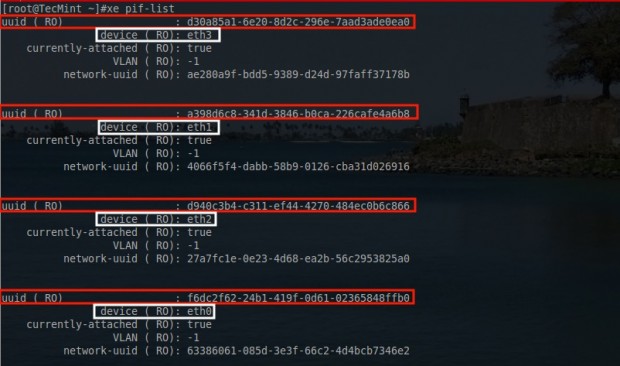
The first task is to obtain the information about the physical interfaces on this particular XenServer. This is accomplished with a utility known as ‘xe‘.
# xe pif-list
This will return most of the crucial information needed to configure these network interfaces. The most important parts from this output include the traditional Linux name for the interfaces (eth0, eth1, etc) and the UUID of each of those interfaces.
The configurations done will require the UUID of the interface rather than the name so it is important to understand how the two are mapped logically in XenServer.
A special note of caution, it isn’t out of the realm of possibilities for XenServer to initialize PIF interfaces in an odd order or an order that makes pool network settings break.
In the event that XenServer initializes a PIF with an incorrect ‘eth‘ identifier, there is a utility that will allow for renaming of the interfaces built into XenServer. The utility is ‘interface-rename‘ and it has seen its fair amount of use by the author.
Now that a list of PIFs is available, the configuration of the appropriate networks to the appropriate interfaces can take place. For this server the PIF configuration will be as follows:
- eth0 and eth1: Configured into an LACP bond connected to a trunk. These interfaces will be used later for guest traffic.
- eth2 and eth3: Configured into an Active/Passive fail-over for Management and iSCSI traffic. These interfaces are connected to access ports on the switch.
Step 2: Creating a LACP Network Bond
Let’s begin by making the LACP bond connection first. In order to do this, the switch MUST be configured for LACP! This will not work if the switch isn’t setup for LACP as well. Again the ‘xe‘ command will be used to configure these PIFs. The first step is to create the bonded network.
# xe network-create name-label=”Tecmint-LACP-Bond”
This command will create a new XenServer network called Tecmint-LACP-Bond. Once this command is issued, a UUID for this network will be displayed in the terminal. Keep this UUID as it will be needed when adding the PIFs to the bond.

In the event that the UUID wasn’t written down or is forgotten, it can always be recovered using the following xe command.
# xe network-list name-label="Tecmint-LACP-Bond"
This will return the network’s information and specifically the UUID necessary for adding PIFs to the network.

Now the proper PIFs need to be added to the network. The physical wiring for this server connects eth0 and eth1 to a switch that is configured with LACP.
# xe bond-create mode=lacp network-uuid=fc5a79cd-a90e-c6a2-a0ff-2bf235cf7a81 pif-uuids=f6dc2f62-24b1-419f-0d61-02365848ffb0,a398d6c8-341d-3846-b0ca-226cafe4a6b8
This is a busy command; let’s take a look at what is happening. “xe bond-create mode=lacp” indicates to the XenServer that a bond is being created and the mode will be LACP.
The “network-uuid=” indicates the UUID of the network that was created on the XenServer earlier.
The “pif-uuids=” is a comma separated list of the UUIDs for each of the PIFs that are to be apart of the LACP bond. If this command is successful, it will reply with the UUID of the newly created network bond.

As with all system administration tasks, it is always a good idea to confirm that changes are recognized by the system.
# xe bond-list

From this output it is clear that the XenServer indeed has created the bond and attached the two PIFs that were indicated on the command line.



Thanks, Rob:
Can you recommend some way of identifying the UUID of the XenServer host’s Primary Management Interface (PMI) from the command-line?
TIA,
Eric Pretorious
Portland, Oregon
Eric,
Sure! xe pif-list management=true host-name-label= or if you want only the UUID only you can run the following command: xe pif-list management=true host-name-label= | head -1 | awk -F ‘: ‘ ‘{print $2}’
xe pif-list management=true host-name-label=
Output:
uuid ( RO) : 2ba82249-cc18-8525-3a3a-289890665e08
Device ( RO): eth0
currently-attached ( RO): true
VLAN ( RO): -1
network-uuid ( RO): 5798e0f4-d84a-ae3e-c090-709f70a016ac
xe pif-list management=true host-name-label= | head -1 | awk -F ‘: ‘ ‘{print $2}’
Output:
2ba82249-cc18-8525-3a3a-289890665e08
Thanks!
Nicely documented !!
Abhinav,
Thank you very much and hope it provided you will some useful information.